![[AD] A Narrow Backyard Dry Garden - The Reveal](https://images.squarespace-cdn.com/content/v1/63c93d56b8f27c4ca17f2ed3/1683896604707-1ZH4SZRP21CNSOX1SWX7/planting_small_raised_bed_dry_garden_hayloft_curate_and_display_10.jpg)
[AD] A Narrow Backyard Dry Garden - The Reveal

[Advertisement] This post in partnership with Hayloft includes product provided by a number of additional brands for the purpose of this post.*
To say it has taken forever to complete this transformation would be an understatement - who knew British summer time could be so full of rain?! I’ve had to get used to abandoning painting and planting at the sight of foreboding clouds. Let's just say interiors are far easier to predict! But I digress. Our DIY dry garden project is finished, complete with a mini seating area, freshly painted white walls and repurposed raised bed with young drought-loving plants.
If you saw my plans for this eco-friendly small garden design, you'll see how I wanted to give this narrow backyard some real purpose. I wanted to create a haven for bees and birds with contrasting leaf shapes and texture. And taking into account my not-so-professional gardening skills, the aim was to find a happy medium somewhere between Beth Chatto’s Essex dry garden with minimal watering and the dreamy swathes of Oudolf Field in Somerset. I hear you laughing at my lofty plans, but stay with me...

Right Plant, Right Place.
In stepped the brilliant team at Hayloft to help me choose the right plants from their online garden nursery. Their site was a life saver in lockdown when garden centres were closed! Started in 1993 from her kitchen table in Worcestershire, founder Yvonne grew a successful mail order plant business alongside her friend Harriet whilst raising their children. Today, Hayloft’s female strong horticultural team specialises in a huge range of quirky and unusual plants grown on site. Most of Hayloft's plants are delivered as plugs or young plants in recyclable packaging, meaning they'll grow into your desired space gradually. And frankly, I love the journey of watching something I’ve nurtured grow over time.

The bed I've used is made from repurposed railway sleepers and sits in a South-West facing part along the side of the house. It gets full sun for the best part of the day and is well-sheltered, making it the perfect spot for sun worshiping, drought loving plants. These will thrive on very little water and love a light, well draining soil. Once settled, I won’t be watering this border much at all, save for rainfall and they'll spread fairly quickly with a good metre or so of height. Imagine if you will (for now) tall spires of flowers for bees and sculptural seed heads to continue visual interest into winter. And of course, we picked out white flowering plants to connect with the main part of the garden:
Acanthus Spinosus
Echinops ‘Arctic Glow’
Penstemon ‘White Bedder’
Thalictrum Splendide White
Pennisetum ‘Advena Sky Rocket’
Gaura ‘White Dove’
Geranium Plenum Album
Agapanthus ‘Albus’
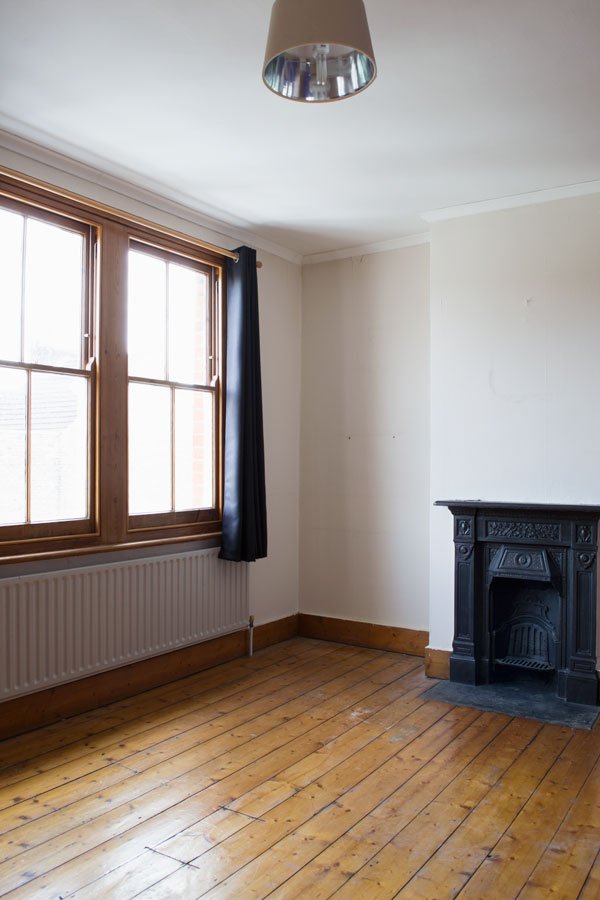
Our Narrow Backyard Dry Garden

And here it is - the finished look! No more stacks of pots or tarp covered bikes. Instead, a cozy outdoor nook to enjoy in the warmer months and a much better view from the kitchen window!
I stitched together four striped cotton seat pads from H&M Home to create a larger French mattress cushion as the square deck was quite awkward to buy anything ready made. Natural linen and jute cushions bring everything back to nature and it's wonderful to be able to take a break here just stepping out of my studio door.

A stack of washed linen cushions in natural tones from Linen Tales on top of a braided jute cushion from Original Home.
You might have noticed that instead of gravel (great for locking moisture into the soil and popular with gravel gardens) I've used crushed shells for mulch. Shell on Earth are a brilliant company from Wales making use of a by-product of the seafood processing industry. It doesn't smell or attract flies and even keeps the slugs and snails away. I also mixed crushed shells into the bed before planting with some extra compost and course sand for free draining soil.

I've reused the large rocks that were here previously which I think look better as additional landscaping against the shingle. And as the planting has already had time to settle in, they've grown considerably from when they arrived as plugs. We kept the honeysuckle as we love the smell when it blooms in summer and it also provides some screening from the neighbours. Once the jasmine is a little taller, I'll train it up towards the trellis and keep everything crossed for some seriously heady scent!


Portable outdoor lights by Fermob in 'cactus green' give us extra time to enjoy the garden at night and I love the warm and cosy feel they bring. Whilst some of our neighbours have really gone to town on garden lights, I'm aware of the detrimental effects they can have on local wildlife, so the fact we can bring them indoors with us when we're done feels like the better option.
Can't wait to see how this garden grows and changes over the years - I'll have to post an update next spring!

Concrete block walls painted in Sandtex Ultra Smooth Masonry paint in 'Chalk Hill', Wickes.
Grid trellis, Wickes, painted with Cuprinol 'Garden Shades' in Daisy White.
Striped beige cotton seat pads (sewn to make a larger square) H&M Home.
White flowering hardy perennials as listed above, provided by Hayloft.*
Shell on Earth crushed shell mulch.
Braided jute cushion, Original Home at Heal’s.*
Washed linen cushion covers in ‘natural’ and ‘nutmeg’, Linen Tales.*
Soft beige linen waffle throw, Linen Tales.*
‘Hoff’ pot by Berg, The Future Kept (with Cotton Tail grass from Hayloft)
Fermob Mooon table lamp, at Heal’s*
Fermob Balad portable lamp, at Heal’s*
*these items are pr products.

Photography & styling © Tiffany Grant-Riley
[AD] Our Nordic Luxe Beige Bedroom Before and After
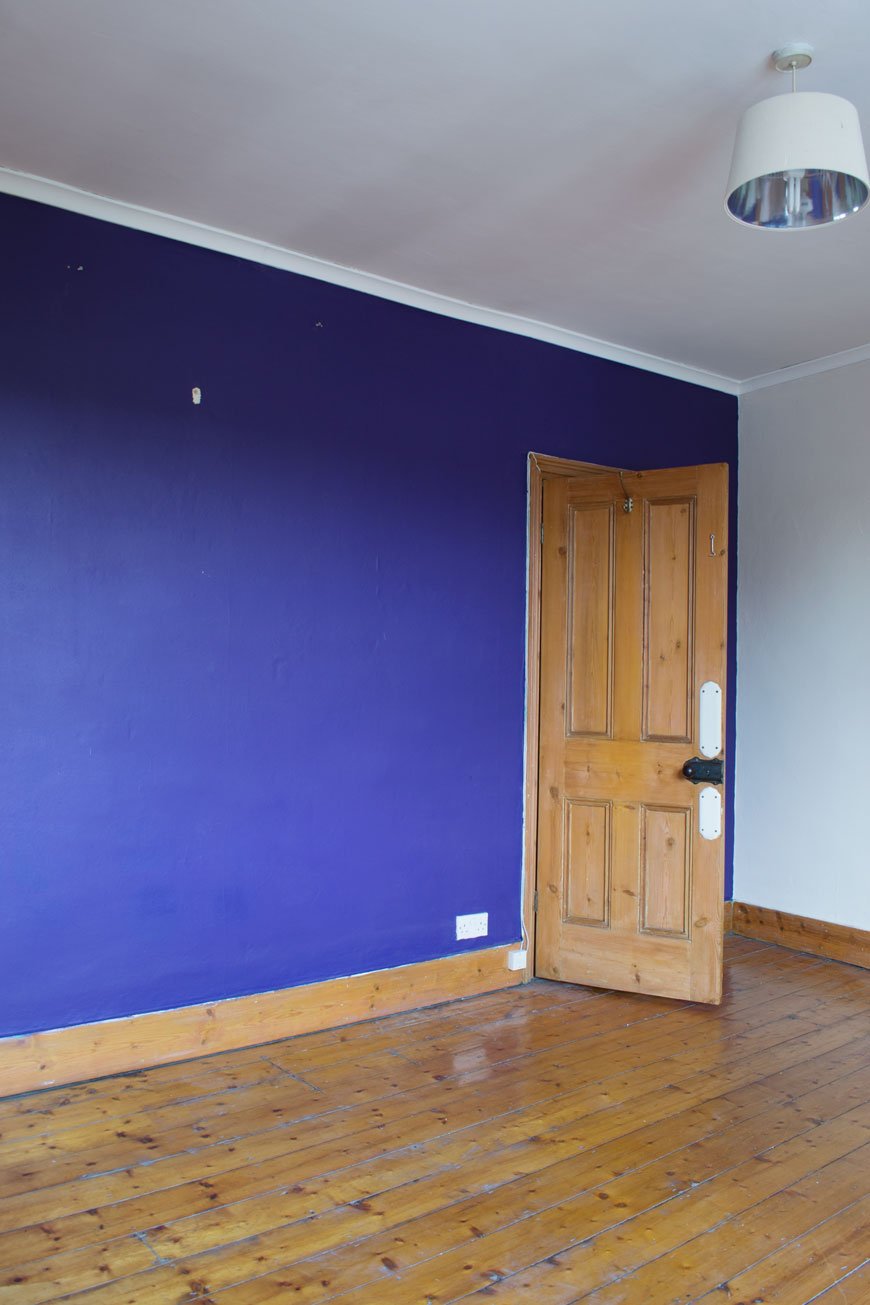
 This post includes gifted product.** Well, that's quite a mouthful. A Nordic luxe beige bedroom. I was beginning to think this day would never come. Two years ago when we moved in, I couldn't see this past the Prince-inspired purple feature wall and peeling wallpaper. And I'm a big Prince fan. But here we are. Back with another before and after. Prepare to witness the fruits of our blood, sweat and tears, of which there have been plenty of each!
How The Bedroom Looked Before
 My advice to you? Always be suspicious of papered walls in old houses. It is trying to trick you into thinking "nothing to see here!" Our bedroom couldn't even be bothered to hide the fact that most of the plaster beneath had blown. And good luck trying to actually remove that wallpaper, my goodness. I've no idea what was used to fix it to the wall but I don't think it was your bog standard paste! You can see more of what lurked behind the paper and the freshly plastered walls here. Oh and how you loved those plaster walls. I know you'd prefer that we left them like that, but we wanted the room to feel finished.
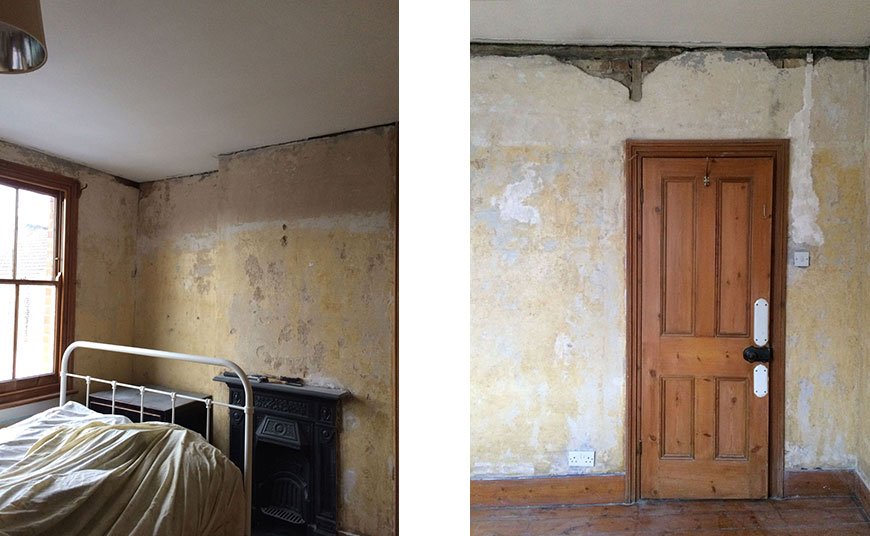 The journey from start to finish has been quite a lengthy one which in all honesty, I'm thankful for. It gave us the time to better understand how the north facing light moved throughout the day and made choosing the colour a lot easier. It gave us time to realise that we needed to put a new floor down, as much as we loved the baseboards, sanding and staining wasn't going to be an option this time. Ultimately, it gave us time to understand how we used the room, how we wanted it to work for us and how we wanted it to feel.
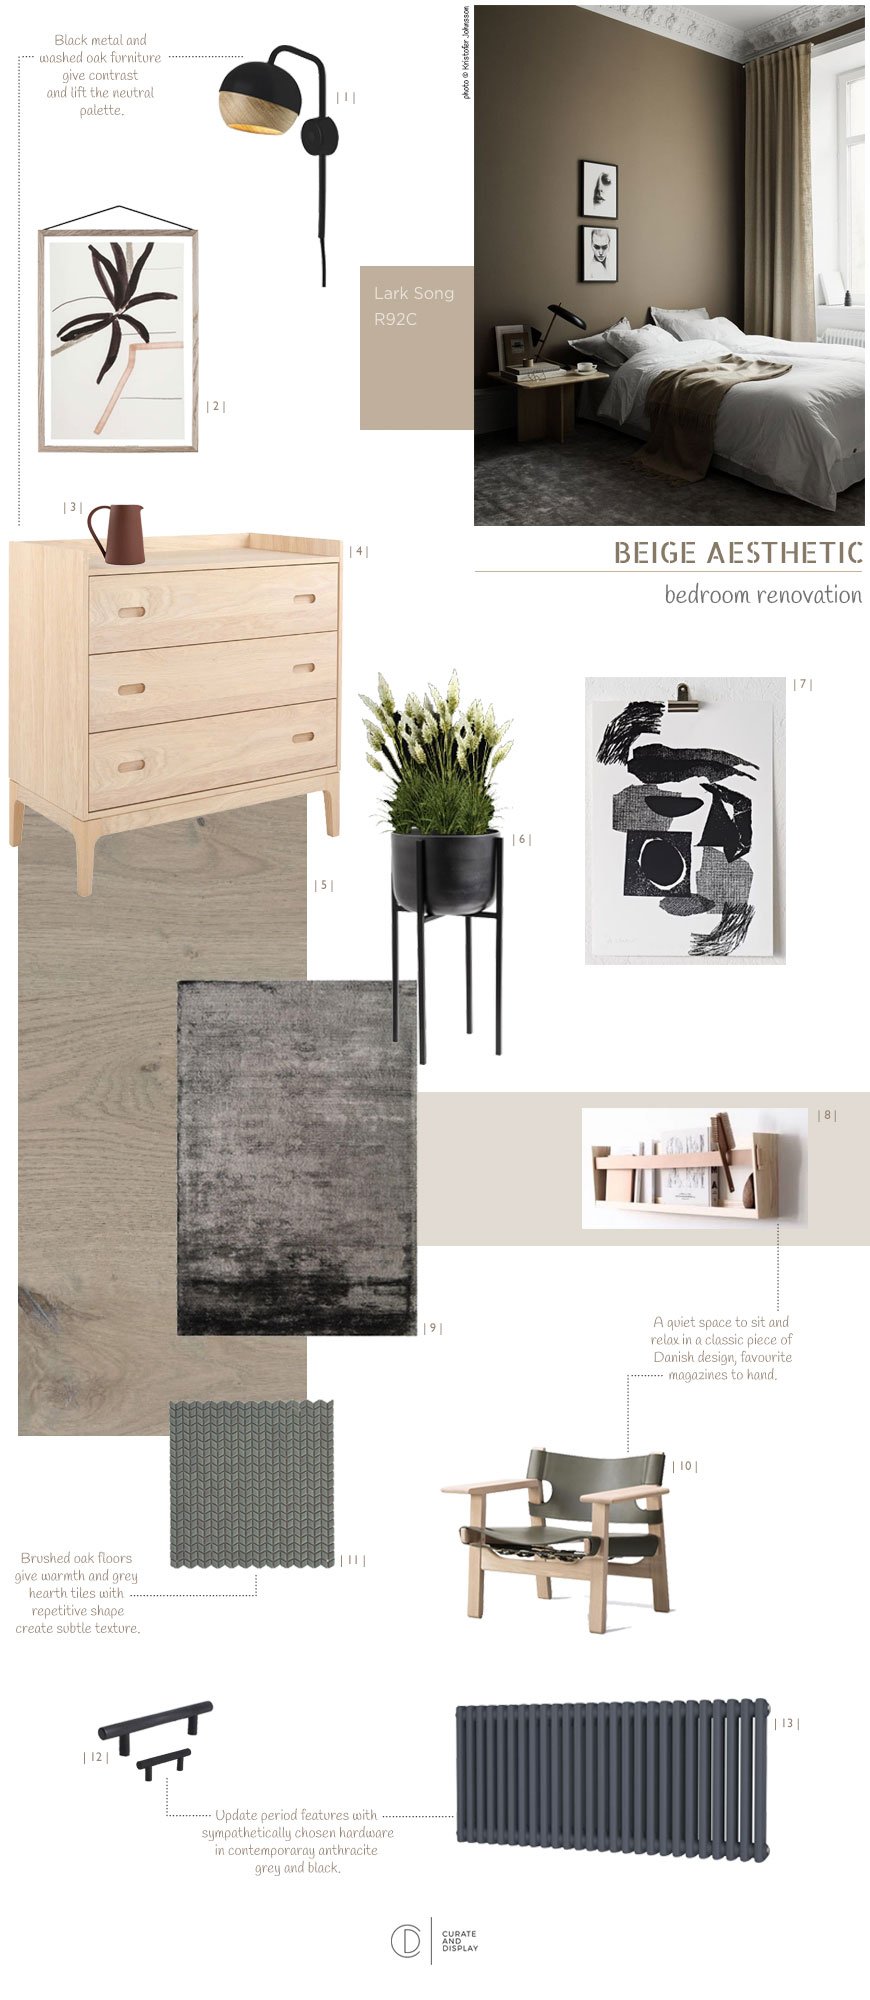 The full design post demonstrates how we arrived at warm beige and how I pulled together the look inspired by past stays in design hotels. The most important part of the whole design is that the room felt like a sanctuary. I wanted it to feel minimal with a Nordic luxe look, drawing on high-quality materials, including the Havwoods oak flooring, black metal hardware and additional furniture. There would be contrasting textures of velvet, linen, metal details and warm wood.
How The Bedroom Looks Now
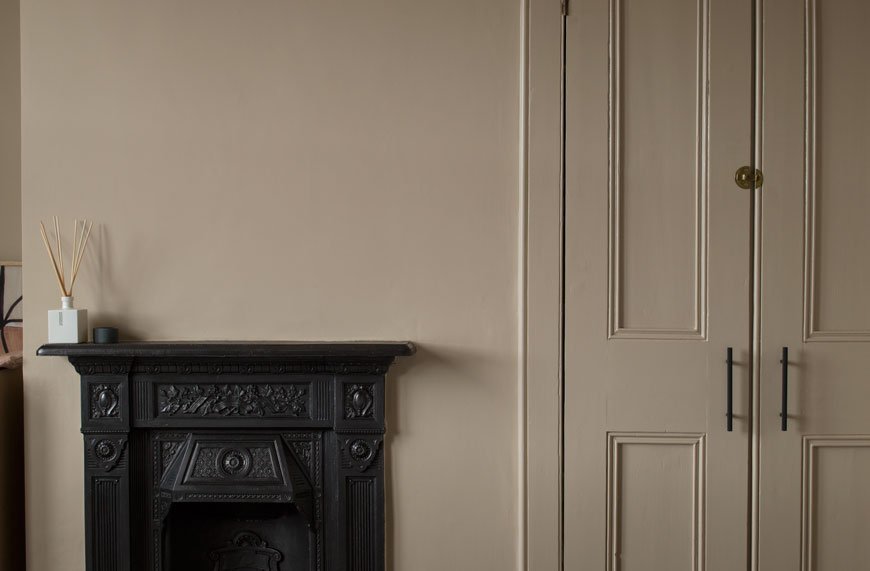
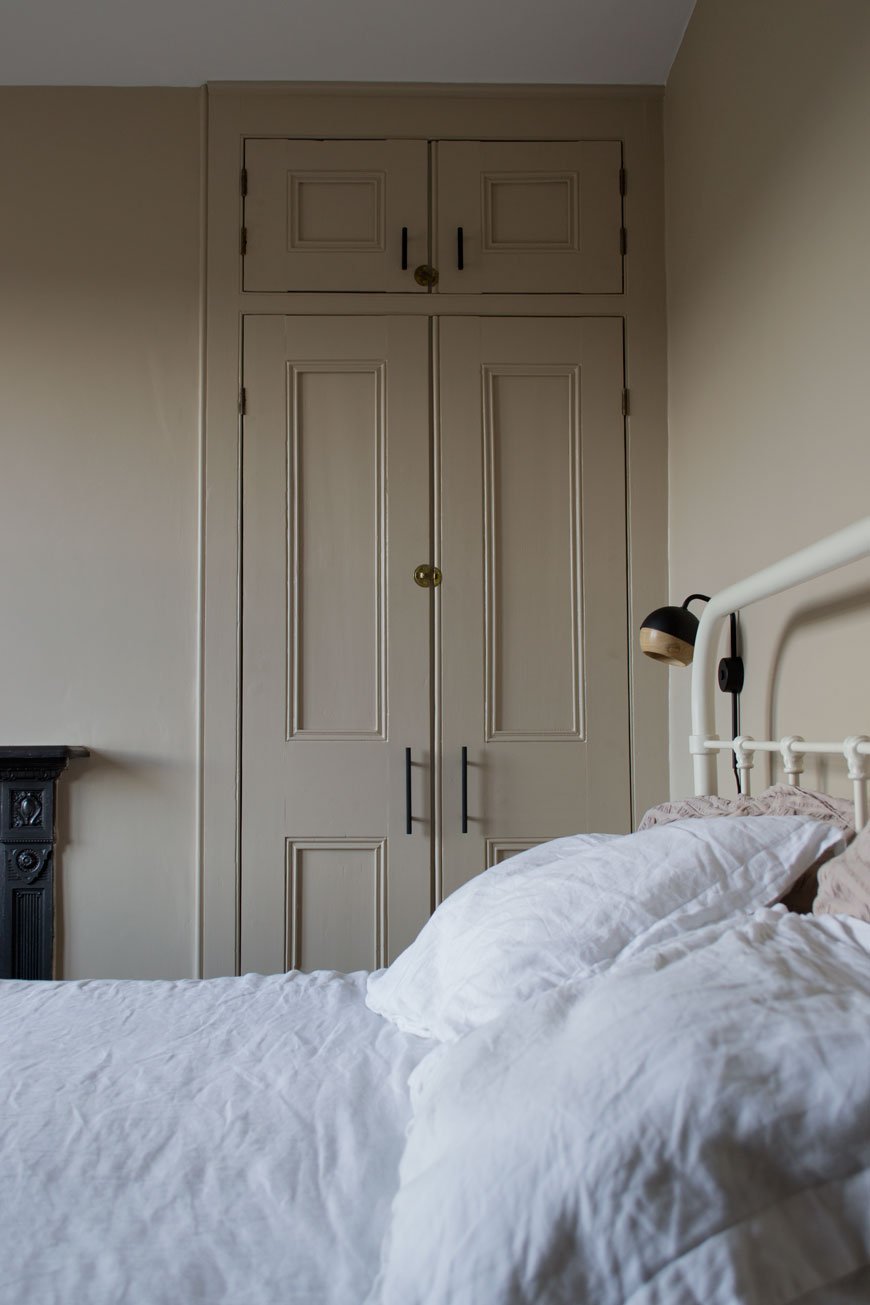
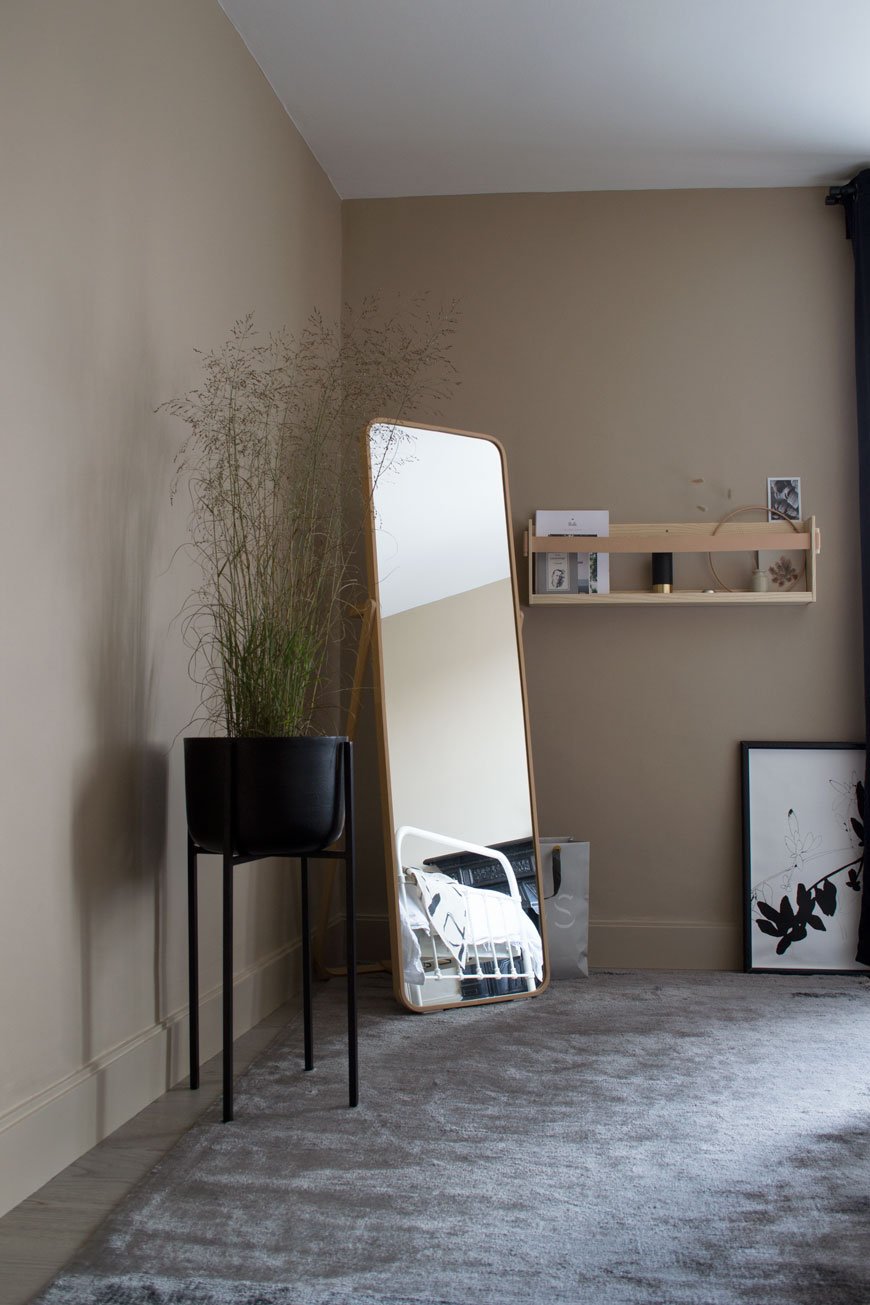 Our journey towards the finish line began in summer, using our plastered walls as our starting point.Work included:• Laying a new engineered oak floor.• Tiling the hearth plate.• Polishing the fireplace.• Painting the walls and woodwork.• Replacing the radiator for a Victorian column style.• Replacing hardware including sockets, switch and cupboard handles.We used the same shade of beige, Lark Song by Valspar, across all the walls and woodwork for a contemporary tone-on-tone effect. It's amazing to see how much the colour changes depending on the light - sometimes appearing almost plaster pink, other times with slight green undertones. It has the ability to glow when the sun hits the corner with the mirror in the early morning and feels warm and moody in the evenings.
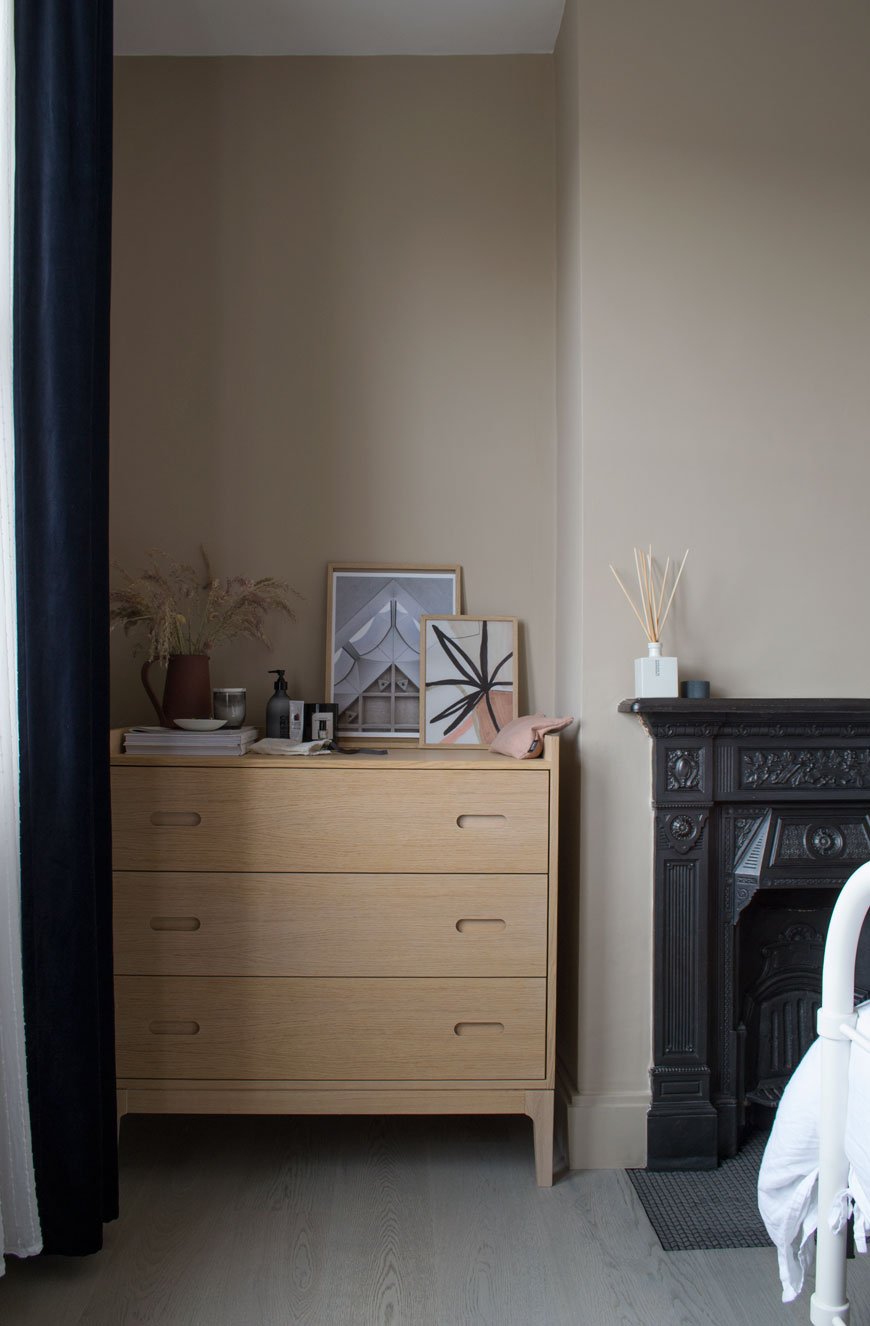 I picked out furniture and accessories with similar warm tones to lift the wall colour, starting with the Sinnerlig bamboo lamp shade that we got last year, tying it in with oak picture frames on top of the chest of drawers. Continuing with tonal furniture, we kept the floor length IKEA mirror and I chose the Shelf90 in ash and leather, designed by SSM and handmade by their studio in Sweden. It's been on my list for such a long time and is the perfect size for a select number of books and our mini speaker. This part of the room will really come into its own as a reading corner when we eventually find a suitable chair for it. No, I didn't get to keep The Spanish Chair.Somehow we instinctively choose furniture with skinny legs which actually give the illusion of space by allowing the floor to be seen underneath. Our hospital-style metal bed has been with us for a few years, a John Lewis design no longer sold, but we still love it. A new of mine is the black metal planter from Cox & Cox which in which I planted grasses instead of my usual houseplant.Given that I tend to lean towards jute woven rugs, I surprised myself in choosing this 'Dolce' charcoal grey viscose rug from the Houseology Collection. It feels super silky underfoot and ties in with luxury hotel style. It also bounces the light as you can see from the photos and connects tonally with the oak flooring, provided by Havwoods. If you read the installation post, you'll know how much of a difference the new floor has made to the room. In fact, the overall look wouldn't work without it there to pull it together. It feels so much warmer and quieter too, which means no more avoiding those squeaky floorboards in the night.
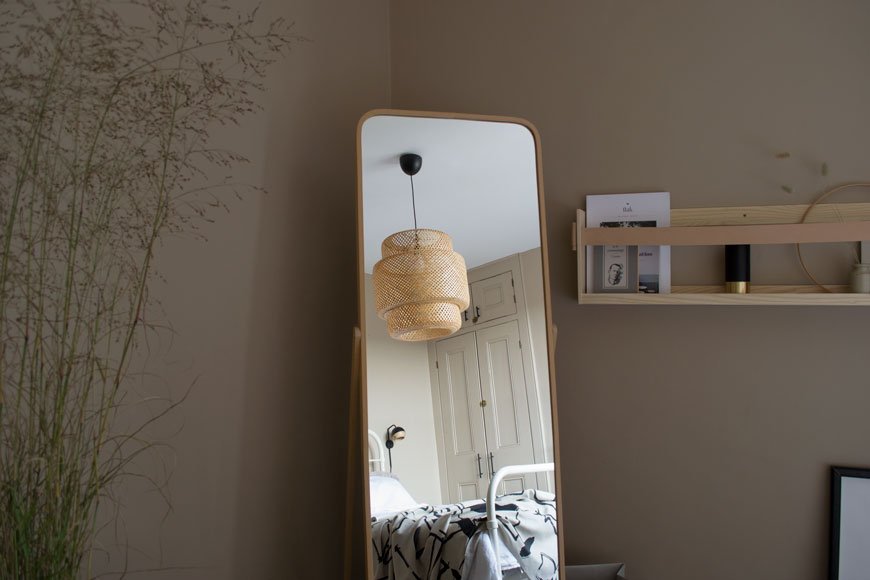
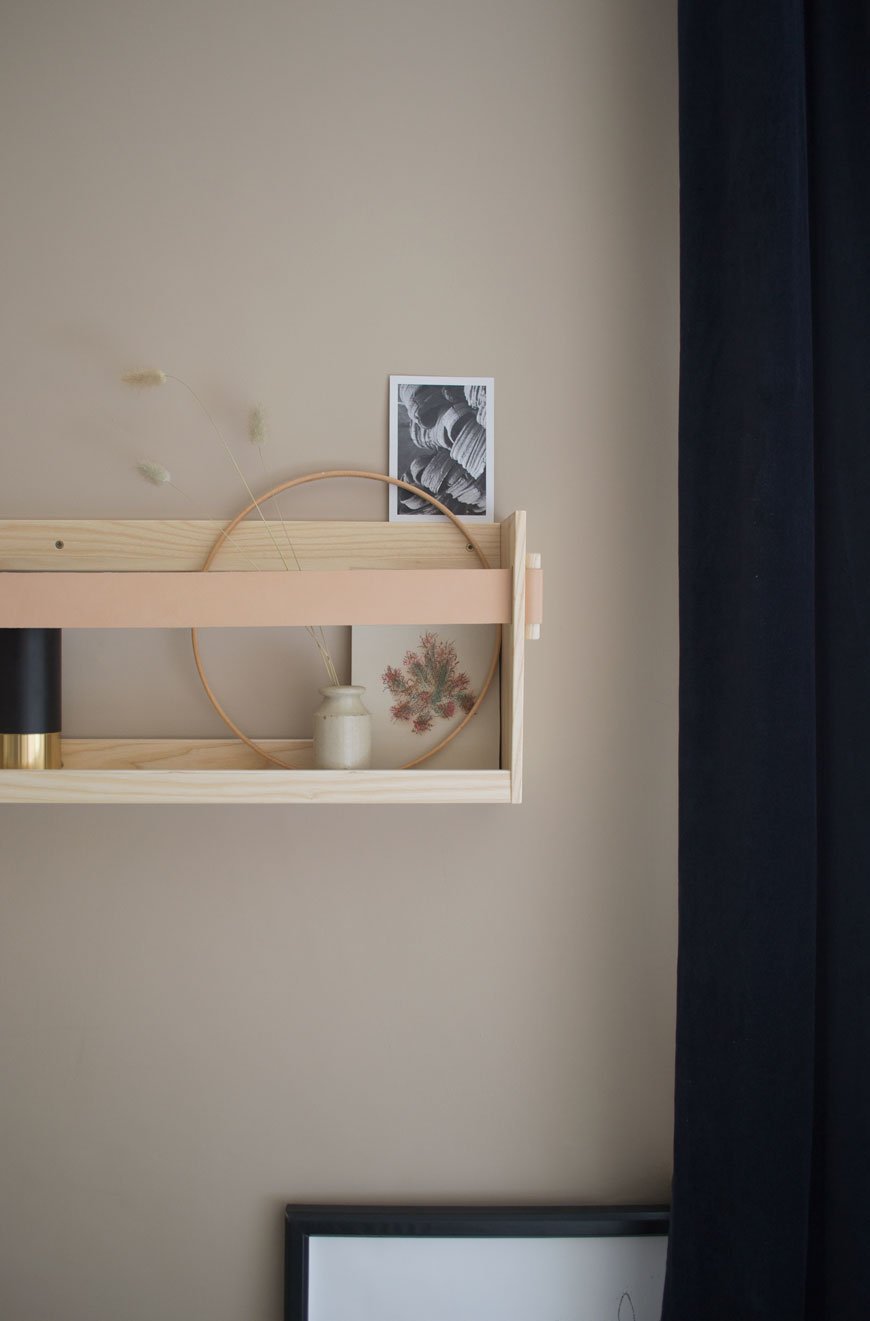
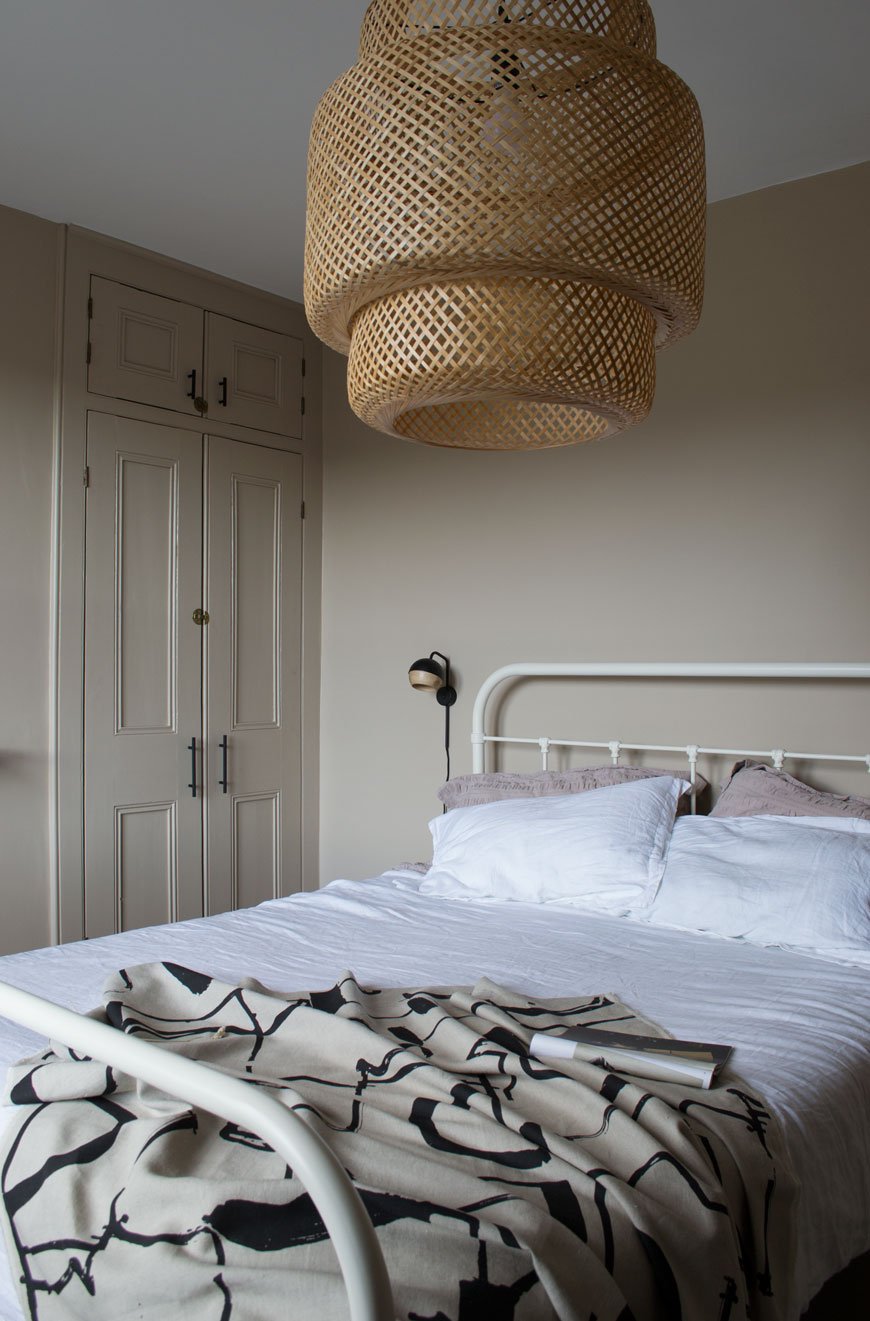
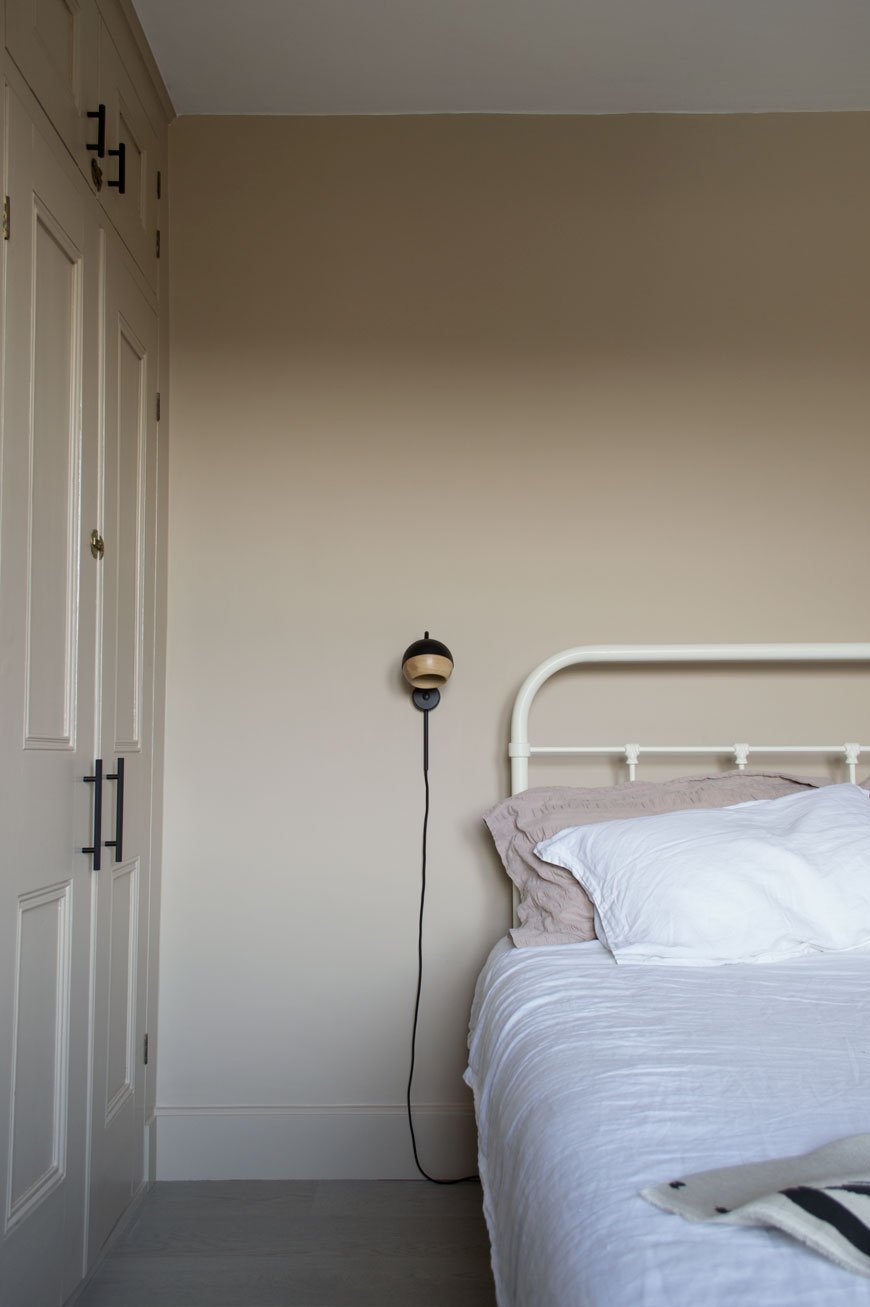 The wall lamps are designed by Pederjessen for Mater, who I featured recently for their sustainable Danish design. The black Ray lamps are a nifty piece of design. Did you know that the oak part of the shade is held with magnets allowing you to pivot and direct the light? Did you notice something missing? Yes, bedside tables. A previous attempted failed but ultimately, I'll be adding discrete and narrow bedside ledges which will sit below the lamps, painted into the wall.
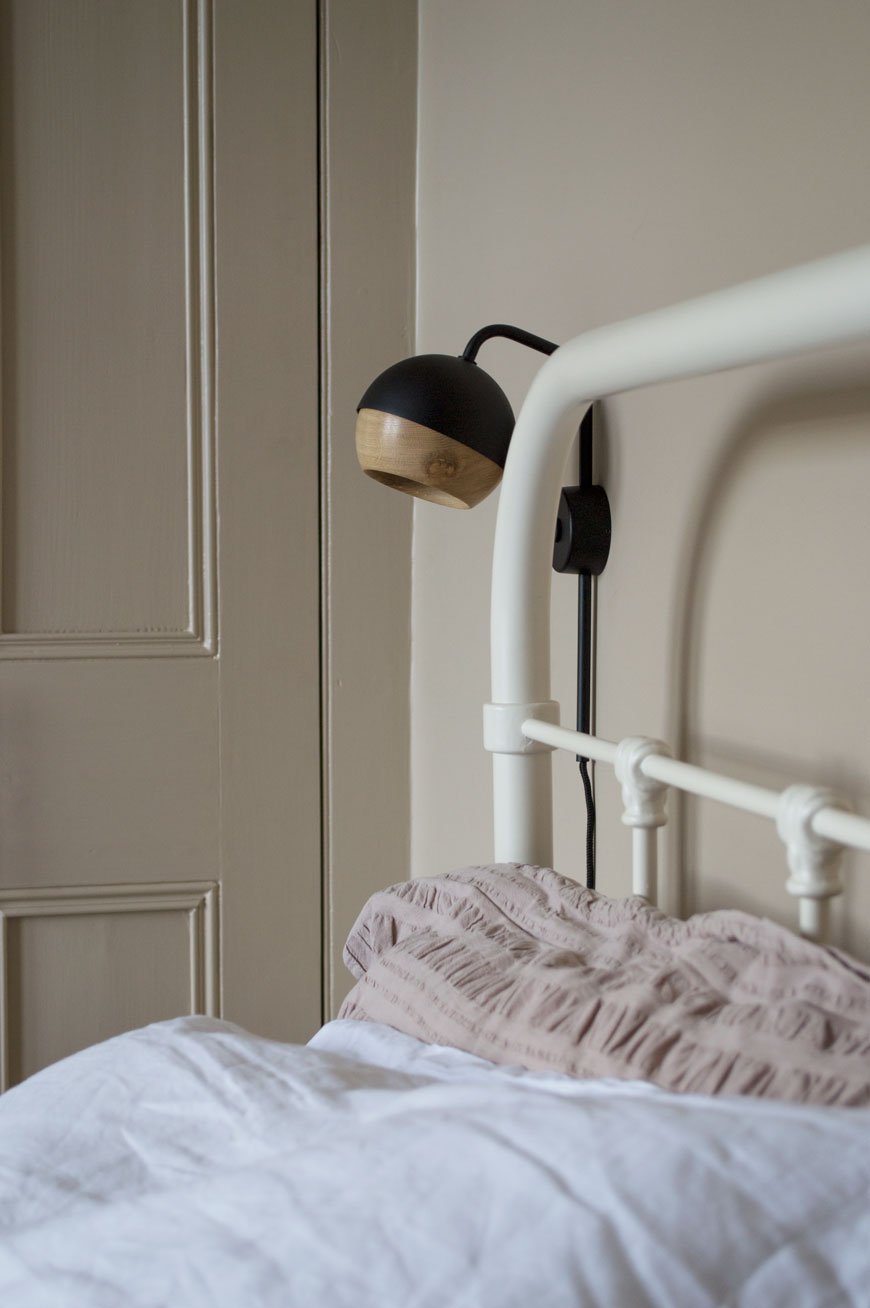
Of course, a home is never truly finished and we’ve left space for this room to grow. Much of the practical work has been Rob’s baby. He’s done an incredible job and is putting the finishing touches to tiling the hearth plate (hence why you haven’t seen much of it). I’ve left space for a large round mirror to hang above the chest of drawers and there's bedsides and a reading chair to sort. For now, though, we can finally see out the winter in a warm and inviting bedroom that we can’t wait to spend time in.
On Pinterest? Check out my beige and greige interiors board for more inspiration or #TheChathamHouse on social to follow our renovation journey.
Beige paint - 'Lark Song' by Valspar in matt for walls and satin for wood and metal.Engineered oak flooring - Shadow Grey 188 from the Havwoods Karelia range.**Black metal sockets and vintage toggle switch - Dowsing & Reynolds.Knurled Skyscraper cupboard handles - Dowsing & Reynolds**Bamboo Sinnerlig lamp - IKEA.Black Ray wall lamps - Mater.**Black metal planter - Cox & Cox.**Oak picture frames - Cox & Cox.**Shelf90 in ash and leather - SSM**Charcoal grey 'Dolce' Rug - Houseology.**Morten oak chest of drawers - Heal's.**Anthracite grey column radiator - Trade Radiators.'Monolith' printed cotton fabric - Laura Slater.
Photography & styling © Tiffany Grant-Riley
[AD] Our New Engineered Oak Floor in the Bedroom
 This is a paid partnership with Havwoods. Have you noticed our plaster pink bedroom walls have been replaced with a cocooning beige? There's also a sophisticated, engineered oak floor down too! Yes, the floorers came last week to lay our Havwoods planks and I'm in love with how different it makes the room feel. I know what you're going to say. Why didn't we sand and stain the original floors then? Good question. I remember being on a shoot a few years back and the assistant stylist told me the best thing she ever did in their Victorian home was to put wood flooring over the top of the original. It made such a difference to the warmth of the house, she said. As a restoration purist, I was a little horrified. Why would you cover up such a beautiful piece of history?!
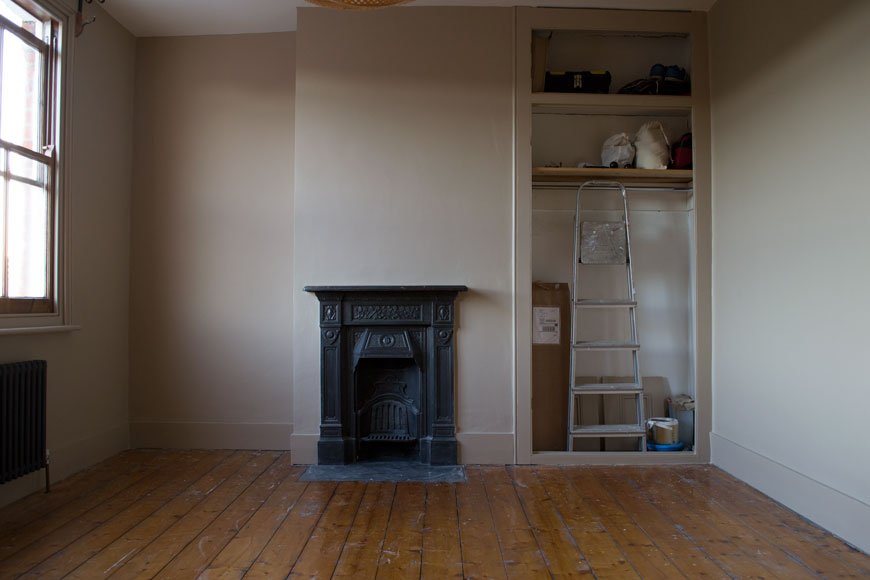 Now I get it. Firstly, what we've been calling the original floor was only ever meant to be a base for the now long gone floor at the time to sit on top of. A subfloor. That explains the gaps under the skirting which show where that floor would've been. And it's draughty. Having been through the very messy, time-consuming process of finishing the kitchen floor ourselves, we just wanted the job done and with a much warmer finish.
Why Choose An Engineered Oak Floor Over Laminate
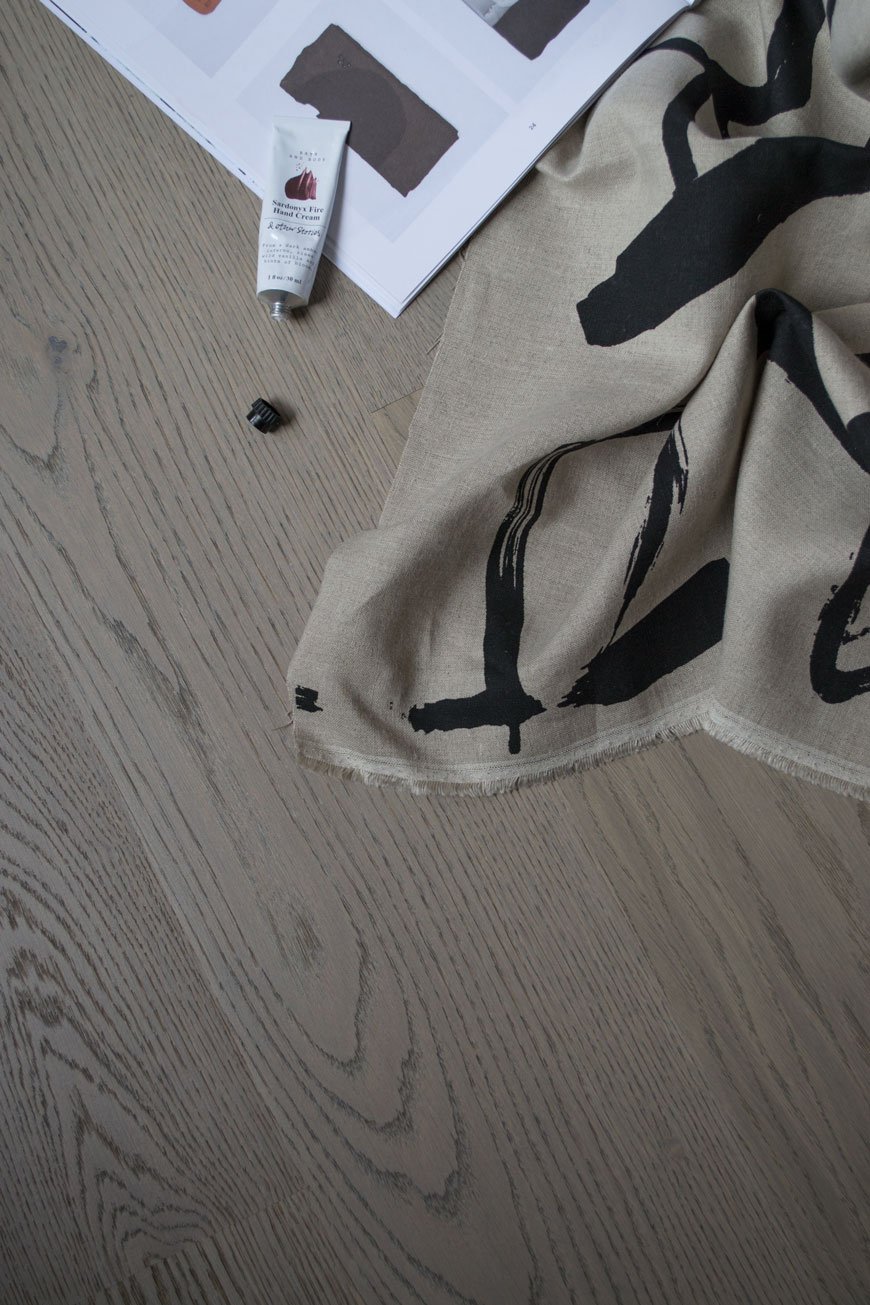
In all honesty, I'm not a fan of laminate flooring. It's a throwback from the 90s when everyone had that blonde wood effect planking that bubbled and marked really easily. There's no doubt that laminate has come a long way since then and with better printing technologies it's difficult to spot the difference now. Here's the thing though. Laminate is typically made from a composition of melamine resin and fibre board topped with a printed, laminated image to look like wood, but wood it is not. It's not remotely eco-friendly and has a lifespan of around 20 years. Although it's possible to replace planks if they need repair, you can't refinish them if they need maintenance.There's a new level of upheaval and added cost with a solid wood floor, so in an effort to stick with ethical products and honour the age of the house, an engineered oak flooring felt like a good compromise. It's important to us that we know the provenance of what we have in our home and all Havwoods products are traceable and certified. Unlike laminate, it's all wood. It can last a lifetime and will take sanding and refinishing several times if necessary. Each plank is completely different too; the oak on our floor has a beautiful wavy grain with a smattering of 'pips and burrs'. It has a wonderful texture under foot and frankly, there's no competition.
Decisions, Decisions and The Karelia Range
Earlier in the year, I visited the Havwoods showroom in Clerkenwell. A treasure trove full to the brim of floor samples, from solid parquet and reclaimed planks to HDF Composite, it's easy to feel overwhelmed.TIP: My advice would be to have some understanding of the look and feel you're aiming for to help narrow it down, even if all you can say is you want the floor to look warm, classic farmhouse.Going in with a contemporary, Nordic look in mind with a touch of grey, it was almost a gut feeling when I was shown Shadow Grey (188) from the Karelia range. This collection is a click system, made from European oak, with a 3.5mm lamella (that's the oak top) and a double base layer of Finnish spruce. The square edge on the planks gives the floor a contemporary luxe feel - however other designs in the Karelia range have a bevelled edge.I took a couple of different samples home just for comparison, but not surprisingly having let it sit in the room for a few days we were unanimously for the Shadow Grey. Yes, it was pretty hard to imagine a whole floor from one sample piece, but the lifestyle images from The Wood Book helped piece it together.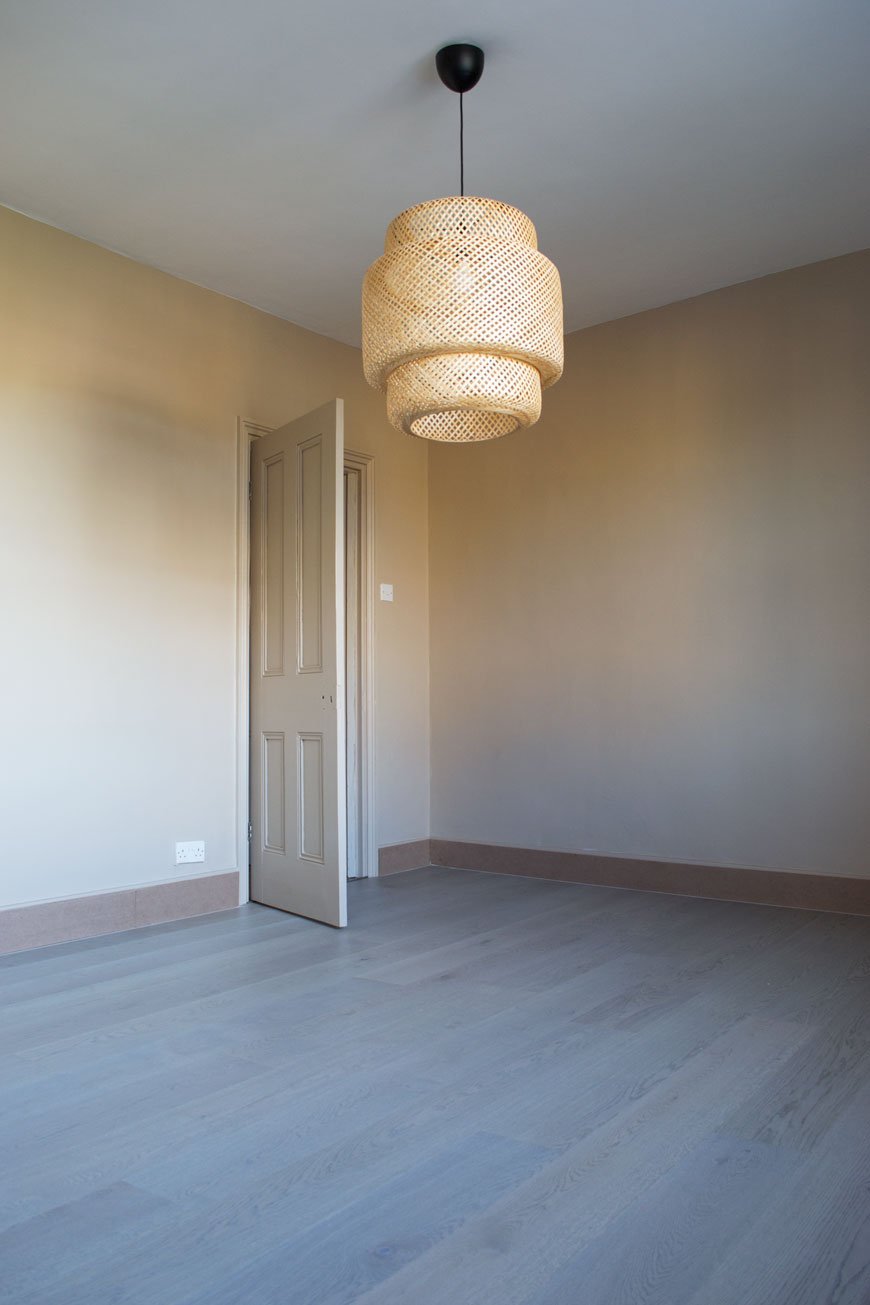
Floating vs. Gluing Installation
You've got two choices when you're laying an engineered floor - glueing it down to the underlay or floating it on top. There are pros and cons for both but ultimately we decided to float it which will allow the wood to breathe and move without fighting against glue. This does mean there's an element of bounce to the floor but I prefer knowing it has room to shift without buckling.
Skirting Options
Normally when you have a new floor fitted the existing boards are removed, but in this case, having already plastered the walls we didn't want to open a new can of worms. In older properties, the skirting can be cut into to fit in the new floor underneath, but I wasn't keen on that for the same reason. We didn't like scotia or other more decorative trimmings, so the floorers suggested adding an MDF skirting on top of the old ones (which we'd already painted, gah!). Slightly lower than the old boards, when painted they'd look a little more ornate but you'd never tell the difference. Needless to say, we went with that.TIP: Make sure you use a paint that's suitable for MDF as it absorbs a lot. We used a primer first before going on with our Valspar colour.Now we're into the final week of finishing the snag list, hanging lights, screwing in handles and all the small details before it'll be ready to move into properly. Can't wait to show you the full transformation!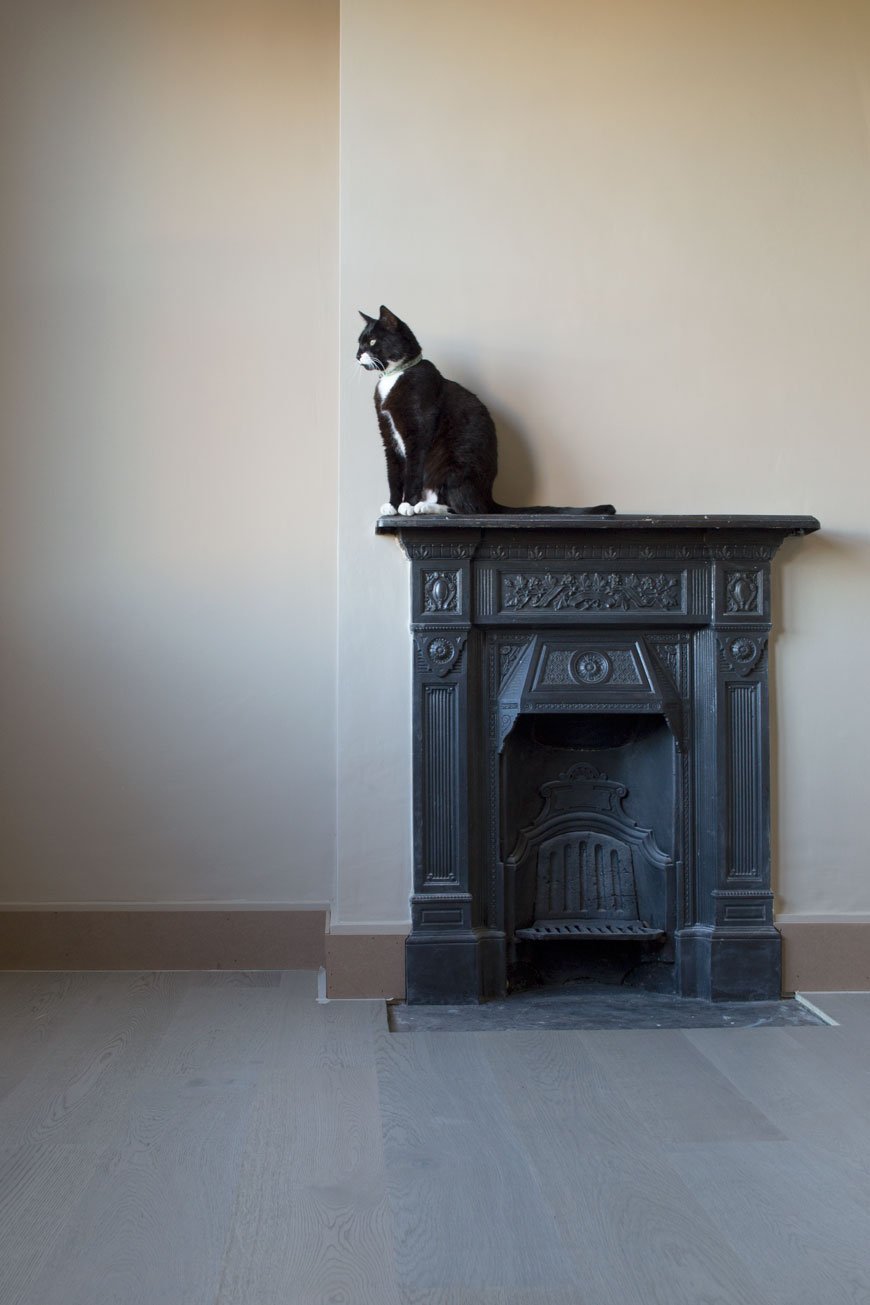
Photography © Tiffany Grant-Riley
Our Nordic Blue Kitchen Before and After Reveal
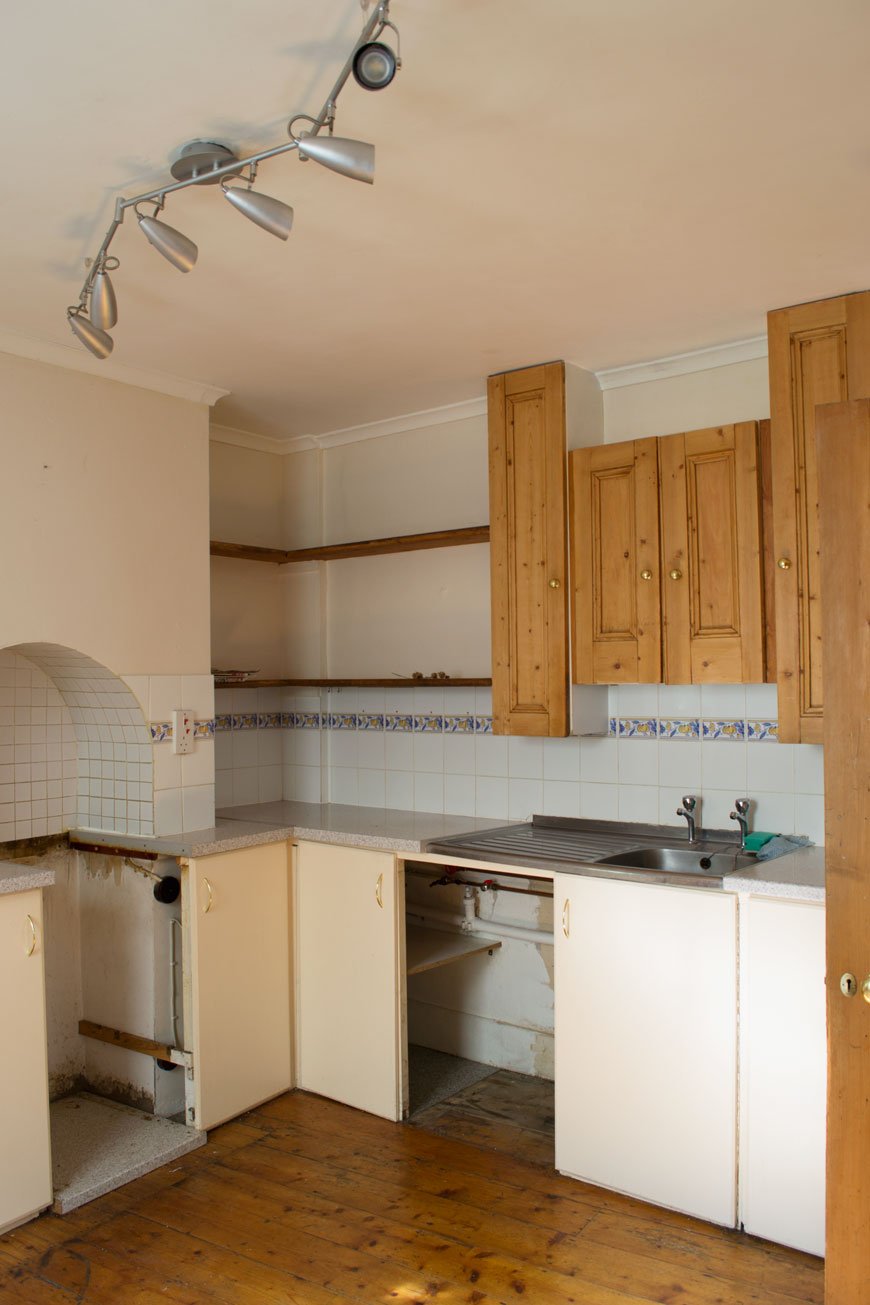 [AD] I never learn. Why is it, that every time I embark on another room project, I think for some reason that it'll take no time at all? Don't get me wrong, I'm not naive, I know that something done well takes all the time it needs, but still. Our blue kitchen refresh was definitely one of those. I mean, look at it. It needed it. Aside from looking like the 90s had well and truly moved in and never left, its mishmash of badly considered DIY meant that it didn't work in any capacity. Ok, so we didn't have epic Grand Designs extensions planned at this moment in time and 90% of the work was cosmetic, but it was still going to be a hard slog.
Here's what we weren't going to change:
• Plastering the walls• Anything structural. So knocking through walls was out.• Cupboard units and worktop. It all had to stay.• Replacing tiles, flooring, sink unit or radiator.Everything else was fair game. If you saw my blue kitchen inspiration post, you'll have got a sense of our plans and how the overall space would eventually look.There's lots to appreciate about this room though. It has plenty of charm in its proportions. One feature I love is the arch in the chimney breast, a nod to where the original stove would've once stood. It makes for a natural focal point. Unfortunately, it also means that due to the way the previous owners built in the cupboards, we could only fit the smallest oven available into it.
The Before
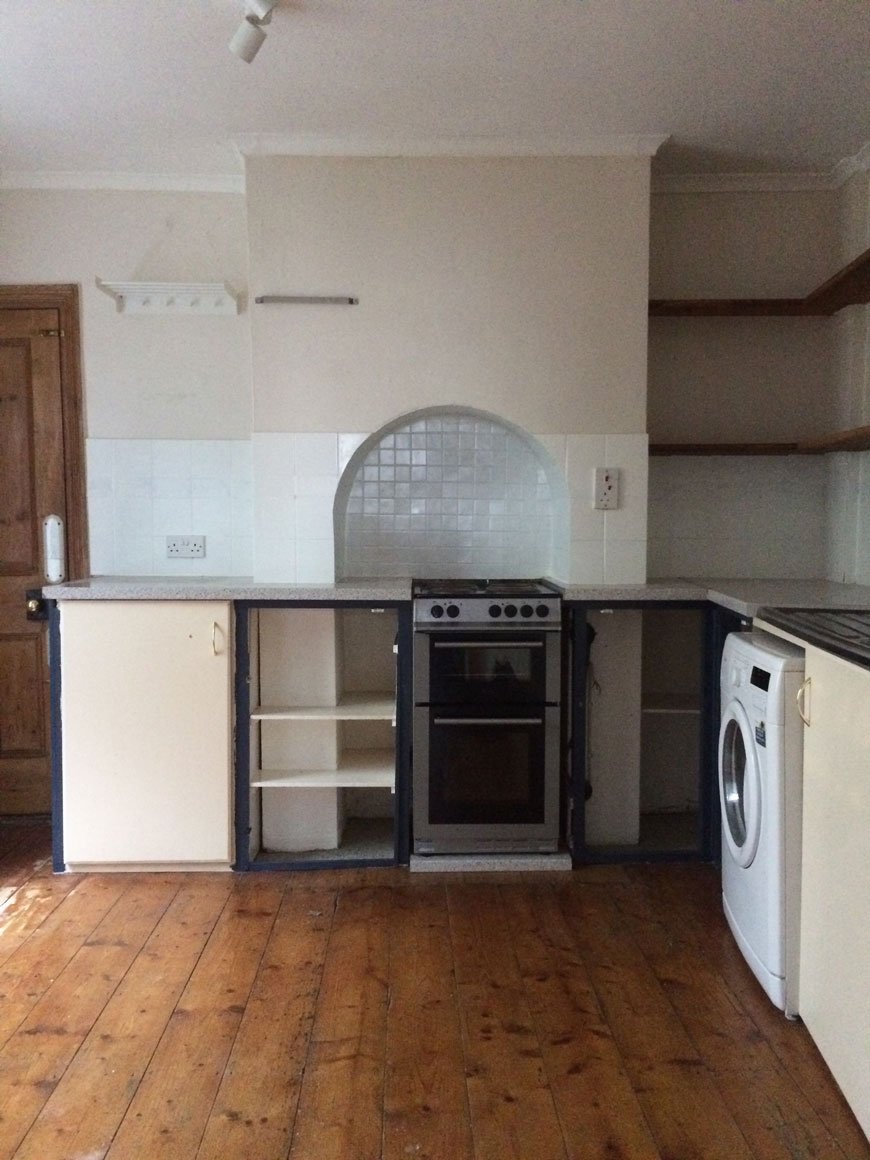 The room is naturally quite dark as the window faces out to a small piece of yard and across to the neighbours. With that in mind, I didn't want to go all out trying to make it look brighter with white paint, only for it to look cold and flat. Instead, I decided to embrace it, bringing in my favourite shade of blue. I wear it all the time and it seems to be a colour we're both naturally drawn to, especially looking at some of the existing pieces we already had in the kitchen.
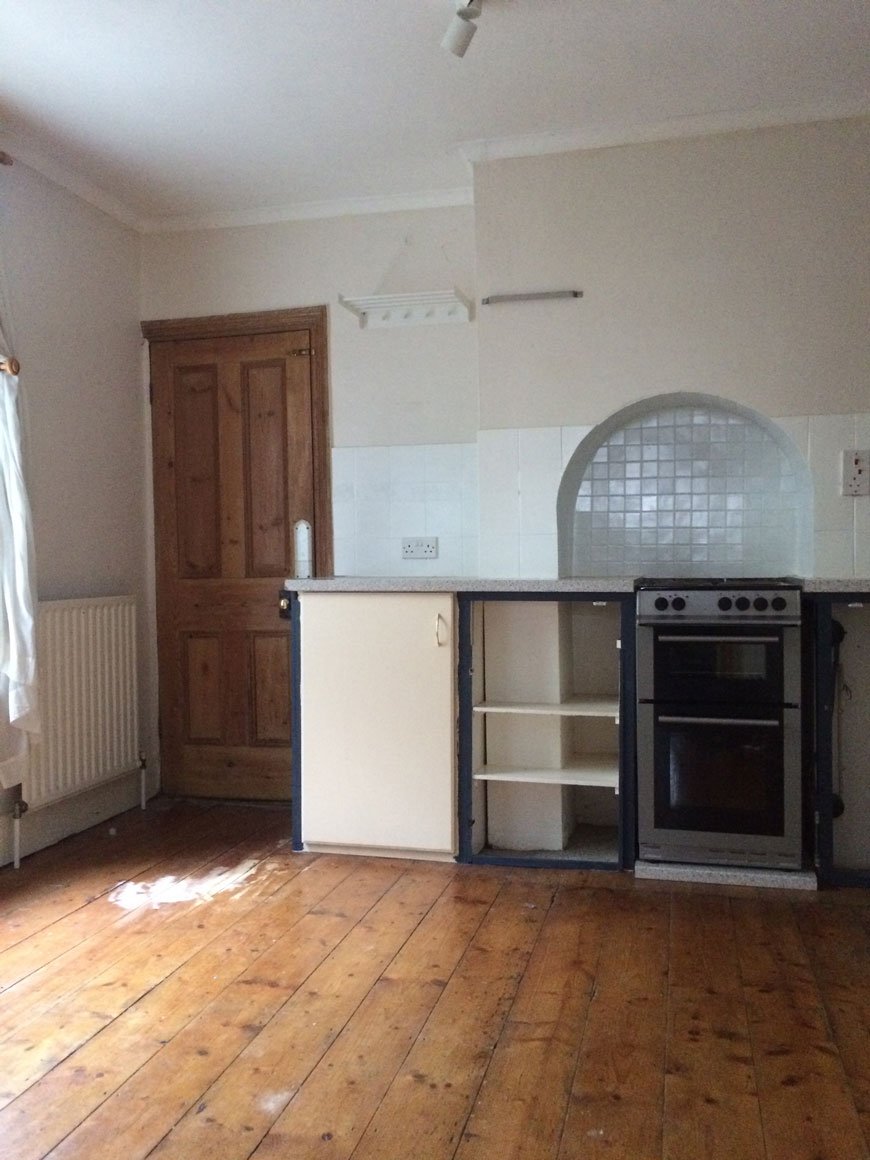 The biggest issue space wise was that although it actually looks spacious, there's very little worktop space for food prep. Cooking has been, up to this point, a literal juggling act. With that in mind, it was important to re-think where certain appliances went, how to use the dead space and free-up some of that worktop. There are also no drawers in the cupboards and the shelves have strange proportions, meaning we needed to make better use of open storage too.
 The floor would also be getting a new finish, with a heavy duty sanding and whitewash stain to lift the light in the room. I couldn't wait to try out OSMO's wax products having heard so many great things about them - and say goodbye to that orange varnish!
The After
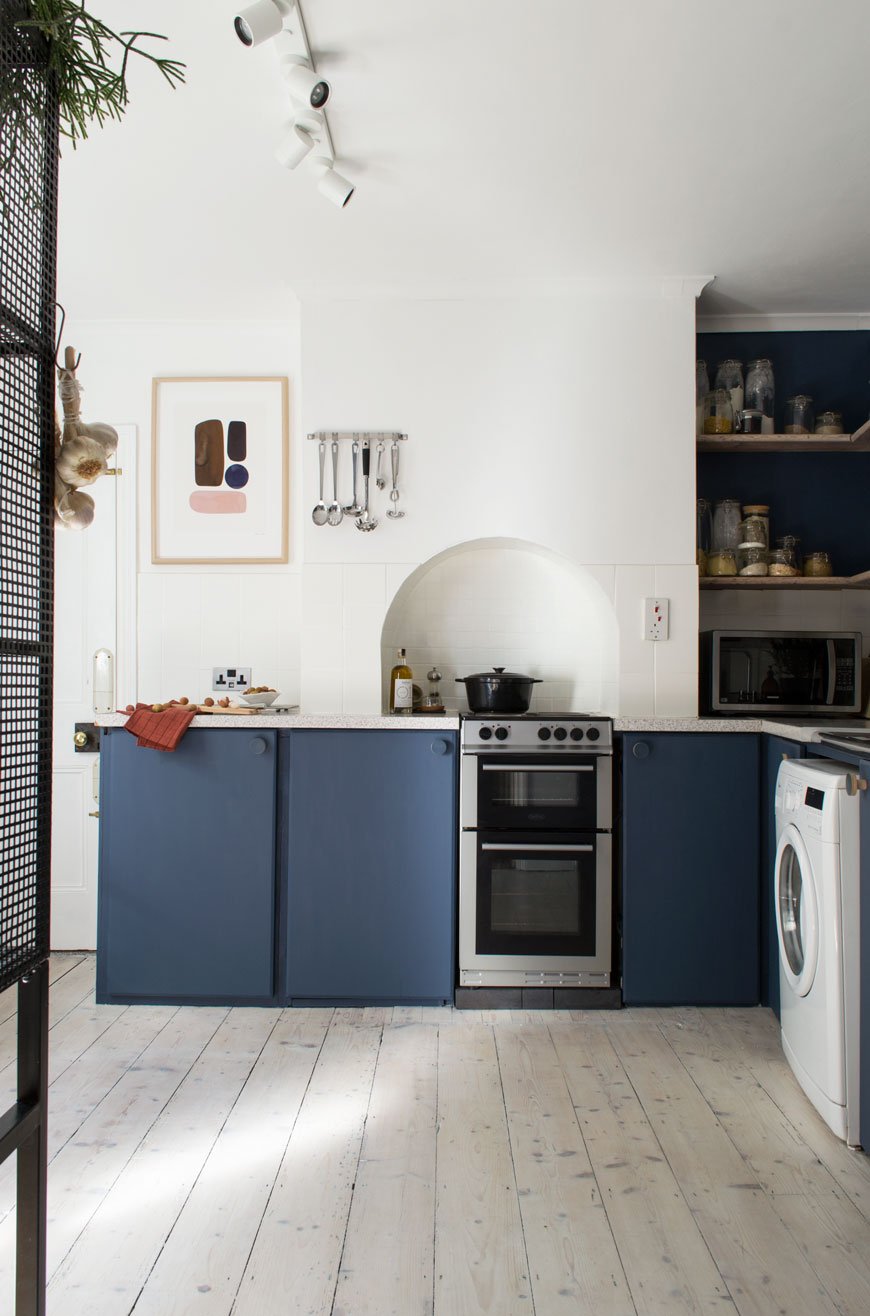 And here we are. It's like a different room, isn't it?The first thing I did was remove the door to pull in as much light from the hallway as possible. It also meant we could easily access the worktop and cupboards usually obscured behind it. One of which is Moesy's food cupboard, which he now camps outside and scratches his claws down all day. Which is nice.
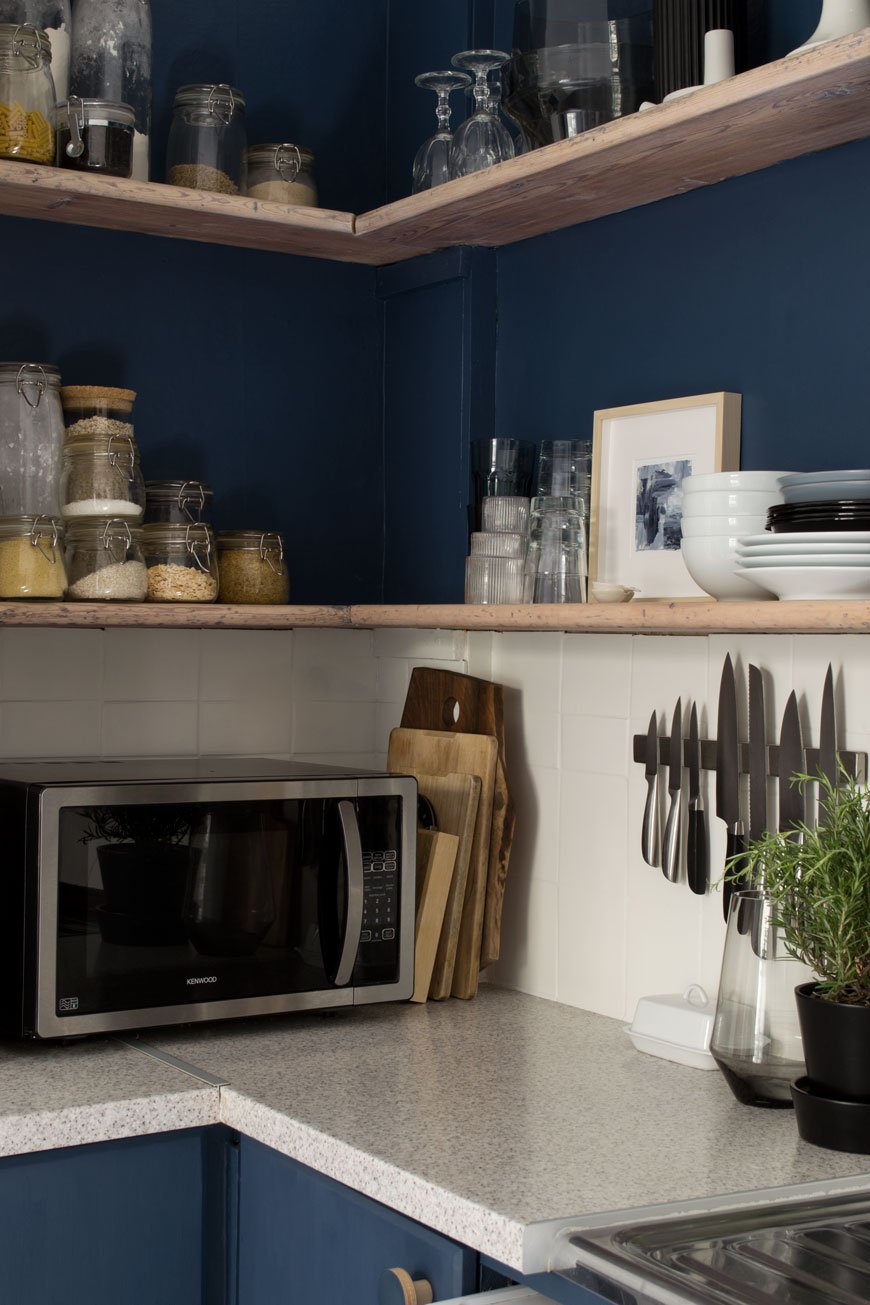
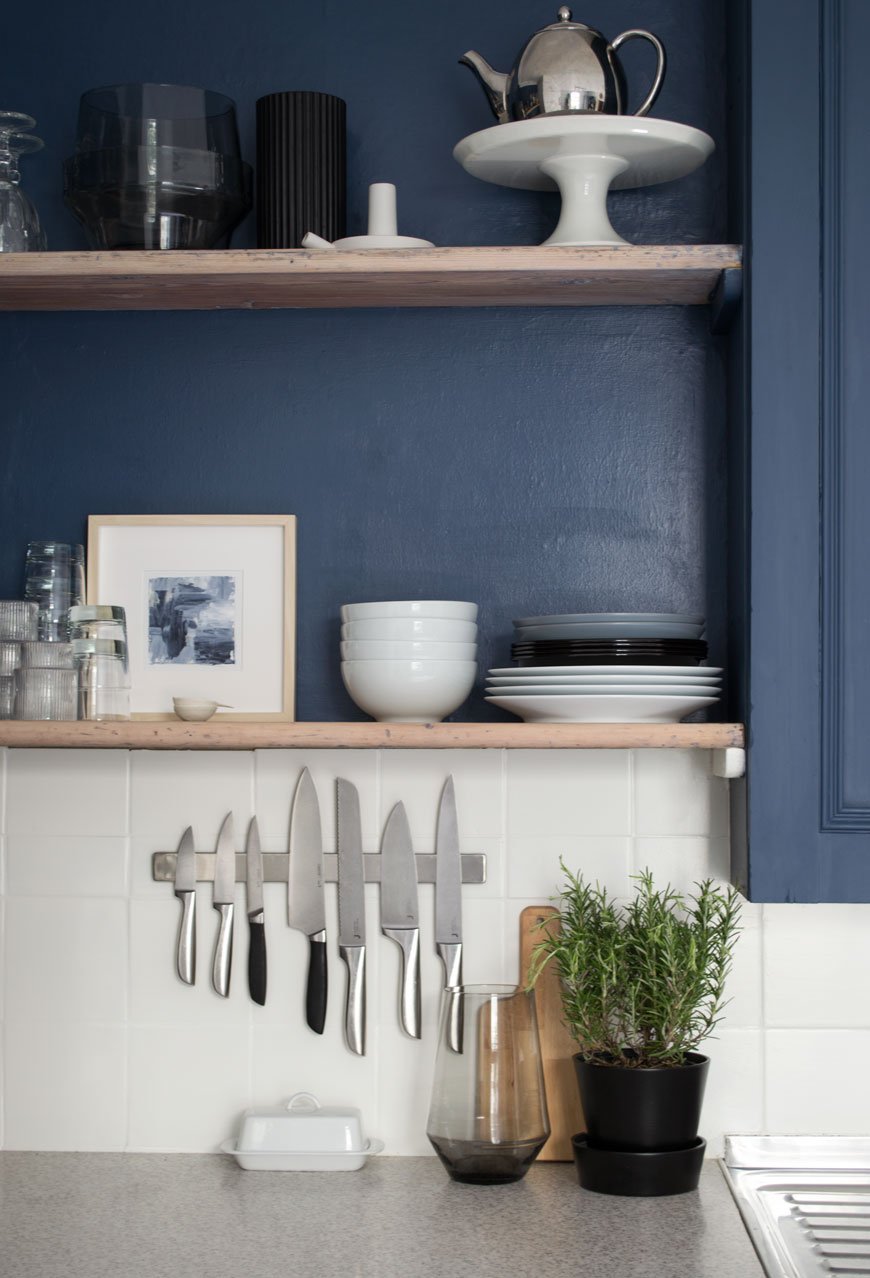
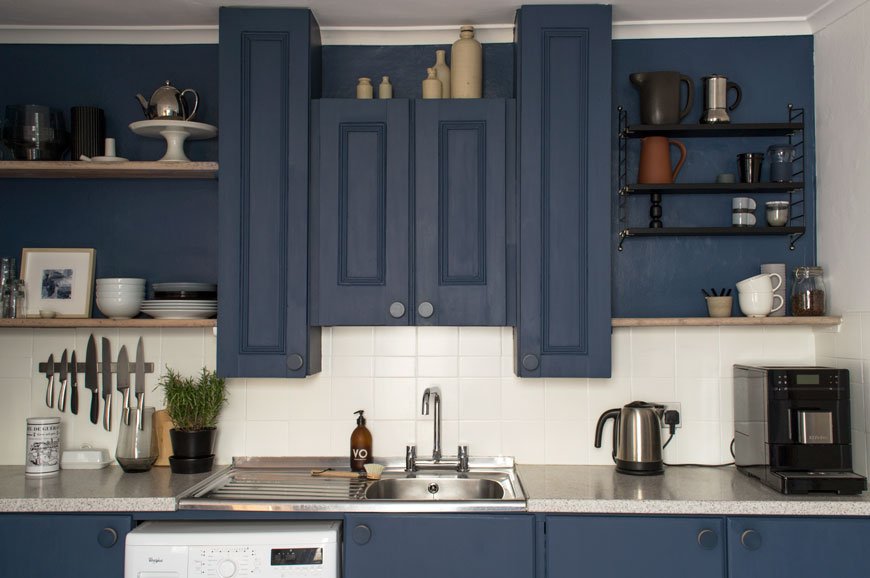 Those very homemade cupboard doors got several coats of Hick's Blue by Little Greene Paint, along with the wall that houses the open shelving. Those somewhat random over-sink cupboards now look less so, thanks to the blue paint which pulls them into the wall. I didn't want them to be a distraction, but now I love to see the details on the fronts which seem to have been repurposed from an old door. I used Flat Oil Eggshell on the cupboards for a matt finish. It took several layers to get them as brush stroke free as possible, thinning the paint a little, laying them flat and using a super soft brush.The light picks up some of the brushwork, but on the whole, it's hard to spot.All the every day essentials we use are always to hand now - on the open shelves, a free-standing wire unit or wall mounted. Every available space has been utilised and the cupboards sorted and clutter-free. I can't tell you how easy it is to cook here now there's free worktop. The microwave moved into the useless space in the corner too and now all available space is used with intention.Did you spot that we changed the taps too? Turns out that few places make contemporary style bridge taps (for converting two tap sinks into one) so choices were limited. Thankfully I found one I liked from Wickes and our brilliant lady plumber Beth (shout out!) who lives around the corner switched them over for us pronto.
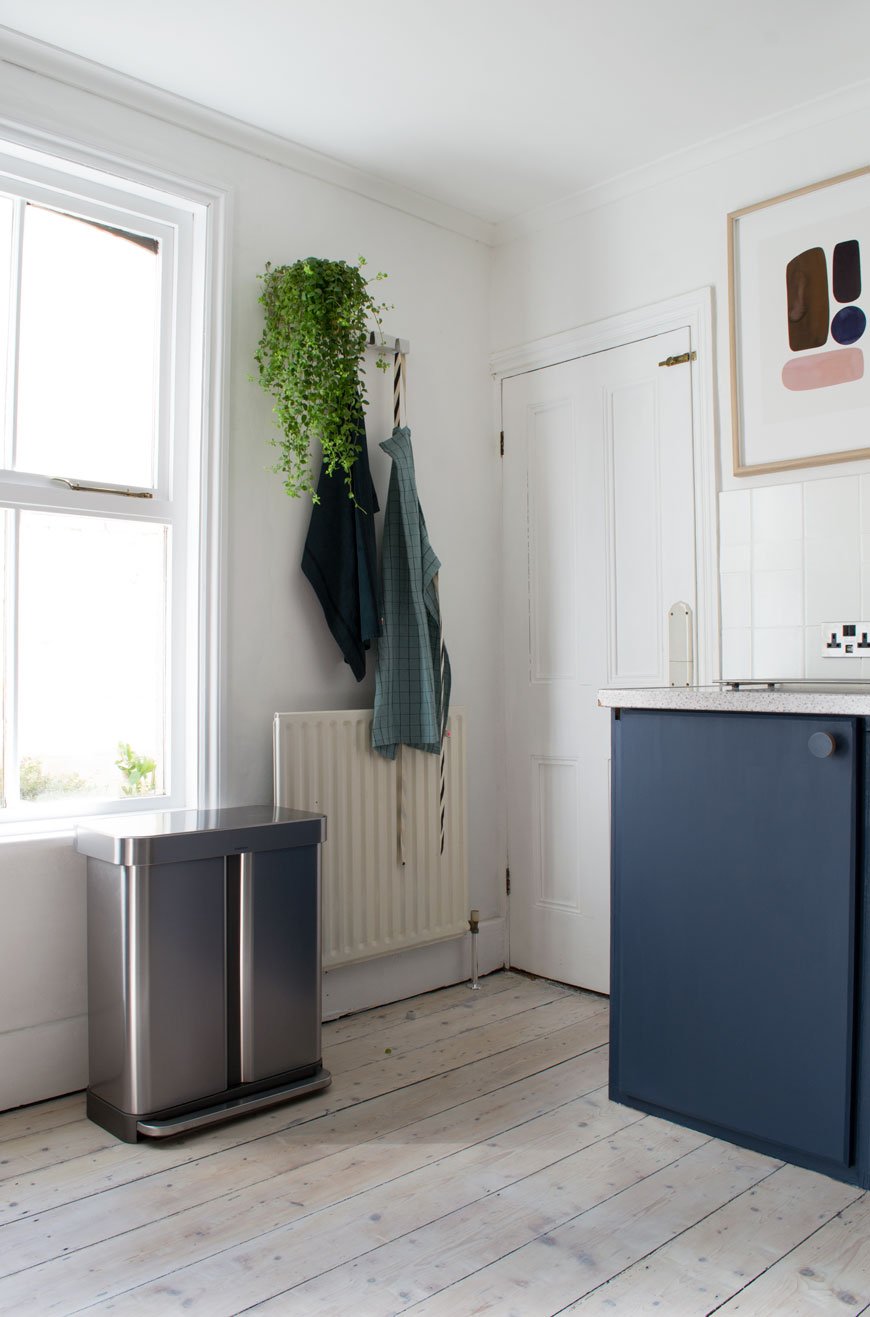
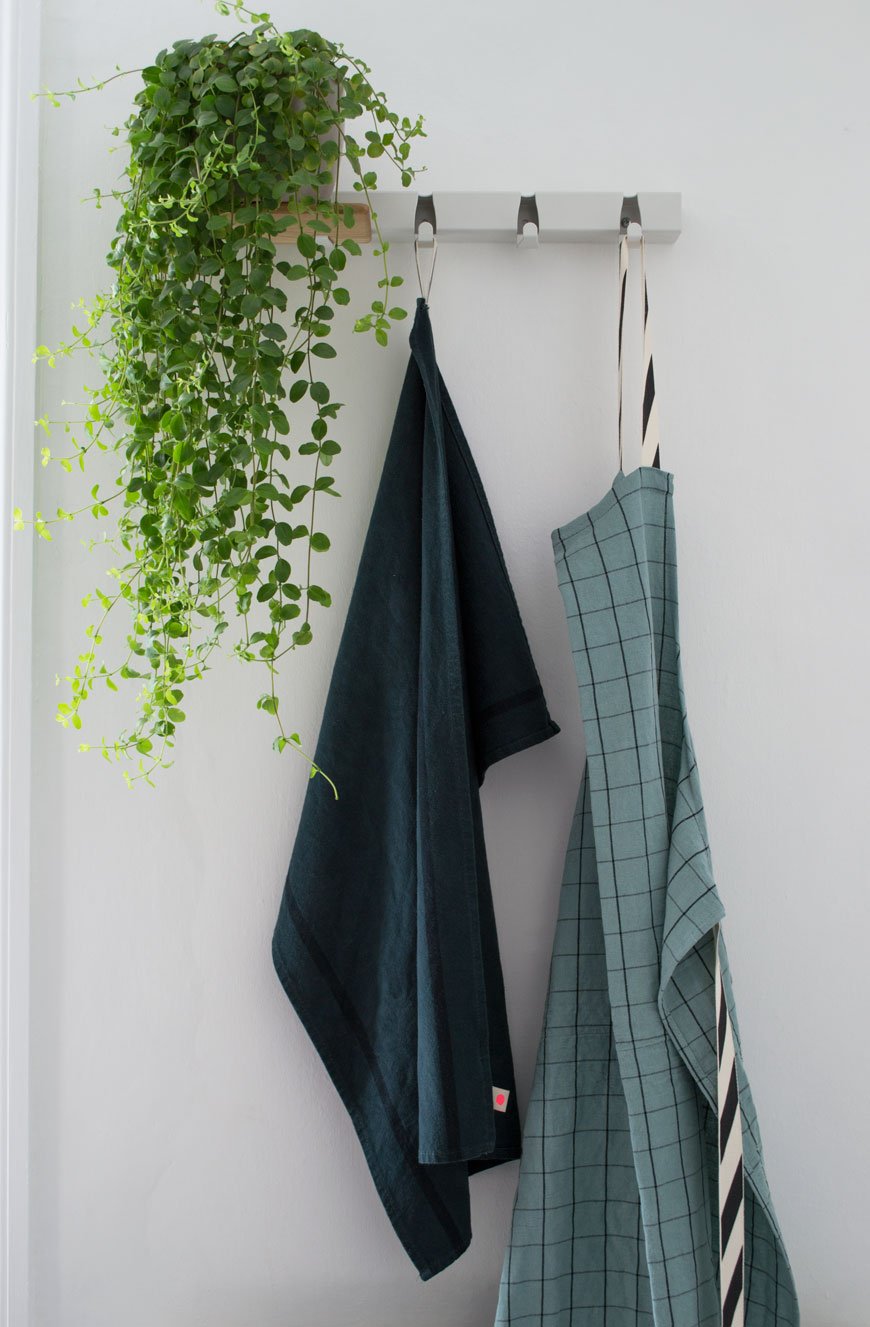 I came across an amazing Dutch design company called Vijf5 (that's five in Dutch) last year at the London Design Festival and their 'Coatrack by the meter' turned out to be the perfect piece to hang linens just behind the kitchen door. It also has an optional oak shelf which slots onto the existing hooks, so you can store mugs or as I've done, a much-loved plant.
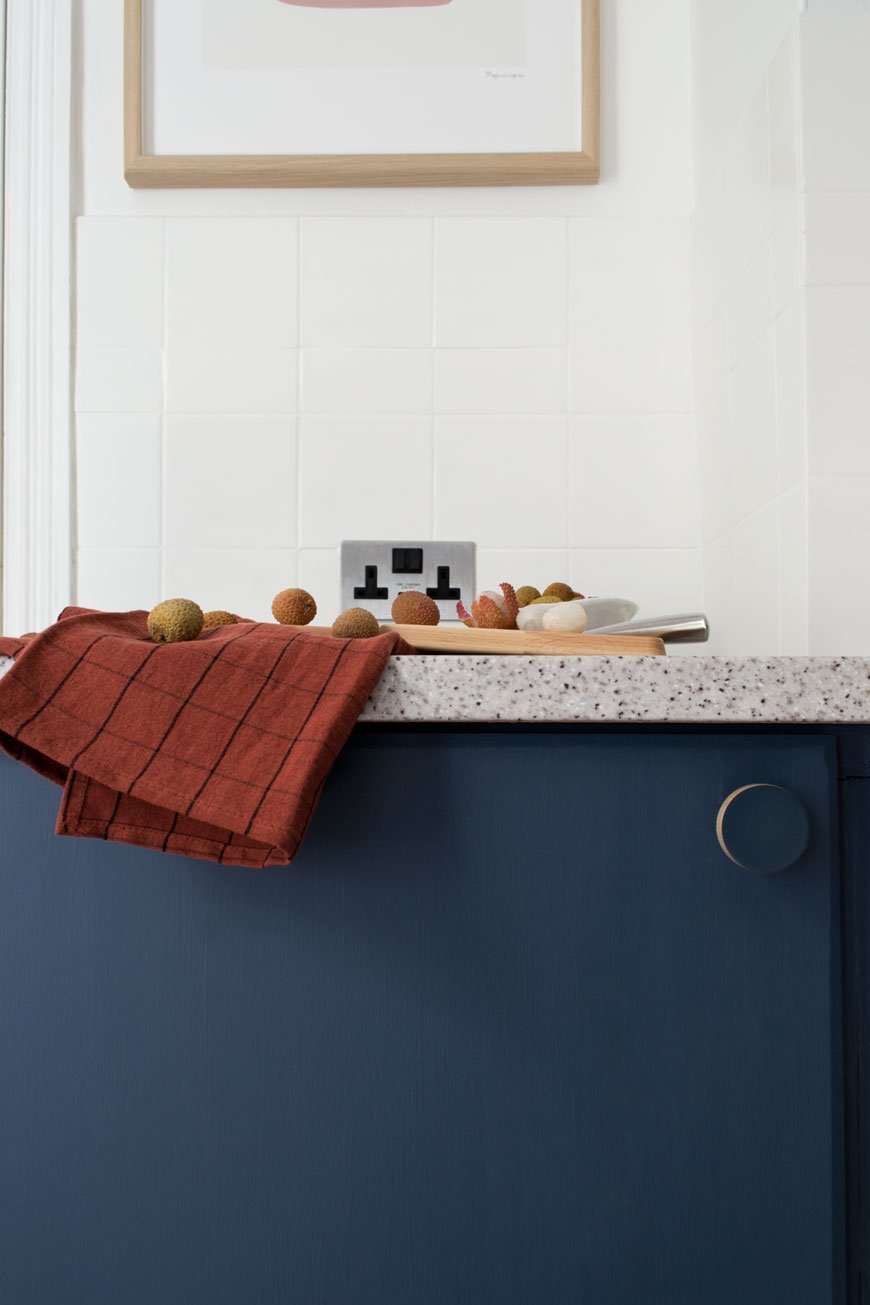 The cupboard handles are a plywood design by Chocolate Creative, the same company who made the door handles in the kids' room. They did an absolutely brilliant job on colour matching them for me, sending three variations to get as close to Hick's Blue as possible. I love the minimal, contemporary lift they give the space with very little effort.The dirty cream walls got an update too with a lick of heritage white, Shirting, from Little Greene Paint, along with the ceiling. An instant lift.Our fifteen year old fridge which was on the fritz got a stainless steel upgrade too. I'm still not used to having so much space and technology at my fingertips, but the fact it takes up less floor space and makes the room look taller is a bonus in itself. The kids can't slam the doors or forget to shut them anymore as it alerts us with a polite beep, and there's literally space for everything. Everything, I tell you.
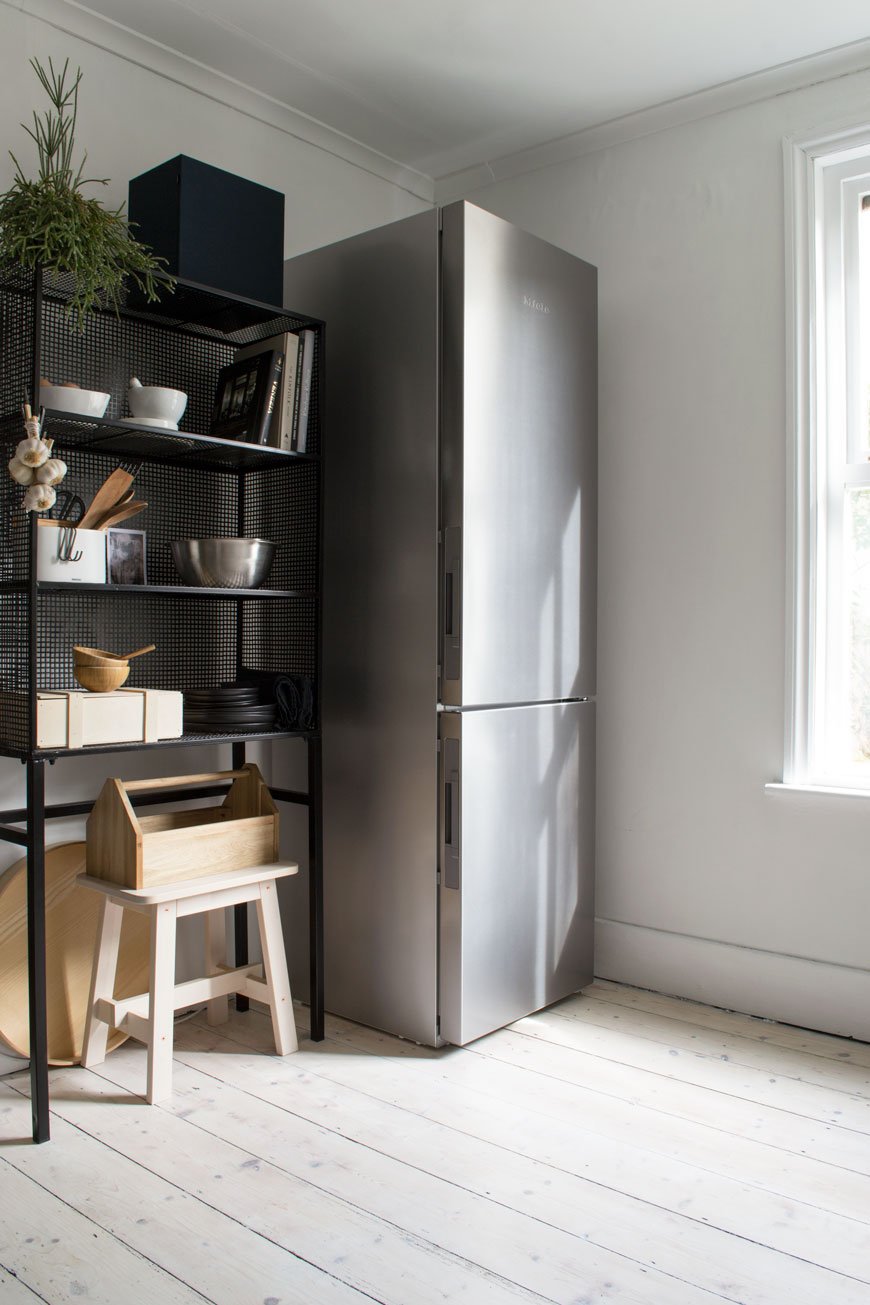
For Coffee Lovers
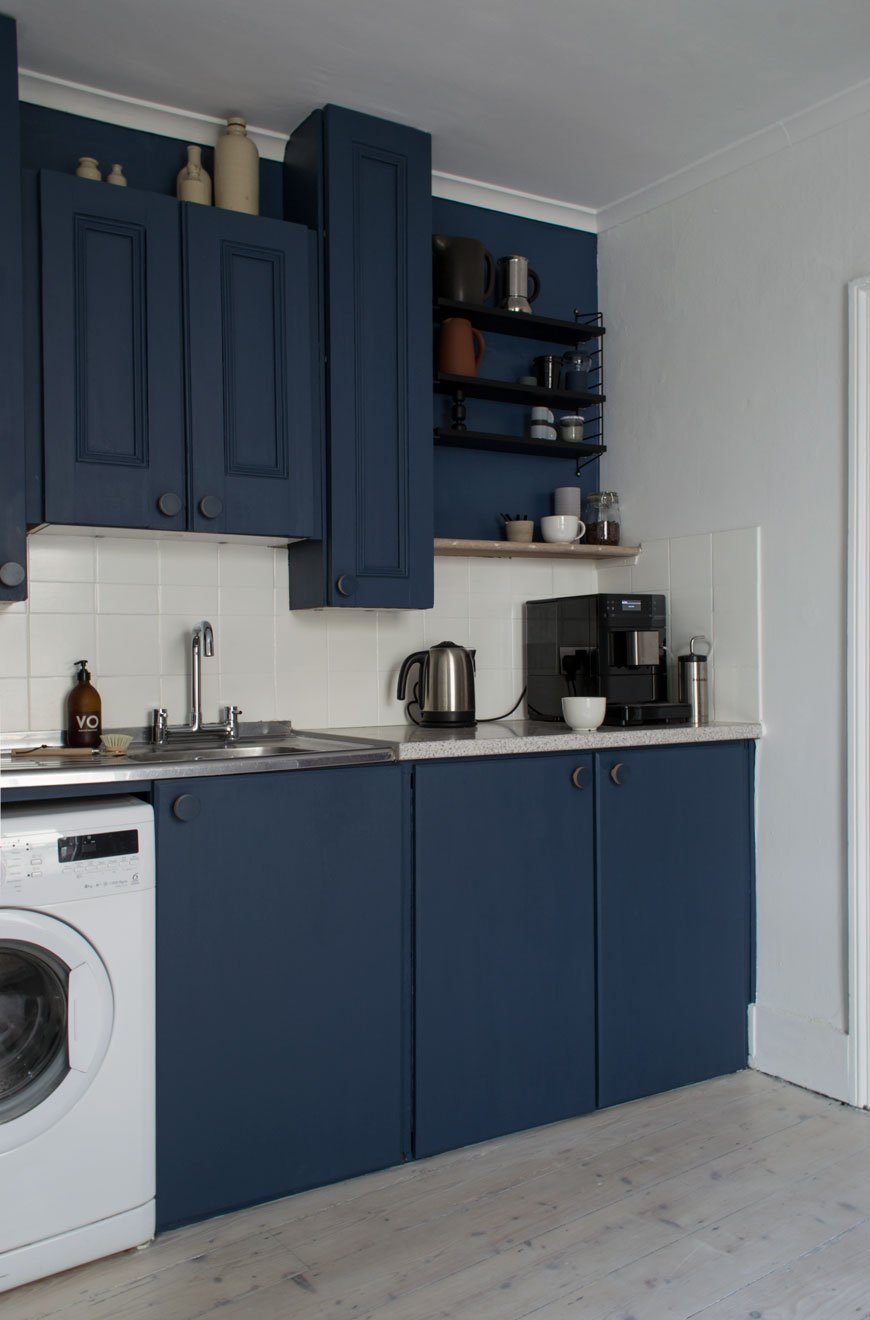 We wanted to make room for a dedicated space to make coffee, seeing as its such an important part of our post-school-run mornings. With everything to hand, from a collection of favourite mugs on the new String Pocket shelves and fresh beans ready for grinding, we upgraded our analogue stove-top to a Rolls-Royce coffee maker. Don't get me wrong, there's always a time and a place for good old-fashioned stove top coffee, but this beauty is game-changing for the time short and hello - hot and frothy milk, should you wish.
 I hope our blue kitchen refresh has demonstrated that small changes can make a huge difference to the feel of a room, whether you decide to paint or upgrade the cupboard fronts, door furniture, walls or appliances. By shifting your perspective away from the things you can't change on to what you can you'll see how much difference they can make. Big change doesn't have to factor in large remodels, so this room is safe. For now...Check out my tips on how to update a tired kitchen on Miele's DerKern. • This post contains brand partnerships. White walls - Shirting Absolute Matt Emulsion, Little Greene Paint.*Blue paint - Hick's Blue in Intelligent Eggshell on the walls and Flat Oil Eggshell on cupboards, Little Greene Paint. *Whitewash floor stain - Wood Wax Finish 3111 White and Poly Oil 3040 White, OSMO UK.*Plywood cupboard handles, Chocolate Creative.Seattle bridge mixer tap, Wickes.Black ash String Pocket shelves, Skandium.*Rhonda black wire rack, Out There Interiors.*Black and stainless steel countertop coffee machine CM 5300, Miele.*Stainless steel fridge-freezer, Miele.*Electrical stainless steel sockets and toggle light switch, Dowsing & Reynolds.White ceiling spots, IKEA.Stainless steel dual compartment recycling bin, Superhuman.Kitchen linens, from the Oscar and Suzette collection, La Cerise Sur Le Gateau.White 'Coatrack by the meter' with oak shelf, designed by Vijf5.
Photography & styling © Tiffany Grant-Riley
Want to see more of our home renovation projects? Follow #TheChathamHouse on Instagram for all updates...
Botanical Scandinavian Sunroom Makeover - The Reveal
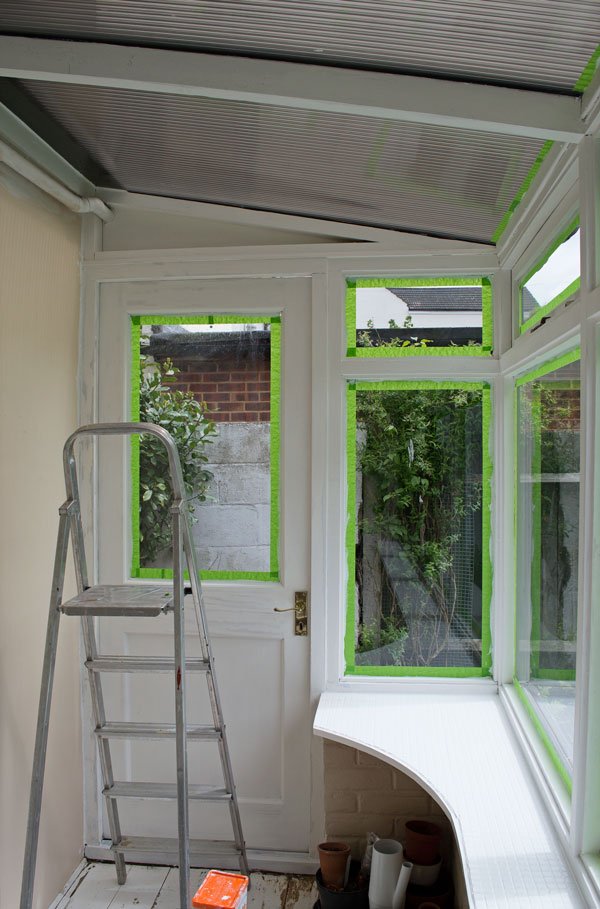 If you saw my last post, you'll know I've been working on a small scale makeover to give our tired little sunroom a refresh. When I started two months ago, I thought it was going to be relatively straight forward - and it was in that for the most part it only involved paint. But painting anything well takes time and preparation. So this is where I've been spending any spare moment of my time of late, come rain or shine, paintbrush in hand with a very clear vision of the finished look in my mind to spur me on. I might as well have moved in here, seeing as the kids always knew where to find me when they discovered I was missing!As this is really only a temporary space (no insulation or heating and windows rotting on the outside) there was little point in re-laying the floor or replacing the windows, so instead I focused on the cosmetics. The biggest challenge was prepping the woodwork, which was not only badly painted in several coats of aged gloss paint, but the wood hadn't been treated properly when the structure went up, so I was often sanding off sticky old wood sap as I broke through the layers with the sander. I gave everything a very brief keying to prep the surface and found a brilliant ultra grip primer, formulated for difficult surfaces and aged paint. It made life so much easier when it came to applying the top coat. You can find all the product information in the source list at the end of the post.
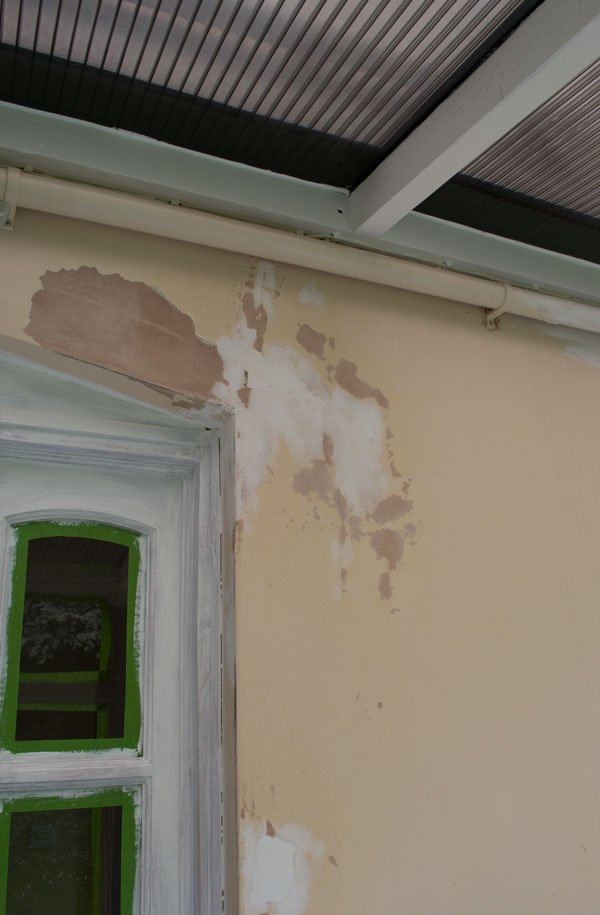 I used masonry paint across all walls to help protect them in the colder months. The old paint had been peeling off in places so I needed something to stand up to all conditions and hopefully avoid it happening again. As it gets a lot of light in here, I chose a white with blue undertones to take the edge off slightly.
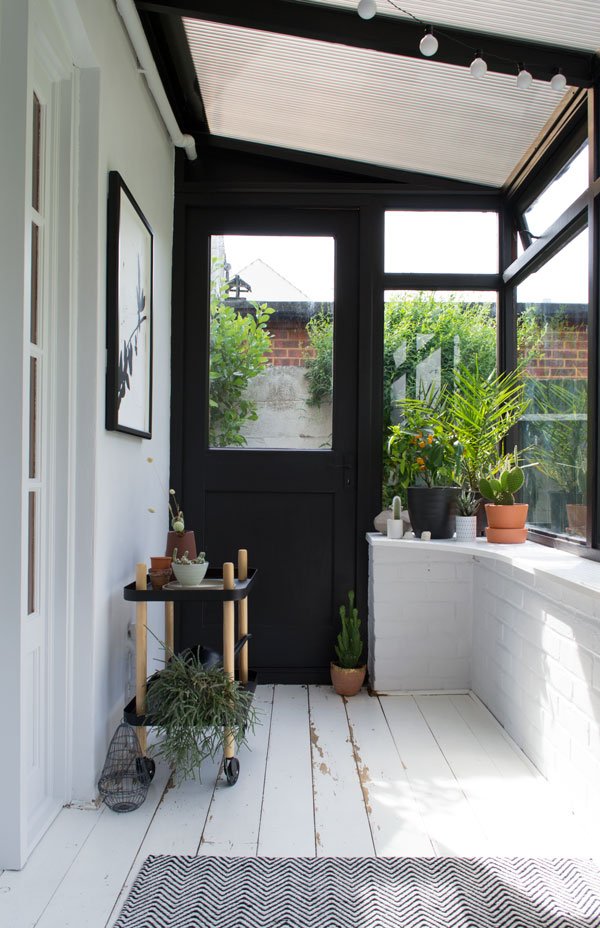 And here it is. Bright, minimal and contemporary, just the way I like it. It feels like the space I've been missing since we moved here and it's so lovely to see everyone drawn to it when we're all at home. Don't the black frames completely transform it? Not quite Crittall windows but it's a great start! Notice how they frame and bring the garden inside? There's space for additional seating - I have a couple of stools which can sit by the windowsill and there's enough floor space for one or two large floor cushions.I wanted to introduce a little warmth into the space, especially as a monochromatic scheme can feel somewhat cold, so I brought out the earthy tones to compliment the lush green planting. From a collection of terracotta pots, a beautiful Ian Mcintyre pitcher, to my newest love discovered at Clerkenwell Design Week - the DUO table lamp, these tones really pull the space together.The pine door was such an eyesore, it pulled the attention away from the garden when we would sit in here, like an orange beacon of misery. It was given a couple of coats of the same white as the walls to blend in with the rest of the space and feels much calmer now. You'll notice I did the door handles and window latches in the same colour to save replacing them all.
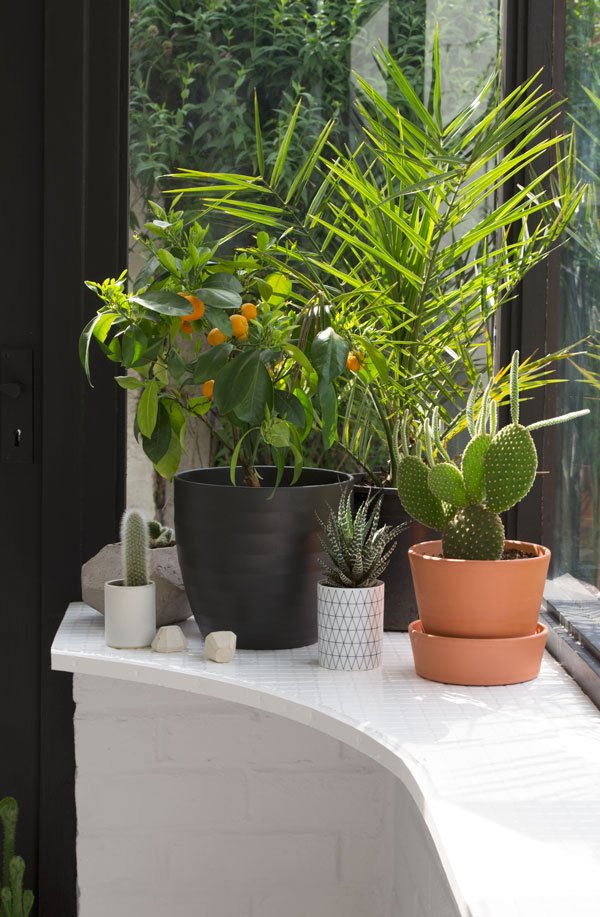
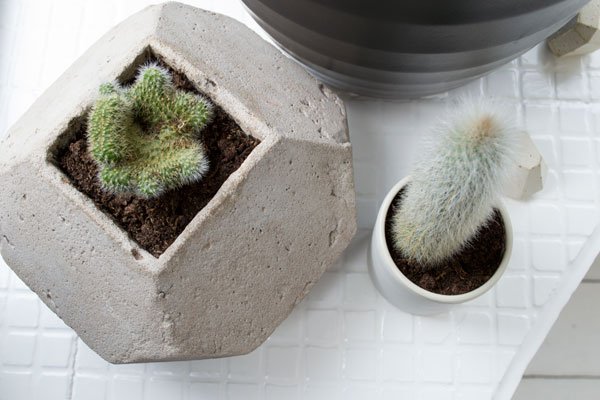


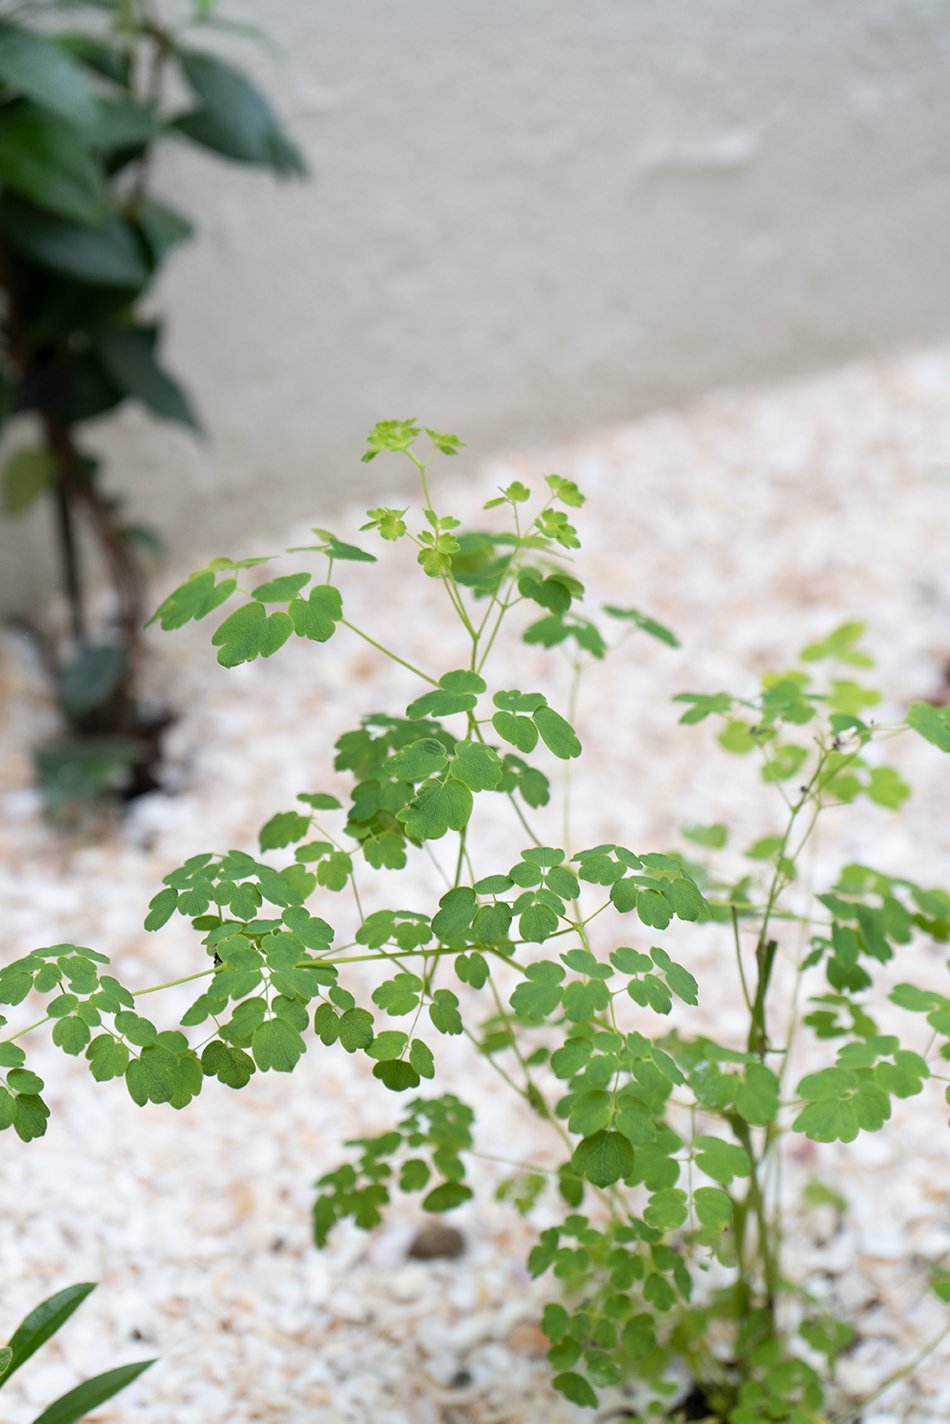
 At this time of year this room has the perfect conditions for heat and light loving plants. I've bought a date palm (pictured next to my citrus tree which was flowering heady scented blooms all spring) and an Areca palm for height at the back of the room. I took the opportunity to repot some of our cacti from the kids room too and I'm completely in love with the fig which comes from Valencia so it's used to sweltering summers and cold winters. I wonder if it'll ever bear fruit? Either way, everything in here will be happy until the colder months come and then I'll bring them into the main house and swap them with others.The black Normann Copenhagen Block trolley has long been a much coveted design, it's such a versatile piece. I can use it for repotting and watering, store blankets over winter or stack it up with magazines. I've already used to it host dinner on whilst I was still painting and it was a nice touch to serve from it.
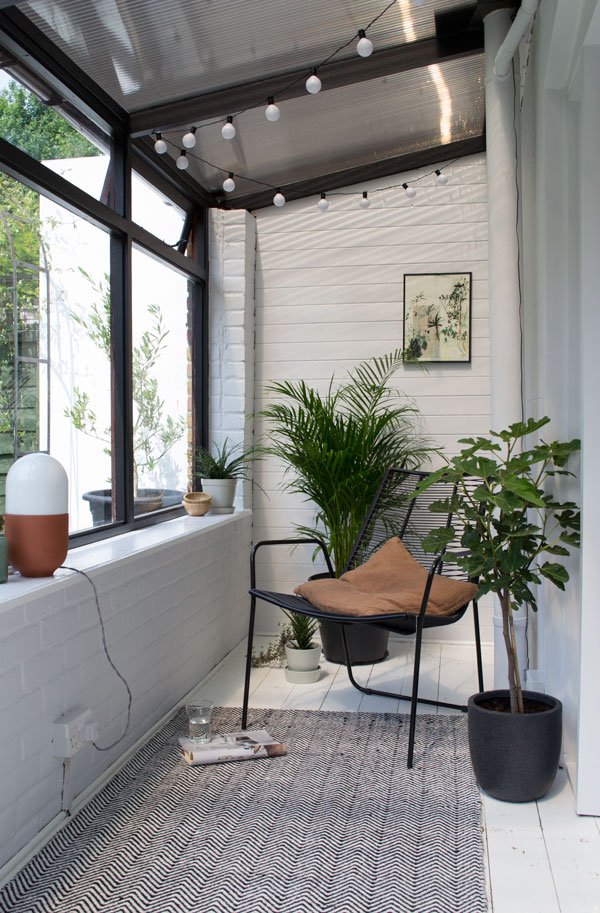 Initially, I'd planned to find an indoor/outdoor rug, but as the dimensions in here are so tricky I landed on the cotton and jute weave Ives rug in a herringbone pattern from Houseology. I love that it brings in a contrasting texture against the rough floor and echos the woven lines in the Lene Bjerre April lounge chair. The thin frame and see-through seat still leaves a feeling of space and it's extremely comfortable to sit back in.Over time I've been collecting botanical art work, and whilst I might eventually move these to the living room where I'd like to include them in a gallery wall, they sit well in this space.
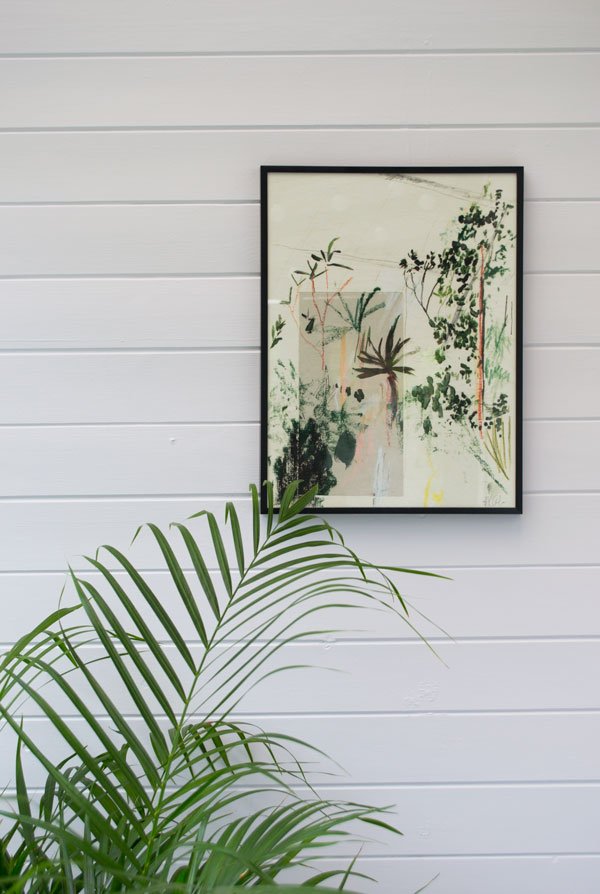


 My next plan will be sourcing blinds for the lower windows as it can feel a little exposed to the houses at the back in the evening. I also want to make sure I can protect the plants from strong sun. Oh. And fill it with a lot more of them, of course.So, what do you think? Maybe I've inspired you to give your garden an update?Source List:Wall paint: 'Sleeping Inn' white masonry paint, Valspar.Wood & metal paint: 'Village Smithy' black paint in premium eggshell, Valspar | 'Sleeping Inn' matt premium eggshell, Valspar.Tile paint:Wood primer: Ultra Grip white primer, Dulux Trade.Herringbone Ives rug: Houseology*.Black Normann Copenhagen Block trolley: Houseology*.Linum jute cushion in rust: Holly's House.Lene Bjerre April lounge chair: Houseology*.Terracotta pitcher: Another Country.Black and white botanical leaf print, Chocolate Creative.Abstract botanical print, Alicia Galer.Terracotta and opaline glass Duo table lamp: Hand & Eye Studio.LED Festoon lights: IKEA.* This post was written in collaboration with Houseology.Styling & Photography © Tiffany Grant-Riley Want to see more of our home renovation projects? Follow #TheChathamHouse on Instagram for all updates...
Botanical Scandi Sunroom Makeover - Before
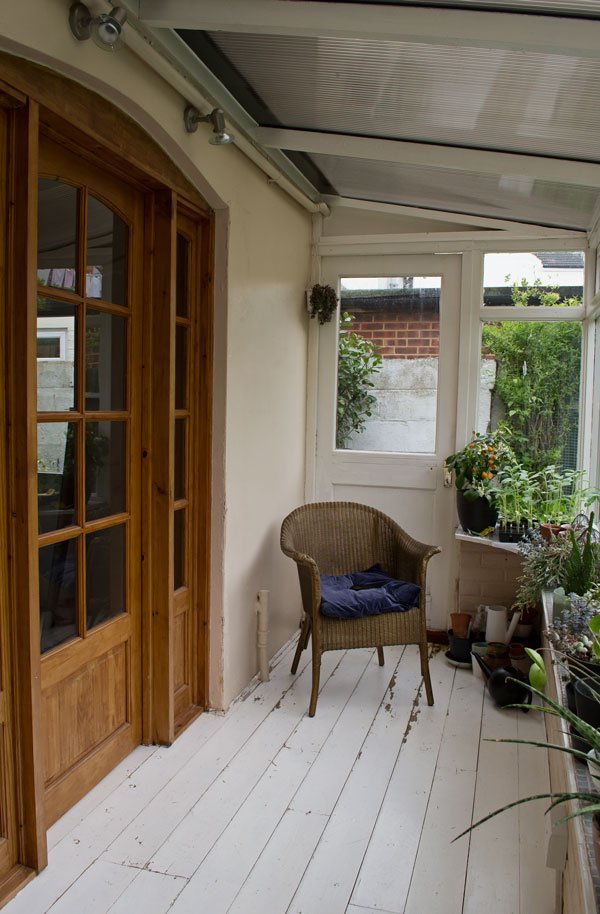 There's all sorts of quirky spaces in this house, one of which is my favourite to spend time in although technically it's not really a proper room. The 'sunroom' as it was called when we bought the house is a borderline dilapidated structure, clearly put up in a hurry. The floor is rotting by the external door, as are the window frames on the outside. Methinks I spy a bodge job! Those things aside, I absolutely love to sit in here, watching the birds flit from the hawthorn tree across to the feeder. I watch the sun sets, thunder storms and listen to heavy rain drumming on the roof as I tend to my family of plants. If we decide to stay long term, we'd like to pull this extension down and rebuild it, knocking through from the kitchen behind, but for now I just want to give it a unified look so that it feels like an easily identifiable space.
Hot, Hot, Hot
As a makeshift room, it's not insulated or heated, meaning sweltering temperatures in summer and freezing cold in winter. I learnt a very big lesson before we officially moved in. Trying to get ahead of the game, I'd started moving some of my plants into here but then had to lock all the doors and windows while the house was left unattended. Needless to say, the high temperatures made only worse by the unseasonably warm October weather and the perspex roof slowly cooked them all to a crisp. Some of those succulents I'd had for over six years! Six years I tell you! Not to let something like that put me off though, I've sinced researched plants that enjoy high heat and lots of light, so for the summer months they'll be in here and in winter I'll switch them out for the plants that love colder climates.
Awkward Space
The sunroom is very narrow and long which rules out having a small sofa or bench inside. As a compromise, I've decided on a combination of lounge chairs, stools and floor cushions which can be changed around and moved depending on who is using the room.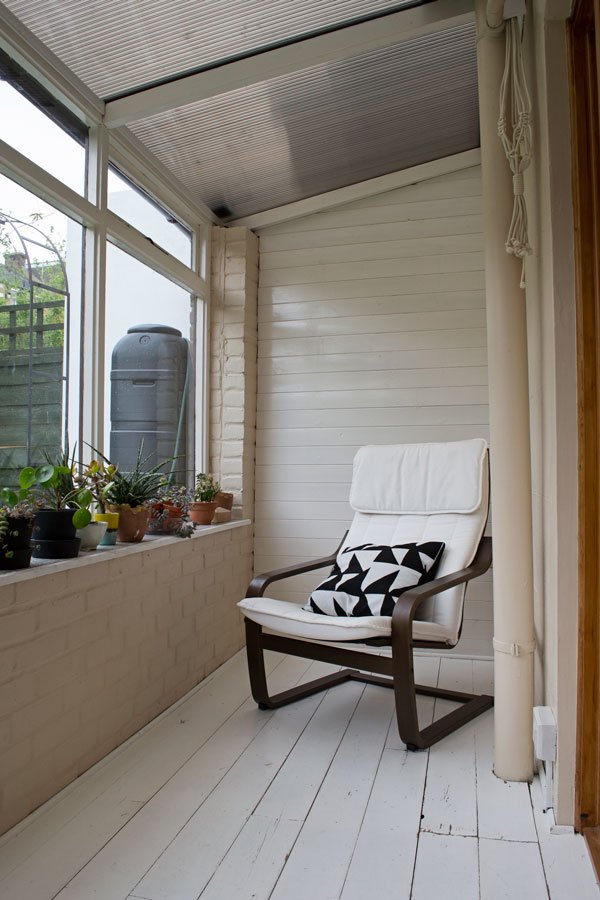
The Inspiration
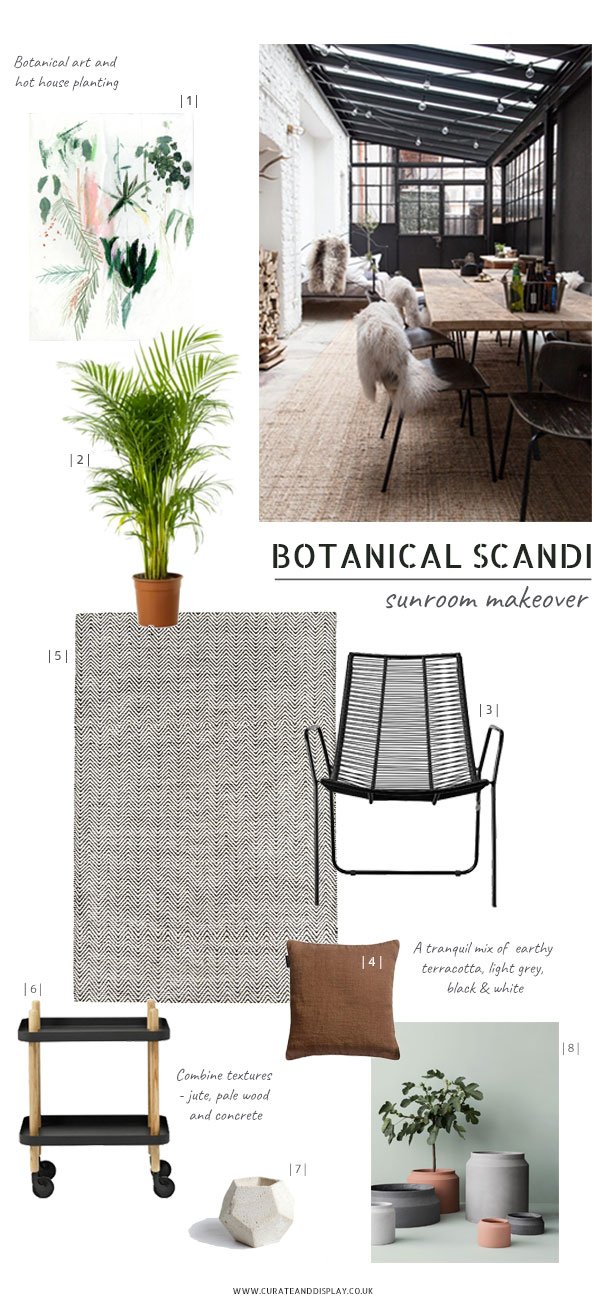
|1| Art print, Alicia Galer |2| Palm |3| Lene Bjerre April lounge chair, Houseology |4| Raw cushion in Rust jute, Holly's House |5| Black & white herringbone Ives rug, Houseology |6| Normann Copenhagen Block Trolley, Houseology |7| Leila concrete planter, Concrete Jungles |8| Terracotta pots, Ferm Living | Image © Wertvoll Fotografie
Ever since I came across this jaw droppingly beautiful garden room on Pinterest (above) belonging to photographer Petra Reger, I've had it in mind to take the best elements from it and apply it to what I have. No, I don't have the structure of those black aluminium framed windows, or space for a dining table, but I have textured brick walls and window frames I can paint. I want the space to feel contemporary, to draw the eye towards and frame the garden outside. I'm going to blend a monochromatic base with terracotta details and layer up on the plants - I never need an excuse to do that!
The Plan
To refresh the ambiguous pink walls I'll be painting them white, but I want to choose a shade with blue undertones so that it's not so glaringly white in full sun - I don't want to be wearing shades in here!The wooden floor will stay as is, the distressed look gives the room character and added texture and I always like to leave part of a room untouched in some way.You might not be able to see from the photos, but the window sill has been laid with a pearlescent blue mosaic tile. I hate it, so I'm going to give it a couple of coats of white tile paint for a better backdrop for the plants to sit on.The orange pine door will also be treated with a coat of fresh white the same shade as the walls to blend with the rest of the space. There's just no excuse for 90s orange pine now people.The two spot lights above the door are pretty awful when you're trying to relax in the evening - you feel on display to the neighbours behind our garden. I'll be using festoon lighting hung across the roof struts for a softer, more intimate light.If you've noticed my absence from the blog in recent weeks it might go some way to explain that - I've been working all the hours I could find to get the room ready to share with you next week. Let me tell you, it's quite the transformation! What do you think of my plan? Do you have a garden project of your own?Want to see more garden inspiration? Check out my In The Garden board on Pinterest and follow #thechathamhouse on social for more of our home renovation updates.
Modern Scandi Kids Room Makeover - The Reveal
 When we bought this house, it was sort of a given that we were going to tackle the kids room first as we wanted them both to feel settled in the new place as soon as possible, surrounded by familiar things from their old room but with a few new and exciting additions too.The room itself is on the whole really light, so we wanted a clean, modern space with accents of grey-blue (check out my inspiration in this post). We knew it wasn't going to be a quick job as four out of the three walls needed re-plastering and we'd decided to sand back and paint the wooden floors, but it took longer still to finish whilst navigating the chaos of moving and settling in and every day life. Aside from the plastering and replacing the radiator, we did everything ourselves and its been a great starting point for the rest of the house...although I won't be painting any more floorboards.
 Essentially, everything needed stripping back so we could get a better idea of what needed attention. The carpet came up really easily (no underlay underneath either) revealing the hearth plate on the fireplace underneath and beautiful, really dirty floorboards. Seriously exciting. The walls were a little tricker as we had to remove the shelves from the alcove which had more or less been screwed in and painted onto the wall. Years worth of gloss paint to hack off to get them off. And then there was the polystyrene coving across the top of the ceiling which had to be chiselled off at the same time as the lining paper. The other delightful thing about this house is trying to locate and remove all the strange cable and phone line ports which have been added over the years - there were a few in here too.
 The floors were given two coats of Wimborne White by Farrow & Ball which gave great coverage and I have to say is holding up well to the sort of everyday abuse wooden floors get from small children-toy car traffic, chairs dragged across the floor etc. If you're tackling a similar project and are as clueless as we were when we started, take a look at out (almost) definitive guide to sanding and painting wooden floors.
 Rob did most of the fiddly painting such as a fresh coat on the ceiling and the cupboard doors were really his project whilst I focused on the walls and skirting boards. After weeks of umming and ahhing over the perfect shade of grey-blue for the woodwork, I picked 'Celestial Blue' by Dulux. The paint didn't need thinning at all and only two coats were needed.
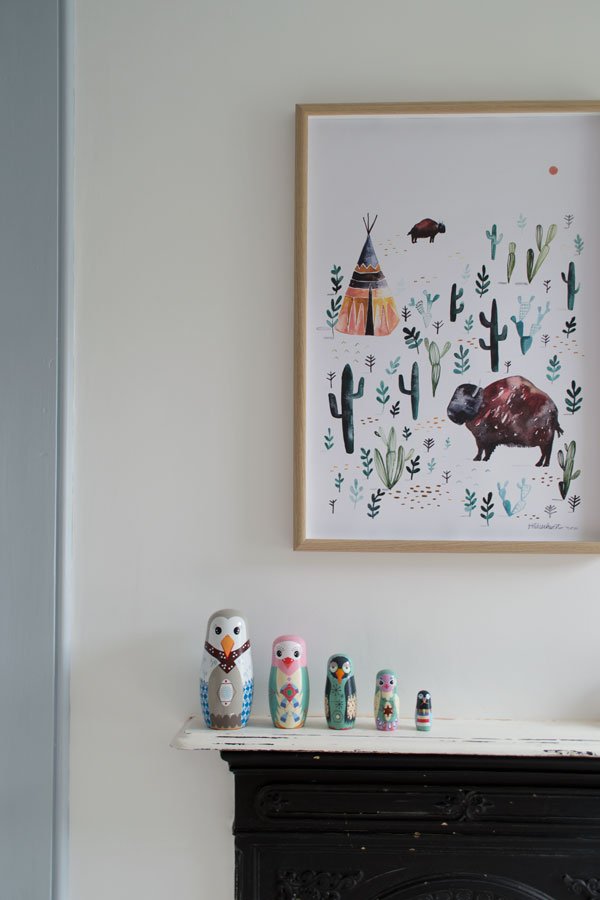
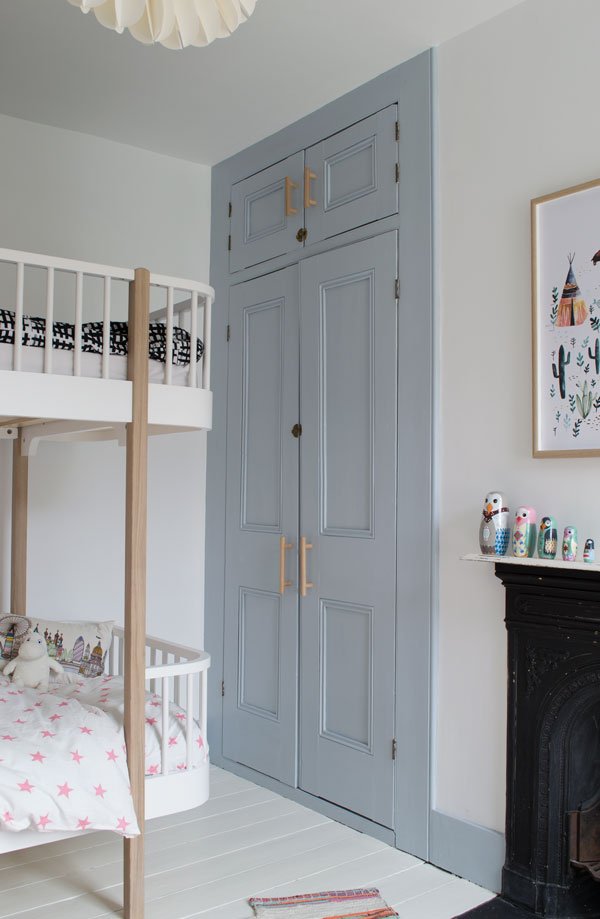
 The original Victorian cupboard is my absolute joy. I'm honestly so chuffed I took a gamble and decided to paint it. There's so much orange stained pine in the house which I find a little over-powering, so I overcame my fear of painting original features and jumped in with both feet. This is generally a really bright room, although typically it was cloudy on the day I shot it, but I love the way the tone of the blue changes at different times of the day. The beautiful minimal door handles are a bespoke design by Chocolate Creative (listed on the source list below) from plywood and birch and give a very traditional cupboard a more contemporary feel. It also means the kids can easily access all their books, games and clothes inside and I plan to restore and decorate the inside properly a little further down the line.
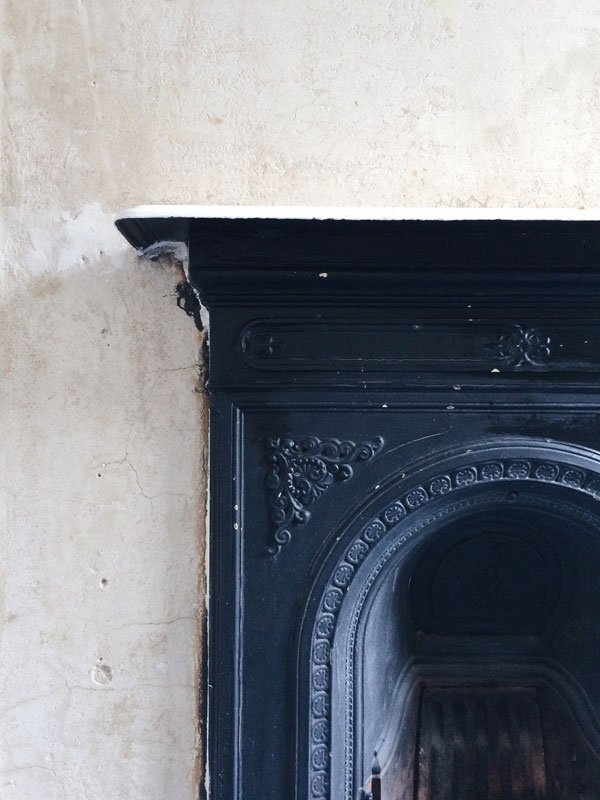
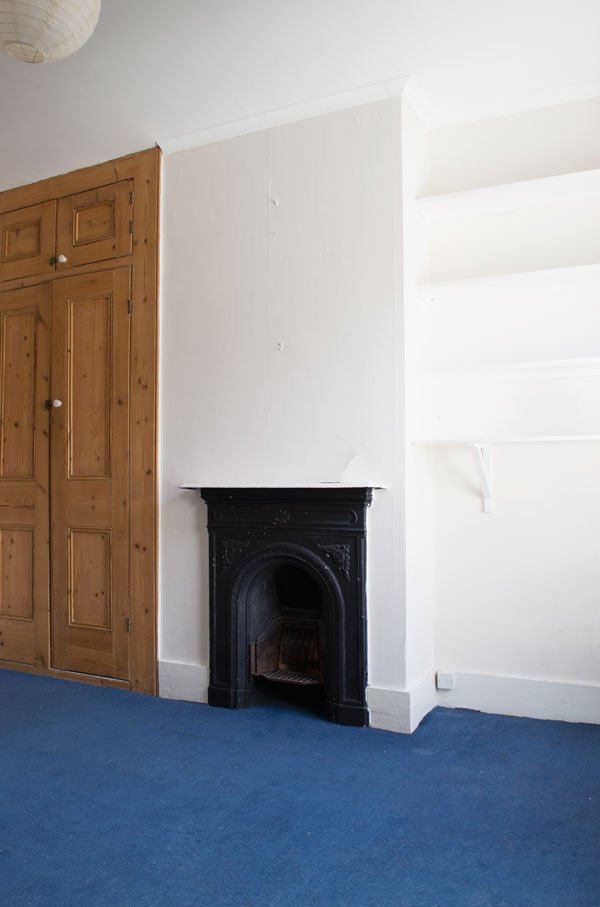
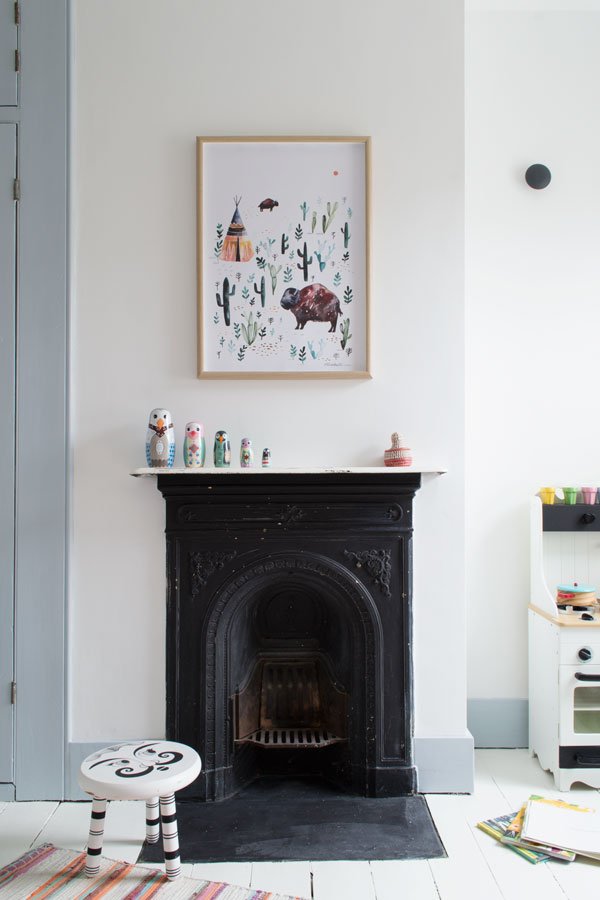 The only feature we decided to leave as was is the fireplace.You can see there are layers of paint underneath which over the years have been rubbed off in places. Much to my mother's dismay (she wants us to restore it) we love how rough and patchy it looks against the otherwise quite polished decor.
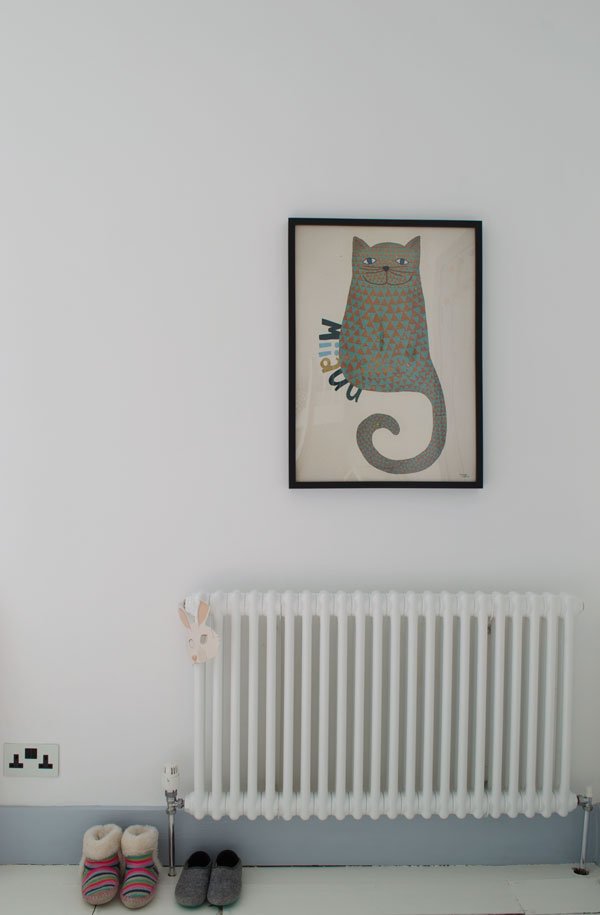 We replaced the old radiator with a new column and chrome pipes. I much prefer this style in keeping with the age of the house, but without the inefficiency which comes with original styles. Rob also wired in new white metal fronted sockets with black inserts, a new black toggle light switch and black ceiling rose from Dowsing & Reynolds. Small details make all the difference is a space this small.
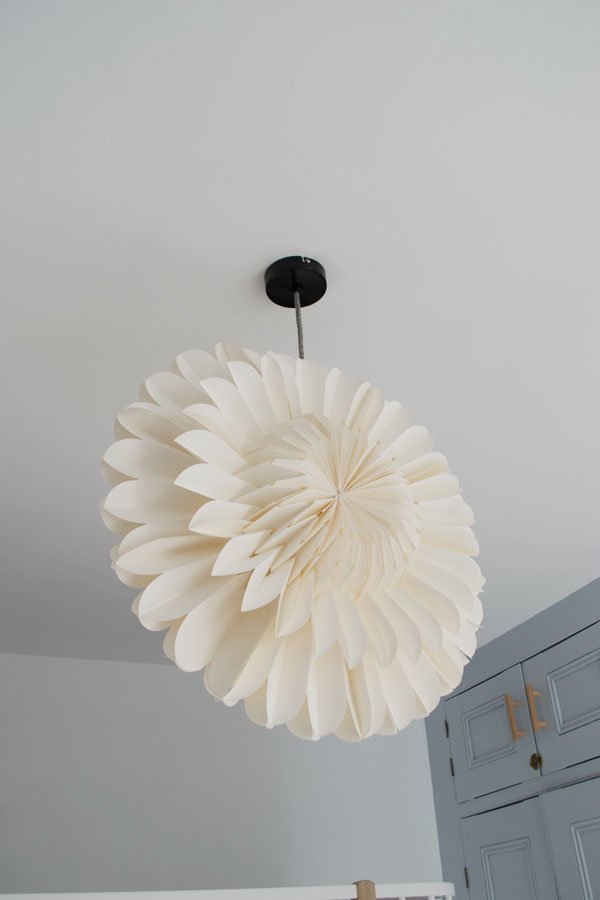
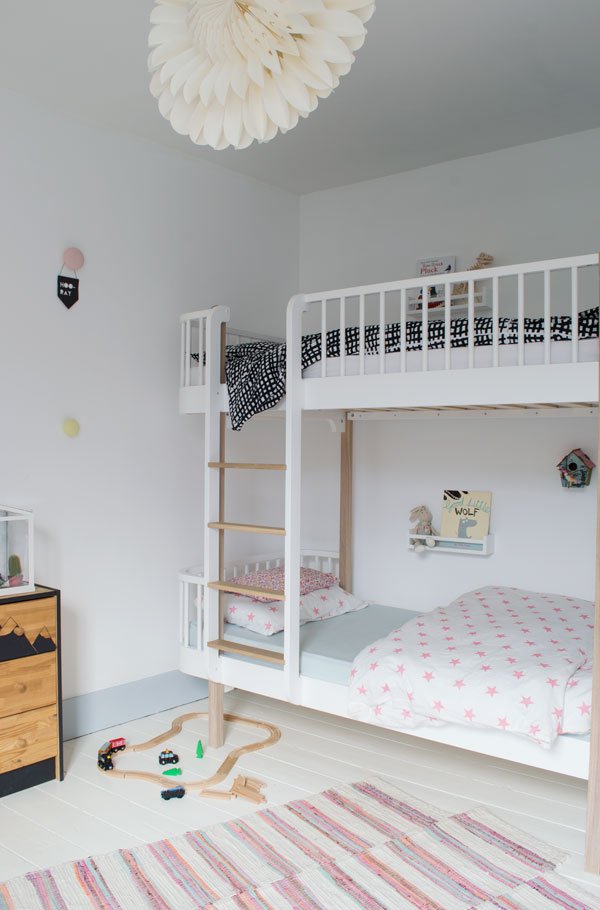 It was only when we put their new bunk bed together and moved it into the room that we really saw it all pulling together. This was the bed I'd had in mind for this room before anything else and I knew the kids would love the novelty of sharing it. The pale oak details tie in with other wooden details in the room and its fun, contemporary shape brings the room up to date. We bought two organic cotton mattresses that are curved to fit with the bed and are made from a combination of coconut coir, natural latex, natural fleece wool and unbleached cotton. They're a dream to lie on (which we've had to do several times) and the covers are completely removable in case they need to be washed.

 The little kitchen was given to us by a friend whose daughter had outgrown it. It was pink and green then, so I took it apart and gave it a monochrome revamp
 because I can't help myself. My daughter still isn't quite into playing with it yet, so if she's still not keen after a year or so, my plan will be to build a plywood box desk into this alcove that they can both sit at and be creative together. And there we have it. Room one down. Only the rest of the house to go...
•••
Source List:*White and oak bunk bed - Oliver Furniture, Nubie.Organic cotton mattresses - Little Green Sheep, Nubie*Dulux 'Ultra White' emulsion paint - Homebase.*Dulux 'Celestial Blue' wood paint - Dulux, Homebase.Two column radiator - Wickes.Porcelain wall hooks - Anne Black DK.*Bespoke 'bench' cupboard door handles - Chocolate Creative.Oatmeal linen look roller blind - Homebase.White 'A' Stool (used as side table) - ByAlex.White 'Cohen' table lamp - MADE.COM.'Socker' greenhouse - IKEA.Cacti, from a selection at The Hendersons.*Black and white sockets and vintage style toggle light switch - Dowsing & Reynolds.Black and white vintage stool - charity shop find.'Rast' chest of drawers - (painted) IKEA.Mini bedside shelves - (painted) Bekväm spice racks, IKEA.Pink, orange and blue rag rug - Zara Home (discontinued).'Bison' illustration poster - Gretas SchwesterBlack and white grid bedding - IKEA (discontinued).Pink and white star bedding - H&M Home.White paper lotus light - Bungalow DK.'Miiaaw' cat poster - Michelle Carlslund Illustration.Mask poster - Wild Boys & Girls.* Indicates where product has been gifted as part of this collaboration. Photography & Styling © Tiffany Grant-Riley
The New House / Before Tour
 So I have some news. It's been the hardest thing to keep under wraps these past few months with a few ups and downs and a lot of nail biting, but now we're out of the woods I can say...we have a house! And breathe...We were first to see it when it came onto the market back in June, first to put in an offer straight after the viewing, have it accepted and then rejected a week later, only to be offered it back another four weeks on from that. Emotional roller-coaster is a complete understatement, but it was worth it, because this was the only place that ticked 99.9% of the boxes, and we have some interesting requirements with us both working from home. And the crazy number of large plants we have. Oh, and the children and cat, of course.The house is a beautiful late Victorian build with three bedrooms just up the road from where we are now, in Chatham. Thankfully, as far as the nasty historical interior updates go, this house has narrowly escaped most of them. Beyond the 70s foam coving in the upstairs rooms and gloss painted anaglypta wallpaper in the hallway, we are relieved that most of the pinewood flooring has been restored along with some of the sash windows. That said, where would the fun be in writing an interior design blog if I didn't say that we're staring down the barrel of a lot of decorating. Come on now. Earlier last week I went up to the house to take a few shots and strip walls. Would you like a tour?
 I absolutely love this space, the front of the house gets a lot of light although it gets gradually moodier the further in you go. It'll take some getting used to from where we're living now and I'm not sure white is going to work quite so well in every room, but that's part of the fun, right?
 We're moving in at the end of October but aside from the kids room and maybe ours and Rob's office room (not pictured), not much else is going to be done until then. You don't realise how much time things take until you move in and really look and we want to live in the house for a while so we can decide how we want to use each room. Eventually, we're going to sand back the floors again, stain them with a white oil to give them a paler look and seal them with a semi-matt wax. A mammoth job, but I'm happy to do it.So for now I'm focusing mainly on this room which will be the children's. I've since stripped the wallpaper off and removed the coving and shelving ready for re-skimming in a couple of weeks. The carpet will come up, floors sanded back and painted.
 In keeping with the bright colour theme, the bathroom is yellow. Eeeesh. We're definitely keeping the bath (painting the feet black) but we'd like to change the floor and other units as they have a traditional Victorian feel.
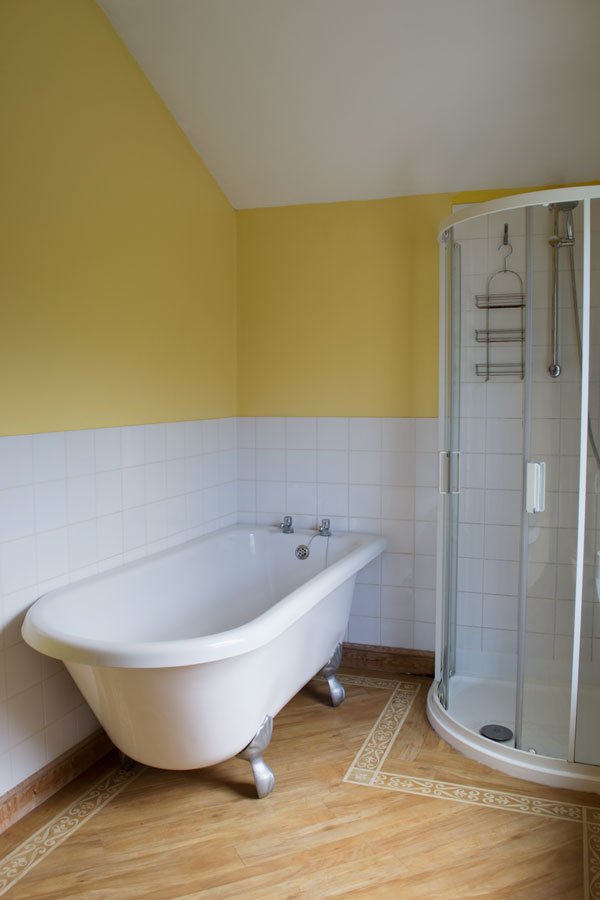 At the end of the hallway is the kitchen which has a sweet window looking into the yard. And eventually we'll completely rip out the units and plan the layout from scratch, although we love the old open shelving in the corner. It looks like those cupboard doors above the sink were repurposed from something else in the house, no idea what but the previous owner said they'd been here a very long time.
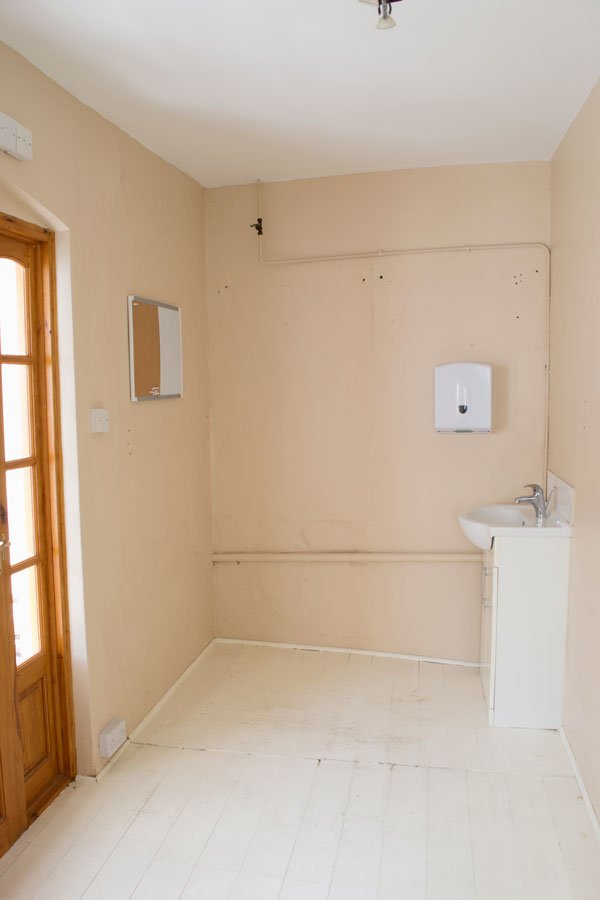 This room is what will be my workspace. Yes, there's a sink in it and a naff cupboard which houses the boiler. I think there were plans to convert it into a downstairs toilet but never happened. The floor is sloping and needs levelling. As I don't think I can remove those pipes, I'm considering covering them with a false plywood wall so they can still be accessed if need be. And maybe soft grey walls? Stay with me on this one. Through that orange pine door (not staying) is the sun room. The floor will also need to be replaced along with the windows, but it's not top of the list right now. Eventually I'd love a real urban jungle in there to sit with and look out onto the garden. When we get round to it.
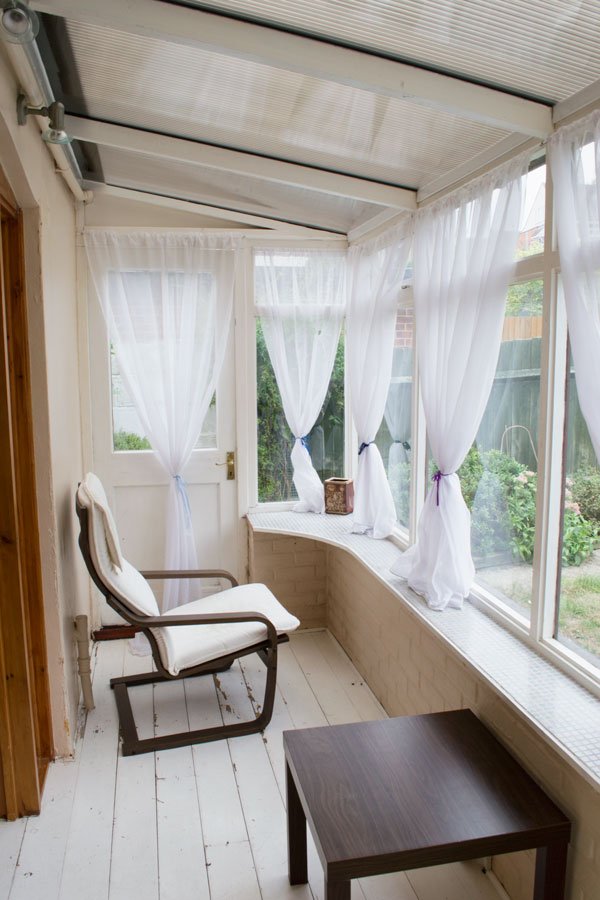 So there we have it. Heaps of potential and heaps of work. Looking forward to sharing our journey of renovation, decoration and DIYs with you and all those in-depth conversations over paint. I'm not even kidding...Follow our progress using #TheChathamHouse on Instagram and follow Stories for regular updates. You can also see how we're gathering ideas and inspiration on The Chatham House Pinterest board...Photography © Tiffany Grant-Riley
My Workspace Reveal / The Befores & Afters
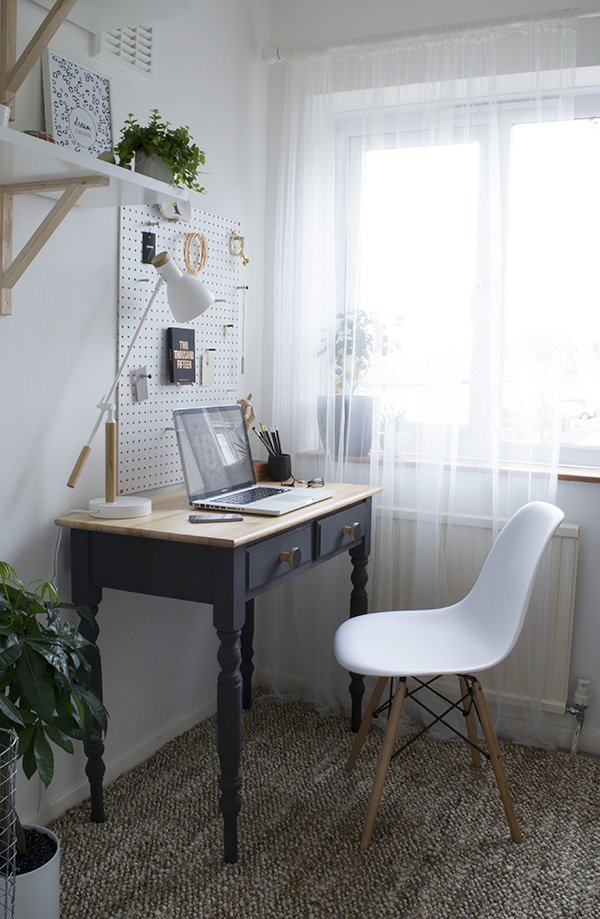
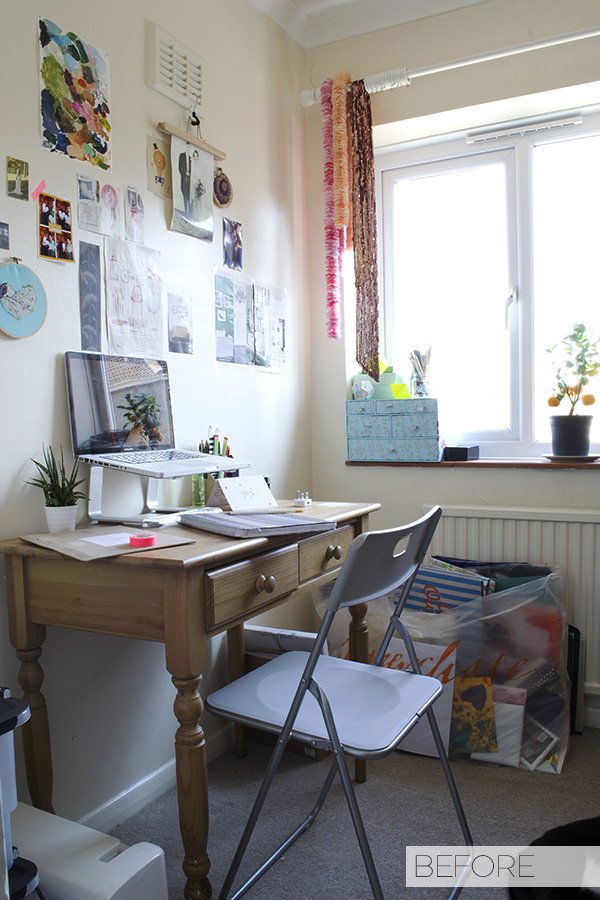
Today is a milestone - I'm excited (and relieved) to finally reveal my new-look workspace to you. We've been here for almost two years now and when I moved into this room it was a sort of shove everything in situation whilst I figured out what to do with it. I set up a desk, stuck some bits on the wall and put up with it as a sort of craft room. And then last August I decided in a fit of frustration that it wasn't working for me and it had to change. Storage was pretty sparse, there was no sense of my style which had changed so much since we'd moved and I didn't feel inspired to work in it, so for the next six months I launched into turning it into the best room in the house. Yes. For a space that's only 2m squared that's a ridiculously long time but hey, Rome wasn't built in a day, right? And it's good to slowly introduce my home to you, particularly as I'm usually quite guarded on that side of things. I feel self-conscious about it in a lot of ways, much of that comes from spending too much time picking over the bits of the house I can't stand or can't change, but that's all part of the joys of renting. Anyway, come and have a look!
Given the size of the room and my penchant for bright white spaces, it was a no-brainer to paint out the cream with a brilliant white, introduce pale, untreated wood to compliment and a touch of black to set it all off. You can take a look at my inspiration on this Pinterest post and see how useful my Studio & Office board became in the process as my point of reference.
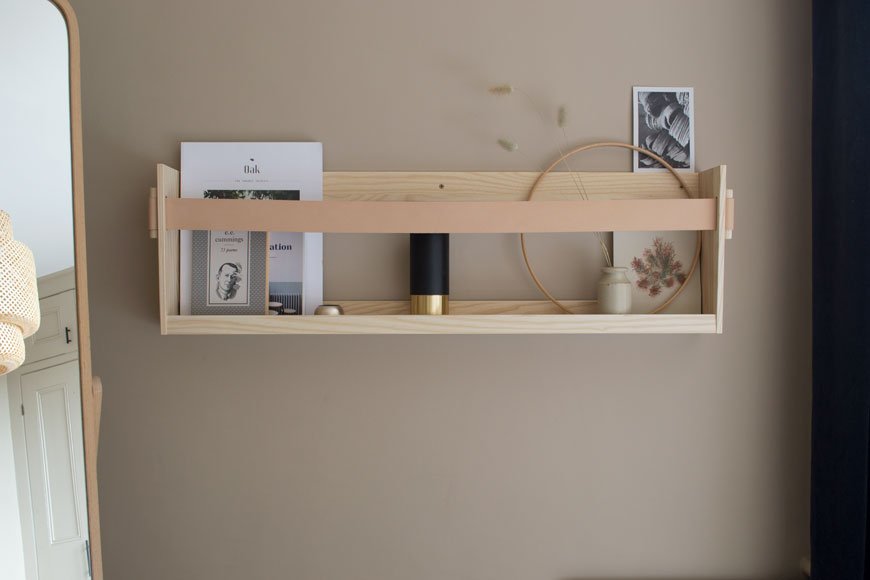
Flooring was a real issue for me and it took months to find the perfect rug. I don't have the glorious luxury of wooden flooring anymore so I kind of just wanted to forget that this carpet existed and find a rug large enough to cover the width of the wall that came out far enough beyond my desk. Try finding one that size within budget! My first attempt was a diamond Berber which seemed great in my head, but in situ just fought with the black desk and took all the focus away from the room down onto the floor. A minor panic ensued (my good friend at LapinBlu can vouch for that as I drilled her for advice) and by the end of the day had returned it and ordered another. I'd come to the conclusion that a textured, patterned rug was just wrong for this space and so Zara Home saved the day with a classic handwoven jute number instead. It was a bit more of an investment than planned but I love the surprisingly soft (for jute) texture under foot and that it adds to the space without distraction. Nervously I waited as Mosey sauntered in to inspect it and I thought he'd take to it as his scratch pad but I'm not sure he's even noticed it, so long as he can lounge underneath the radiator!
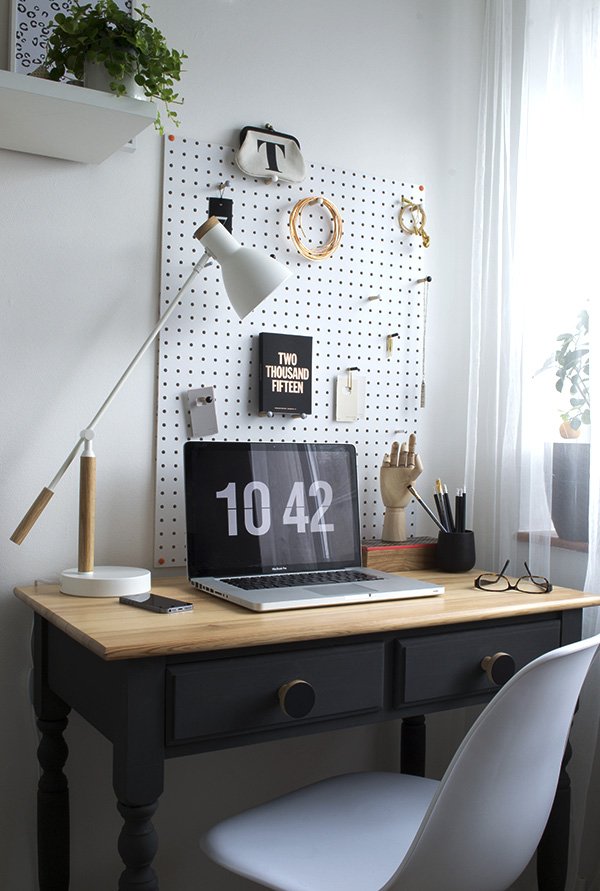 I'd planned to get a new desk in baltic ply on trestles encouraged by the guys at Hopper + Space, but when I couldn't find trestles small enough without taking up half the width of the room I had to be realistic and decided to update my existing one. My sister had given it to me after she'd decided she didn't want it anymore (thanks Meg) but as I thought it was out-dated and worn out in its current state it had to become a statement piece. I'll be posting a DIY piece on the desk later next week to show you how I did it, but in short, I sanded down the layers of stain on the surface to lighten the tone of the wood, gave it a coat of clear wax, chalk painted the base and changed the drawer knobs which are made from ply by Chocolate Creative. They're so sexy!
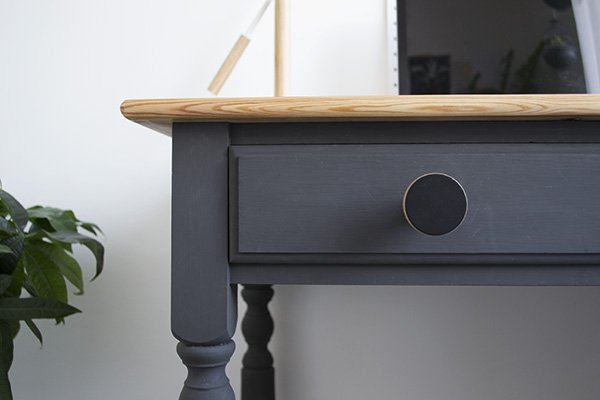

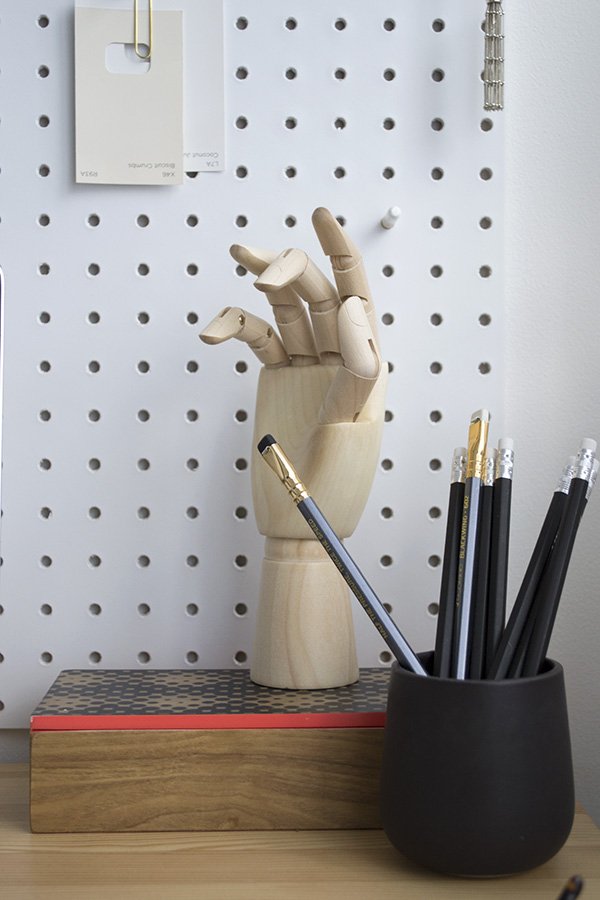 I've tried to eliminate the desk clutter and keep the surface as clear as possible with the white PegBoard from Block.The pegs arrived with coloured tips so I painted them out in black and white. I love that I can switch up the display whenever the urge strikes. The simple white desk lamp was a birthday present from my mum, the 'Cohen' by MADE.COM. Sheeeeeesh that lamp. It's just so elegant, don't you think?
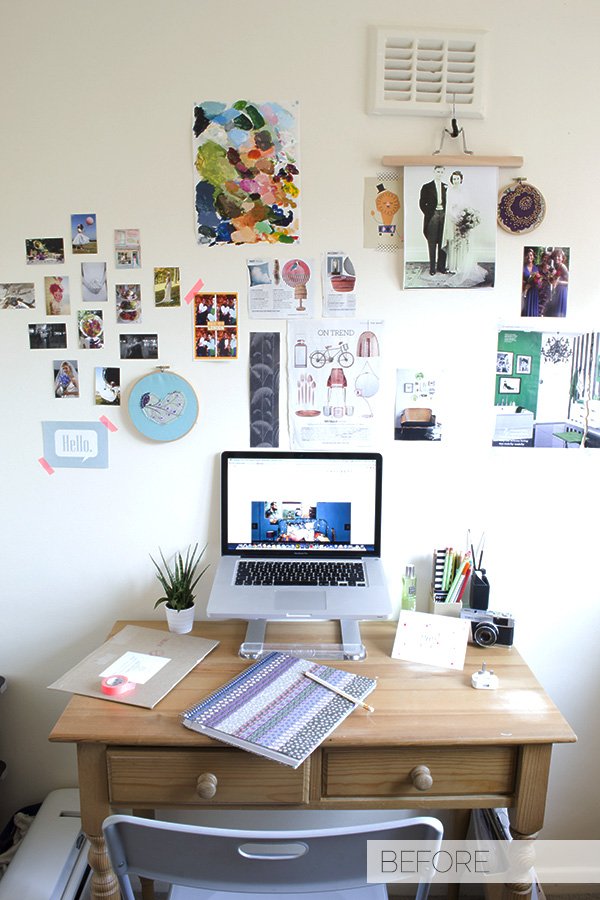 Storage was a huge issue before I put in the shelving which I found in IKEA after quite a lot of searching and deliberating. I wanted to stick with the combination of white and untreated wood to compliment the rest of the look and I loved the mix and match shelving at IKEA. I used to store most things into plastic crates which I hated looking at, so I sorted through the paints and other pieces that weren't an every day necessity and moved them to the garage instead. Initially I'd had it in mind for three levels but it actually wasn't necessary once I'd got them into place, so the third will probably go into Tabitha's room when I get round to it. Now I use a mixture of desk drawers, shelving and my 1920s bureau behind it which is a much better solution.
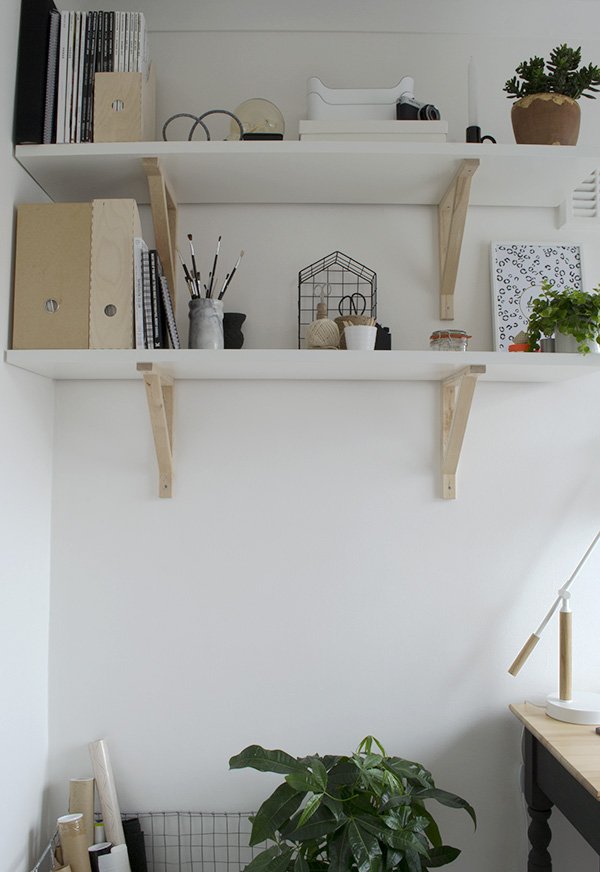
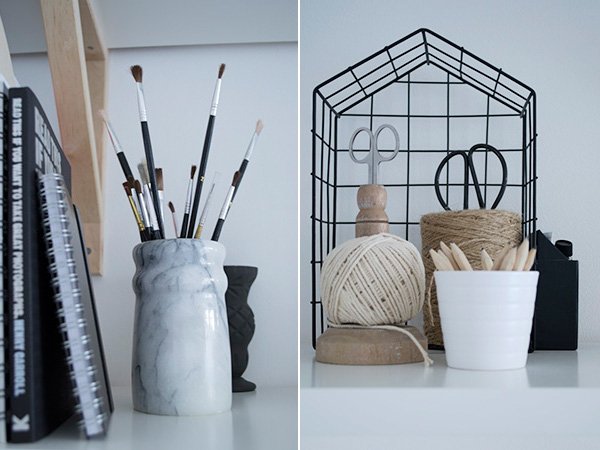
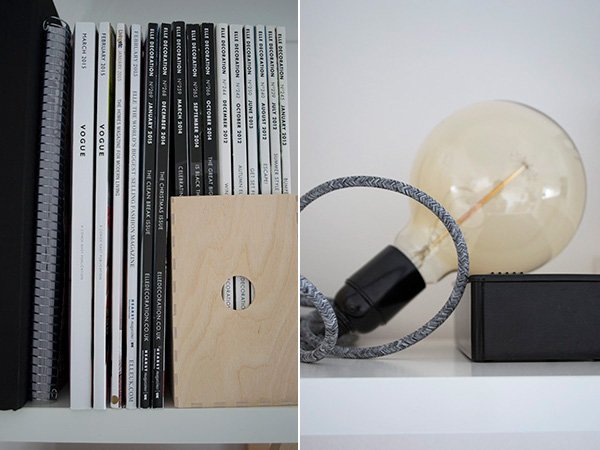
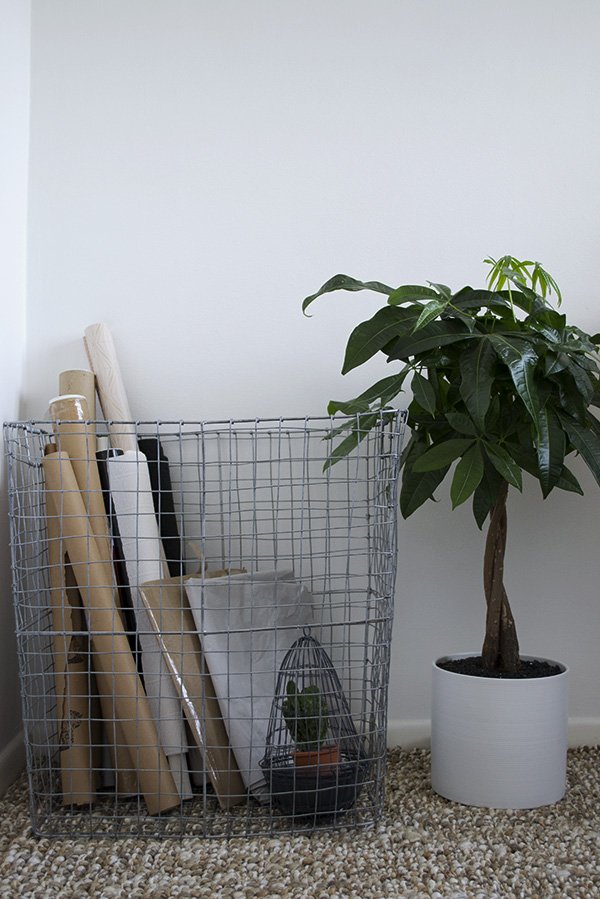 Let me just take a minute to talk about this basket. Oh wow, this basket. I saw it way back last summer when I'd popped into West Elm for a quick meeting and had to have it. Given the amount of prints, random rolls of paper and packaging I seem to collect (I hate throwing paper out) it made sense to store them all in something extremely stylish. Before I was just using a bag (see below) but the wire basket is a far better option and doesn't take up too much space either. Win.
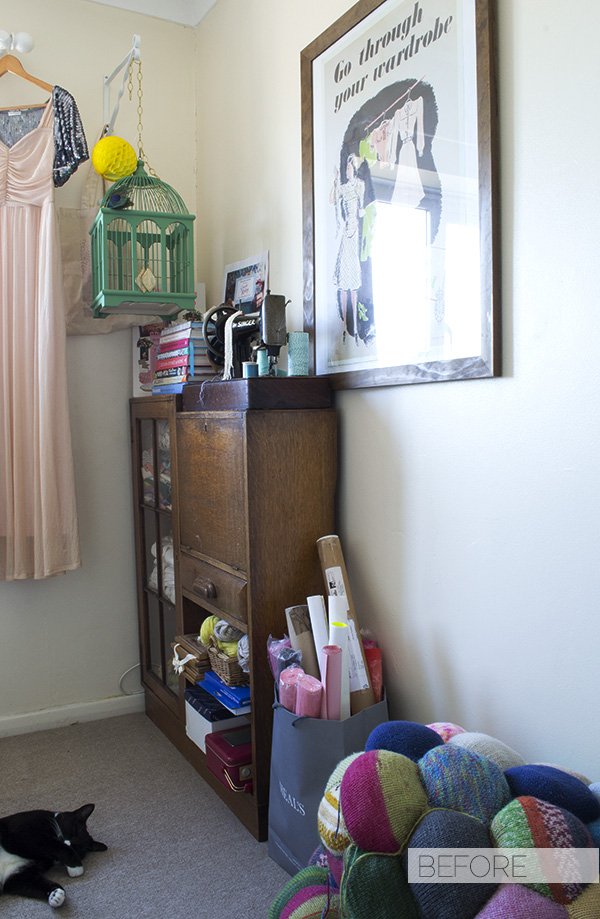
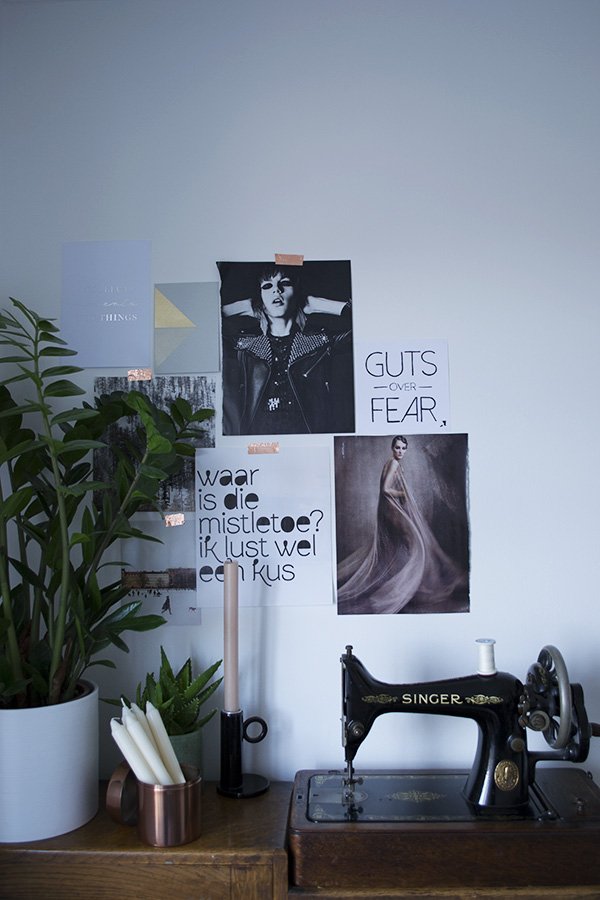
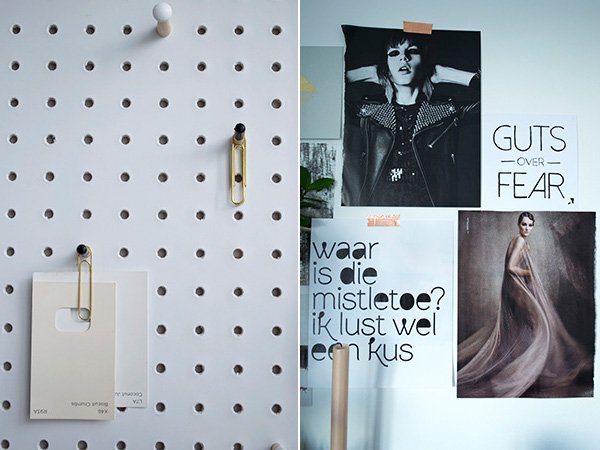
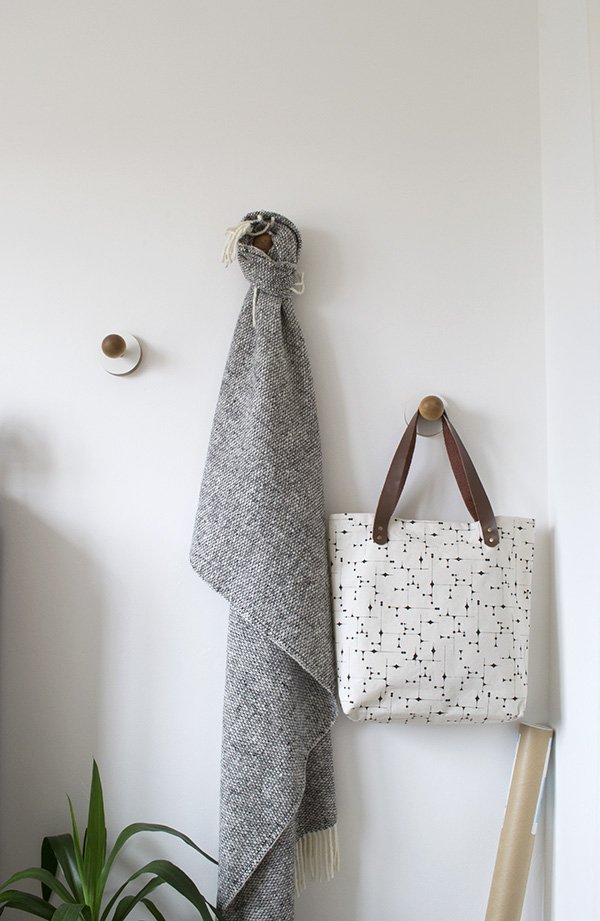 As floor space is at a premium in here, I was keen to source some wall hooks to keep things like my camera bag and tripod out of the way but also have somewhere that I could hang prints as I find them. When I had an email from designer Nikki Kreis to introduce her beautiful, minimal homeware collection, I called off the search when I found these beauties. With a layered plywood plate and smooth birch ball, they're so tactile and instantly become an extension of the wall.
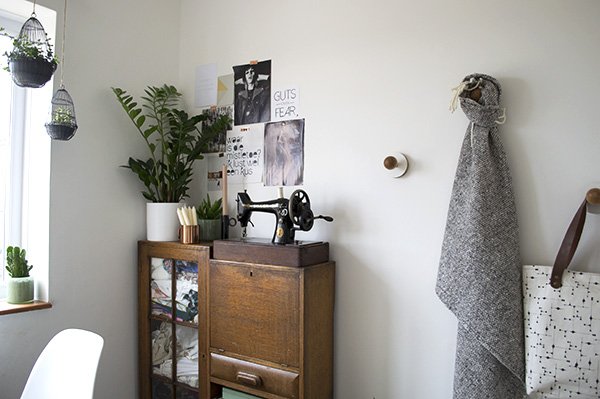 Of course, it wouldn't feel complete without the presence of plants - you might have noticed that I'm a little obsessed? The hanging wire cloche planters in the window were found as a set of three in my local Oxfam which stocks discontinued Zara Home decor. Not sure if that's where they originally came from but either way I wasn't hanging around (excuse the pun) and snapped them up for a bargainous £6.99. The first plants I tried inside them were a bit of trial and error and didn't take too kindly to the bright light and heat from the radiator, so I switched to these two succulents which will spread and trail. So far, so good.
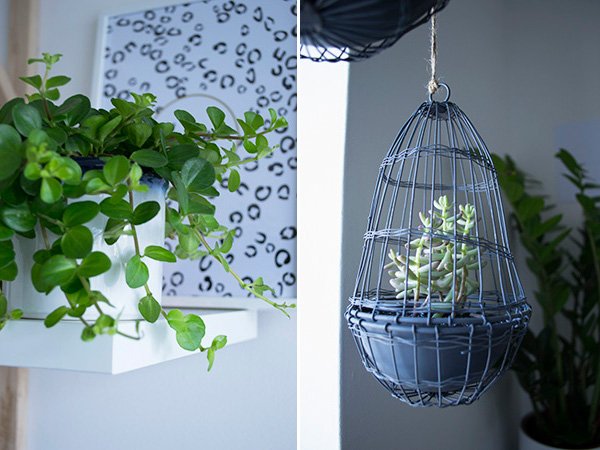 Phew. So there we have it. One workspace, pretty much complete. Sure, it'll adapt over time and I plan to bring in some prints at a later stage just as soon as I can decide on what but for now, it's done. This is absolutely my favourite room in the house now. The kids come and hang out before bedtime in here too and I just love working with fresh walls to play with and a clean, bright space. What do you think?
Photography & Styling by Tiffany Grant-Riley
'Brilliant White' paint, Crown | Jute rug, Zara Home | Shelves 'EKBY JÄRPEN' & 'EKBY VALTER' brackets in birch, IKEA | White PegBoard, Block® | White & natural oak 'Cohen' table lamp, MADE.com | 'LILL' net curtain, IKEA | Wire mesh hamper, West Elm | Black chalk paint in 'Graphite', Annie Sloane | Black plywood drawer knobs, Chocolate Creative | Plywood & birch wall hooks, Kreisdesign