DIY Chair Styling For Love My Dress Blog
Although my wedding planning days are behind me, it would be impossible for me to leave it completely behind. I ran my wedding planning business, Grant-Riley Weddings for almost seven years and made some wonderful friends along the way, one of whom is wedding blogger Annabel Beeforth, the founder of top UK wedding blog Love My Dress. Following its recent rebrand I've come onboard as 'DIY and creative features contributor' which I'm absolutely over the moon about-a chance to create more beautiful DIYs to inspire brides with none of the stress that comes with shouldering the planning!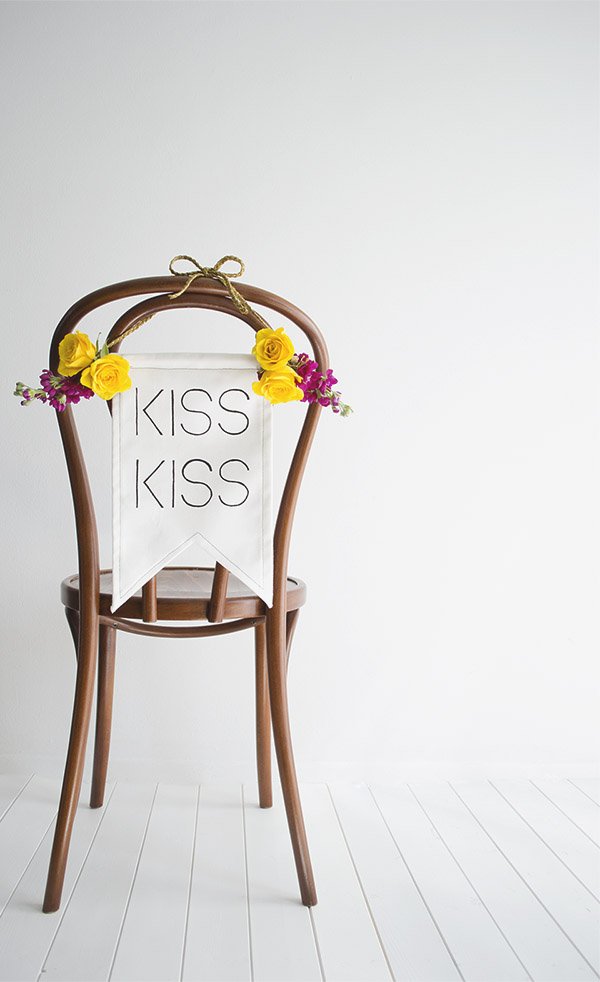 For my first feature, I decided to focus on styling chair backs as they're usually a real bug-bear amongst brides when they're deciding how best to style their wedding. A lot of venues still use rather outdated conference chairs or at least choose a style with upholstery that's difficult to compliment anything other than white. Red is a real pain. So, I thought that as an alternative to chair covers, I'd look at ways to draw attention anyway from the chair itself and onto the decor instead. Yes, I used a classic bentwood to demonstrate, but come on, it's my job to inspire and aspire too. I shot this series of three DIY tutorials at home amongst the chaos of my two small children, the nursery runs and everything in between, but you'd never tell, right?
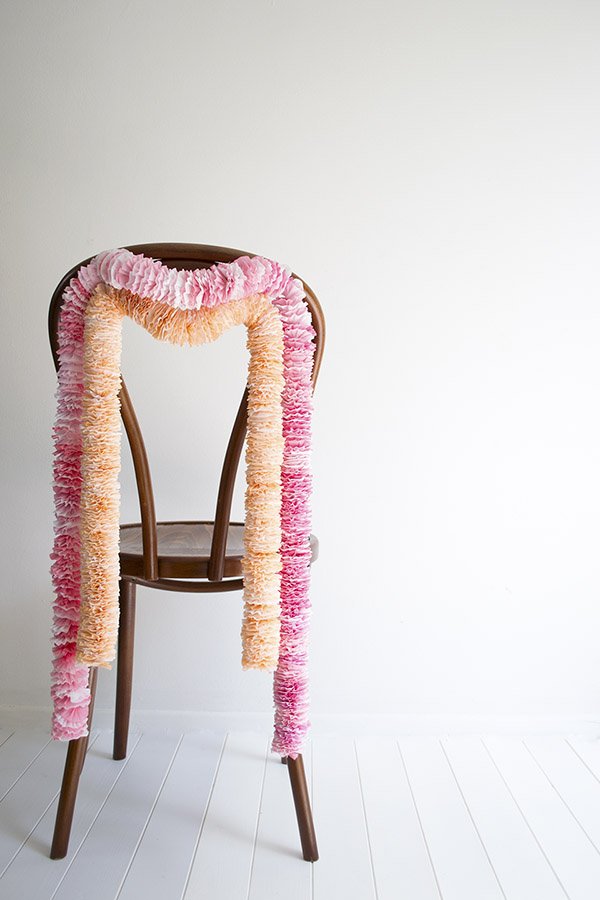 I've really fallen in love with crepe paper since I started my West Elm paper flower workshop, it's such a versatile material to use and these dipped garlands add a pop of colour to any space. They'd look awesome made longer as a backdrop too.I couldn't not work with fresh flowers, for a start it's the best season for huge, heady and romantic blooms. Isn't that frothy peony just something else?
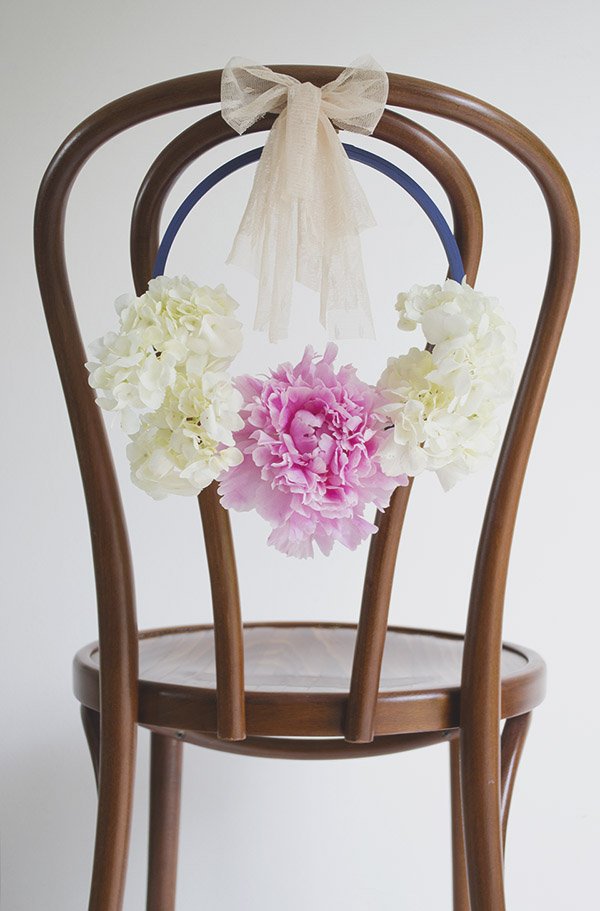 All my tutorials are easy to follow, some take a little more effort than others but I think they're worth it. To try them out yourself and to view the full DIY tutorials on Love My Dress, click on the links below:Kiss Kiss Wedding Chair BannerDipped Crepe Paper Chair GarlandPretty Floral Hoop Chair Back Tell me what do you think of them and if you get round to making your own, send me a photo, I'd love to see!
DIY Easter Party Favours / The Outtakes
The past two weeks have been insane, in only the best way. For a couple of months now I've been working hard on a collaboration with West Elm and their London team and, in my usual "I need to prove something to myself" style (what is it with that??) I didn't do any of it by halves. I held my paper flower workshop in store at the weekend-more on that next week, my styled table in the "loft" has been sparkling like a beauty all week and last Wednesday my DIY Easter party favours post went live on Front+Main. I'm still getting over the buzz from all the amazing feedback on Instagram, Pinterest and Twitter-thank you if you spoke out and loved it.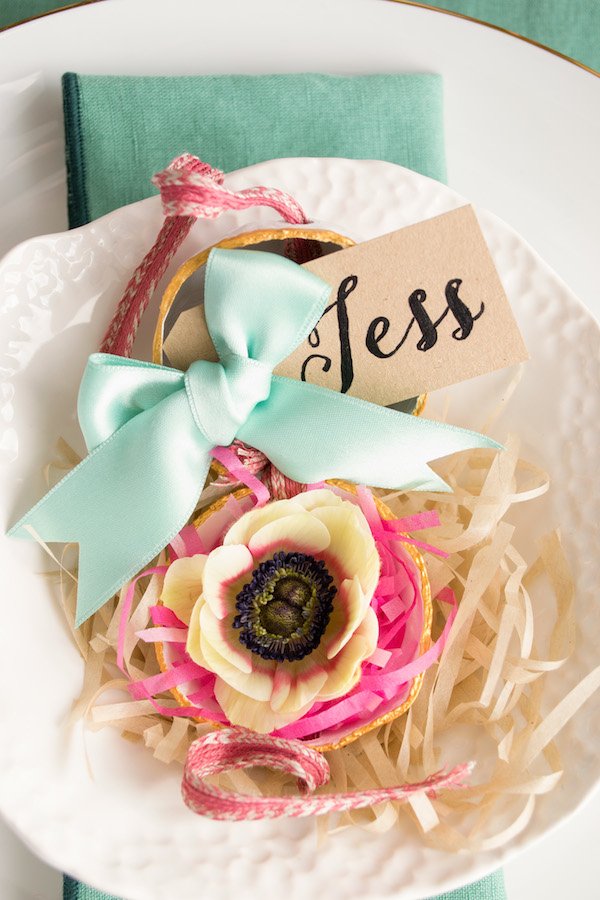 I came up with the design, perfected the DIY and shot and edited it myself. I don't think I could've predicted how well received it was going to be and I'm all the more proud of myself because, just two weeks before I took the final shots, I'd never used a DSLR before. Yep, never. I bought my Nikon D3100 in February as I felt that it was time to graduate from my iPhone, which is still my camera of choice when I'm out and about, but when it came to shooting styled pieces, it was coming up too short for my liking. I'm most definitely a run before walk kind of person when it comes to learning (I think that's why it took me so long to learn to drive!) and I get really frustrated when something doesn't work first time, but this time I was prepared to sit and read the boring manual, hunt for the best online tutorials and experiment. It paid off. I am a living testament to anyone that thinks learning something new is impossible-I got manual mode nailed in just a few days and look what I did! When you're under to pressure and you have no choice but to do something it-you will do it.So I really wanted to share the remaining shots that didn't get used for the post because, if I do say so myself, I think they're really beautiful. For example-this shot of my sister. She hates having her photo taken, so I told her I was only going to shoot her hands and torso and focus on the little pod. Then I pulled back a bit, focused on her face and got her looking quite relaxed. She'll probably hate me for this now!
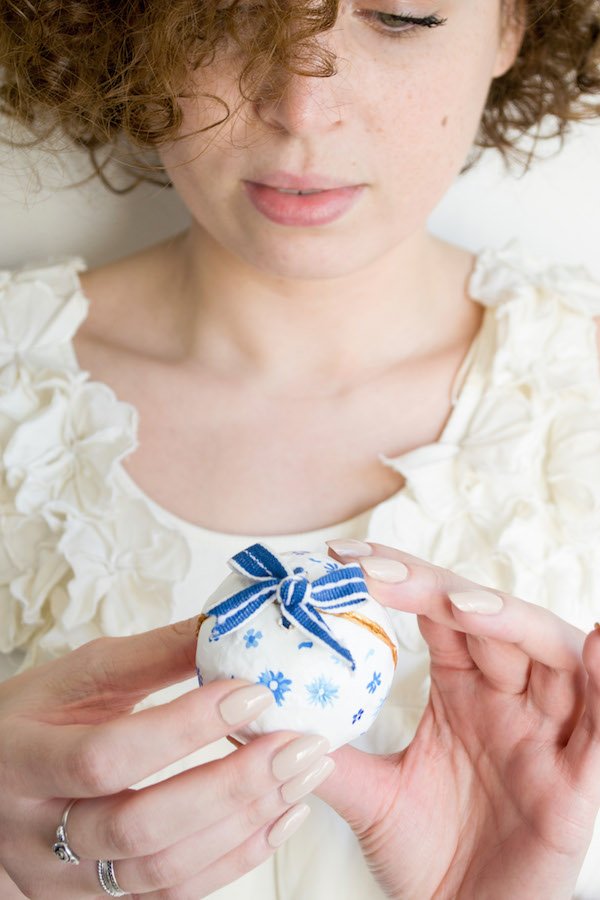 I took my inspiration for the floral motifs on the pods from Rifle Paper Co and Leslie Shewring-I could fawn over those designs all day long. Sweet, delicate and bursting with spring, don't you think? After a hectic day with Reuben and Tabby it was a real treat to sit down for a couple of evenings and get some ideas down in paint, I don't use my acrylics enough.
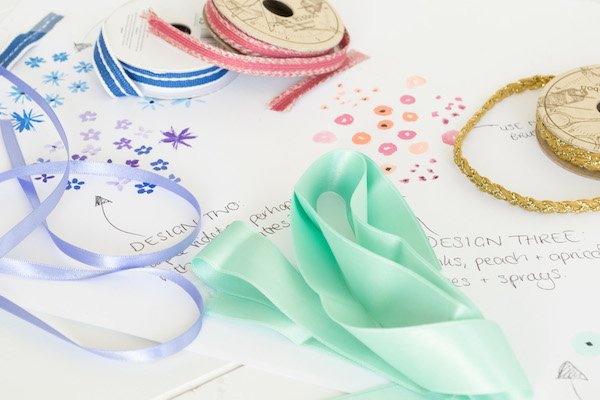
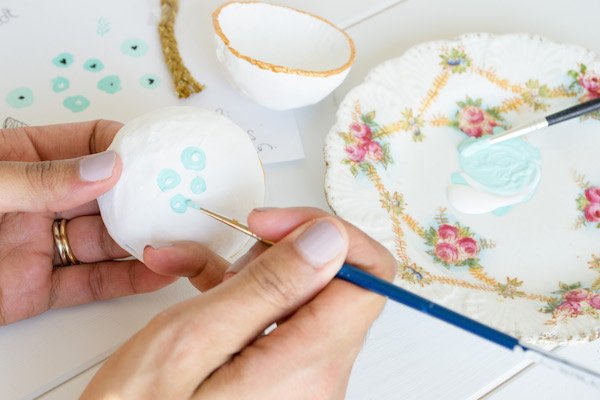 I got pretty handy setting up the shots and working with the timer given that my hands had to be in most of the frames to show the action. Took a little practice but I'm a pro now!
 That beautiful blue/green cotton napkin against the gold flatware. Oh my. It just works, doesn't it? And I was thrilled to find anemones in such excellent condition- I didn't have time to order them in through my florist so I did a run to M&S and was pleasantly surprised. Sometimes you buy them closed and can see the petals are bruised or browning around the edges, but these were immaculate and allowed me a good two days to work with them fresh.
 As a contrast to the soft tones of the irises and parrot tulips, I wanted to add in a pop of colour so I deconstructed a bouquet which had that beautiful protea flower inside, the vivid green leaves and hot pink Metalasia Muricata which dyed the water pink!
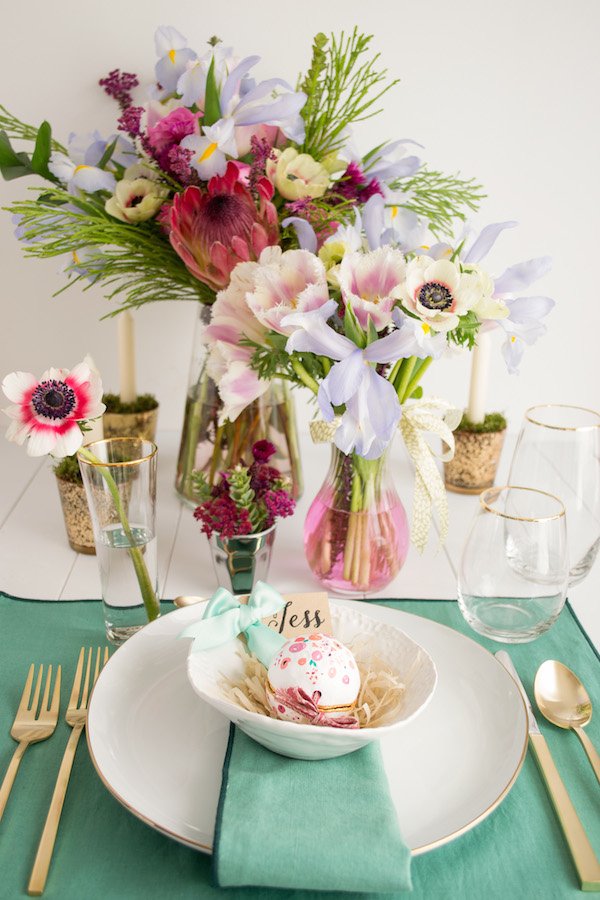 Do you love it? If you fancy having a go for yourself, you can find the tutorial here on Front+Main and most of the pieces I've styled the table with can be found online.Thanks again to West Elm for having me, and to the UK marketing manager Jess for bringing me onboard in the first place.I'll be back after the weekend with more about last weekend's workshop, how to choose the best indoor plants for your home with a special guest and more. Have a beautiful Easter!.
Happy House Warming!
 Welcome to Curate & Display, my new blogging home since moving out of The Curiosity Project! Now that we’re developing The Project into what it was originally (as an international gift swapping experience) it made sense for me to separate the two to avoid confusion - I also found it harder to blog under that title as it just didn’t “fit”. In short, I was blogging design, interiors and styling to my gift swapping audience which, whilst many of them held on for the ride and actually kinda liked it, others lost interest. Who could blame them? So here it is - Curate & Display! A warm and cosy place for real and attainable interior design, lifestyle inspiration, DIY and craft projects and insights into my work as a stylist. You can find out a little more about me here or check out some of my regular features. I’m also on the look out for fresh, new home tours and designers so if this might be you, take a look at Submissions for more info.It’s good to be back and blogging again after a good few months of solid working and motherhood. I’ve got some seriously exciting projects to share with you in the coming months that I’m currently working all hours to make a success-there’s a couple of shoots and a workshop coming up. Can’t wait to tell you all about it….
DIY Festive Fir Tree Garland
There's a lot of blank walls staring me in the face at the moment and so I've been thinking of ways to break them up a bit and bring some of the outdoors in. I decided to try my hand with a little natural decor and whatever I had to hand in my kit and, ta da! a festive fir tree garland is what sprung to mind. I ought to start by saying that my floristry skills are somewhat basic so please don't let this put you off-it's really basic and easy to do, I promise. Aside from collecting the fir tree clippings from my local woods (I took only what I needed I might add) and bumping them up with trimmings from the Christmas tree this garland took me about two hours to put together with a demanding toddler and baby for company. You could also use evergreen cuttings as an alternative which will smell gorgeous and it'll last around a week before it starts to droop.
 Make sure you assemble all your necessary tools before you begin, which includes 4m of hemp rope (I trimmed this once I'd measured the depth of the swag across my chimney breast) 2mm gauge copper wire, green florists tape, fishing line, star shaped cookie cutters (bear with me on that) copper coloured thread, wire cutters and pliers, clear pin board pins and plenty of greenery.
 1. Start by cutting up your clippings into smaller pieces before building up bunches and securing them with florists tape wrapped around the base of each. To attach them to your rope, wind each bunch on with more tape, then layer up the following bunch so that it overlaps slightly and hides the mechanics. Repeat until your rope is covered. Think about how you'd like your garland to flow and make sure your bunches follow this pattern-I wanted the two ends to hang with the tips of the fir tree pointing down and the tips pointing left along the swag.2. Once your garland is complete, it'll be ready to hang. Determine where you want to display it and where you'll place your pins. As mine was attached to wooden tongue and groove I didn't have too much trouble getting them into place, but you might need a couple of picture hooks tacked in if it's a bit tricky for you. Just don't go putting holes in your plaster work please!Once my pins were in place and I was happy with the spacing, I tied a loop of fishing wire around garland at the point of the first drop and looped it onto the pin. I then did the same with the other side. You might find it easier if someone helps you support the weight of the garland while you do this although I managed on my own.3. If your garland tends to hang downwards with the weight, exposing the rope at the back then you might want to secure it with a little tape strategically placed on your wall to hold it. Mind your paint work when you come to remove it though!
 4. Next up it's time to make your sweet little copper stars. Using your cookie cutter as a template, gently wind the wire around the shape before cutting it a little longer at the ends and twisting the two ends together. I made around twelve of these in three different sizes.5. Hang your stars in varying lengths using the copper coloured thread with a little tape hidden behind your garland.
 And voila! Your garland is ready to wow. You could add in some battery operated fairy lights to give it extra sparkle if you like and when the garland has seen better days, use the clippings for compost and keep the stars for the tree next year.What do you think?.